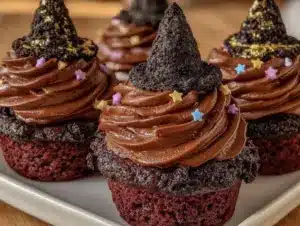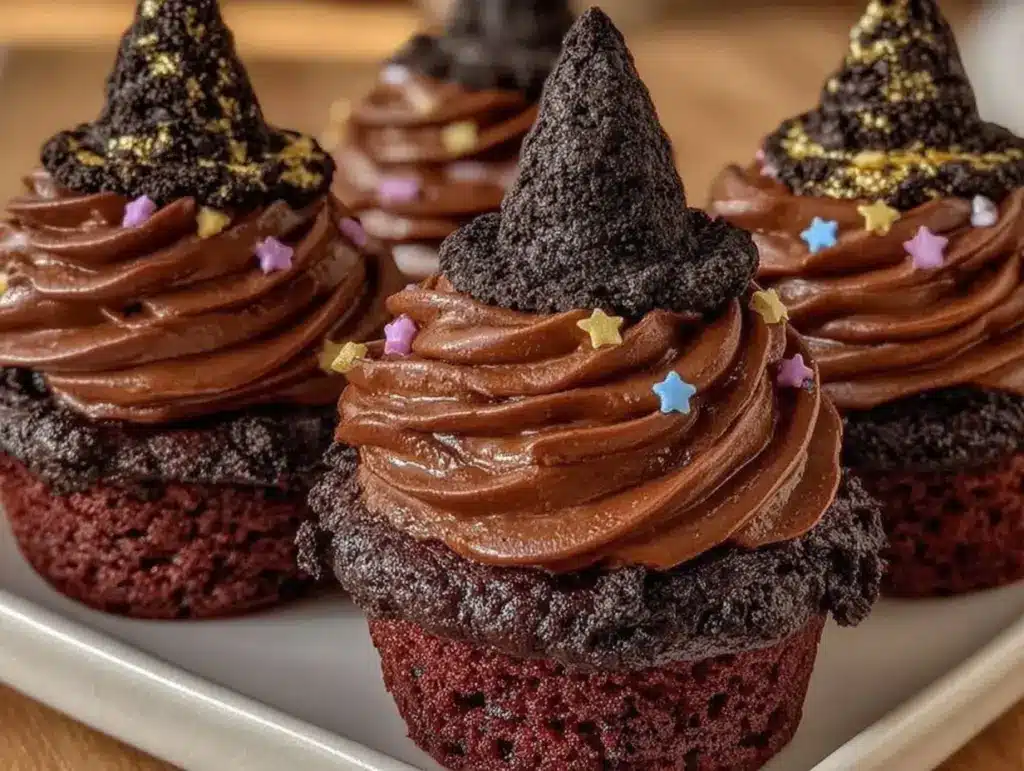
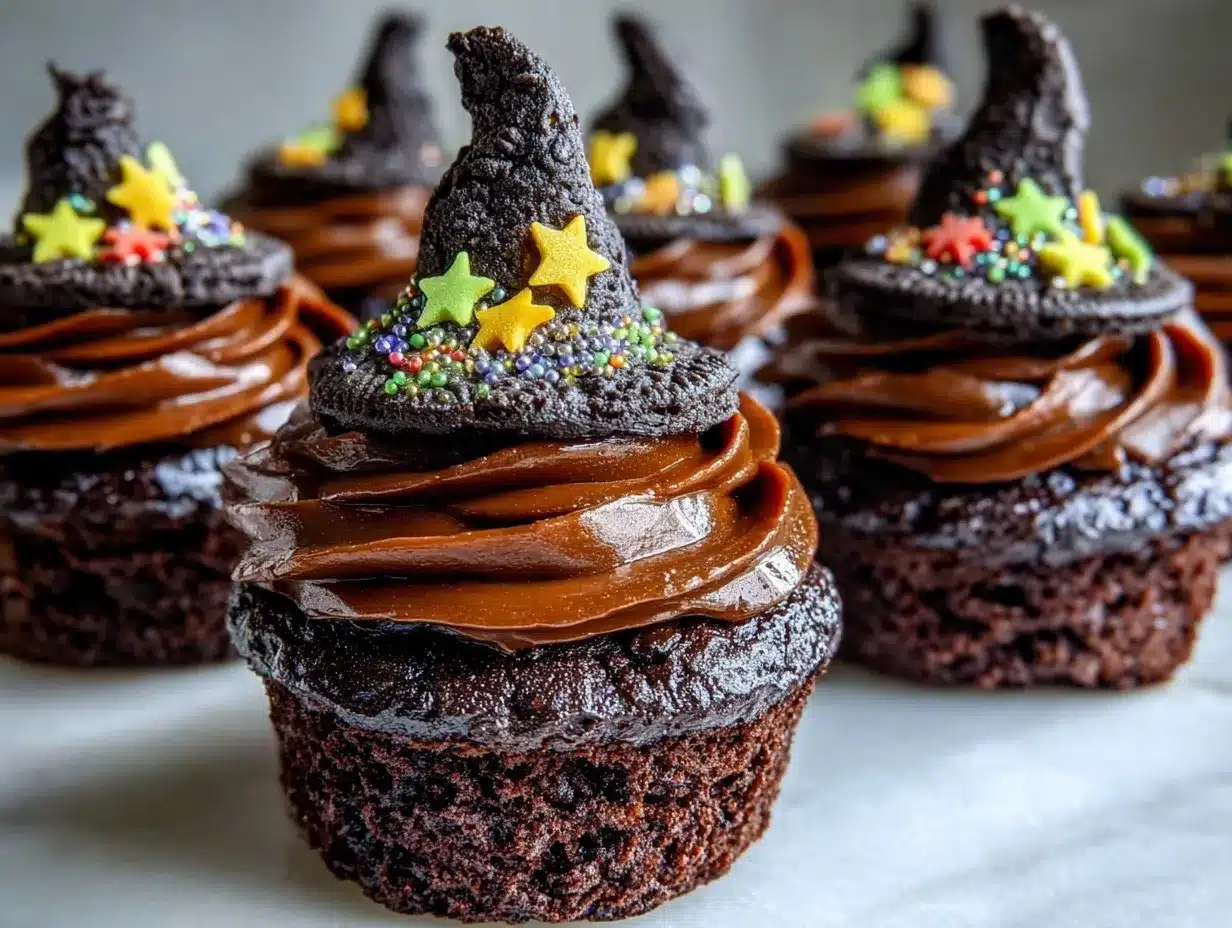
These witch hat cupcakes are calling out to me, and there’s no way I’m not answering. The idea of crafting chocolate cupcakes that look like tiny witch hats, complete with that iconic Oreo brim? Honestly, it’s too fun to pass up. I have everything except a fresh pack of Oreos, which means a quick store run is in order. But I already know this recipe will be a hit for any kids party—I’ve made it twice, and each time the cupcakes disappeared faster than I could say “trick or treat.” The rich chocolate sponge, the creamy frosting shaped like a conical hat, and that crunchy Oreo base—it’s a whole vibe. Plus, there’s something a bit magical about how easy it is to pull off a look this cool without needing a culinary degree.
Every time I see those little witch hats lined up on the party table, I get a quiet thrill. It’s like I’m sharing a secret with the kids—the kind of treat that makes their eyes light up and their imaginations run wild. These cupcakes aren’t just desserts; they’re little moments of joy, and that’s why I keep coming back to this recipe.
Why You’ll Love This Recipe
Making Perfect Witch Hat Chocolate Cupcakes with Oreo Brim is honestly a little slice of joy—here’s why it stands out:
- Quick & Easy: You can have these cupcakes ready in about 45 minutes, which is perfect when a kids party sneaks up on you.
- Simple Ingredients: No fancy, hard-to-find items here. Just classic pantry staples like cocoa powder, flour, sugar, and Oreos.
- Perfect for Kids Parties: These cupcakes aren’t just tasty—they’re playful and thematic. Great for Halloween or any costume party where a bit of whimsy is welcome.
- Crowd-Pleaser: Every kid I’ve served these to has gone back for seconds, and even the adults can’t get enough of that chocolatey goodness.
- Unbelievably Delicious: Moist, chocolate-rich cake topped with a smooth, velvety frosting and that signature Oreo crunch—it’s comfort food with a fun twist.
What sets this recipe apart is the Oreo brim trick—using the cookie as the base for the frosting cone adds a perfect texture contrast and makes the witch hat shape pop. Plus, the frosting is whipped just right to hold that pointed hat shape without being too stiff or too soft. I’ve tweaked this over a few parties, and it’s hands-down the best version I’ve found. It’s also a recipe that feels special without being complicated, so you’re free to enjoy the party as much as the kids do.
What Ingredients You Will Need
This recipe is a straightforward mix of classic ingredients that yield rich chocolate flavor and that perfect witch hat look. You’ll find these are mostly pantry staples, with Oreos giving it that fun, crunchy brim.
- For the Cupcakes:
- All-purpose flour, 1 ½ cups (180g)
- Unsweetened cocoa powder, ¼ cup (25g) (I like using Hershey’s for rich flavor)
- Baking powder, 1 tsp
- Baking soda, ½ tsp
- Salt, ¼ tsp
- Sugar, 1 cup (200g)
- Vegetable oil, ½ cup (120ml)
- Large eggs, 2 (room temperature for better mixing)
- Vanilla extract, 1 tsp
- Buttermilk, ¾ cup (180ml) (or milk with 1 tbsp vinegar as a swap)
- Hot water, ½ cup (120ml) (helps to bloom the cocoa for intense chocolate taste)
- For the Frosting:
- Unsalted butter, 1 cup (230g), softened
- Powdered sugar, 3 cups (360g), sifted
- Unsweetened cocoa powder, ½ cup (50g)
- Vanilla extract, 1 tsp
- Heavy cream or whole milk, 2-3 tbsp (adjust for consistency)
- For the Oreo Brim:
- Regular Oreo cookies, 24 (one per cupcake plus a few extras)
Pro tip: If you want a gluten-free option, you can swap the all-purpose flour for a gluten-free blend that measures cup-for-cup. The frosting is flexible, so using dairy-free butter and coconut milk works great if you’re avoiding dairy. For seasonal parties, I’ve swapped Oreos for chocolate-covered cookies or seasonal spiced cookies, and they still look just as magical.
Equipment Needed
- Standard muffin tin (12-cup capacity)
- Paper cupcake liners (plain or black for the perfect witch vibe)
- Mixing bowls (medium and large)
- Electric mixer or stand mixer (a whisk attachment works too but takes longer)
- Measuring cups and spoons (for both dry and wet ingredients)
- Rubber spatula (for folding batter and scraping bowls)
- Piping bag with a round or star tip (to pipe the frosting cone)
- Cooling rack (to cool cupcakes evenly)
If you don’t have a piping bag, no worries—using a zip-top bag with one corner snipped off works just fine. For mixing, hand beaters get the job done, but a stand mixer saves you some arm work and gives a smoother frosting. I recommend lining the muffin tin with liners, or else the cupcakes stick and you lose that perfect Oreo brim look.
Preparation Method
- Preheat your oven to 350°F (175°C). Line your muffin tin with cupcake liners. This usually takes about 5 minutes.
- Mix the dry ingredients. In a large bowl, sift together the flour, cocoa powder, baking powder, baking soda, and salt. Whisk them lightly to combine. This ensures an even rise and a smooth batter.
- Combine the wet ingredients. In a separate bowl, whisk together the sugar, vegetable oil, eggs, and vanilla extract until smooth. Then add the buttermilk and mix well.
- Slowly add the dry ingredients to the wet. Pour the dry mixture into the wet ingredients in batches, stirring gently with a spatula until just combined. Be careful not to overmix; you want a tender crumb.
- Add the hot water. Stir in the hot water last. The batter will be thin—that’s exactly how it should be for moist cupcakes.
- Fill the cupcake liners. Spoon the batter evenly into the liners, filling each about two-thirds full. This usually takes around 15 minutes.
- Bake for 18-20 minutes. The cupcakes are done when a toothpick inserted in the center comes out clean or with just a few crumbs. Let them cool in the pan for 5 minutes.
- Transfer to a cooling rack. Remove the cupcakes from the tin and cool completely before frosting to prevent melting.
- Prepare the frosting. Beat the softened butter until creamy. Gradually add powdered sugar and cocoa powder, alternating with heavy cream, until you reach a smooth, spreadable consistency. Add vanilla last. This step takes about 10 minutes for the perfect texture.
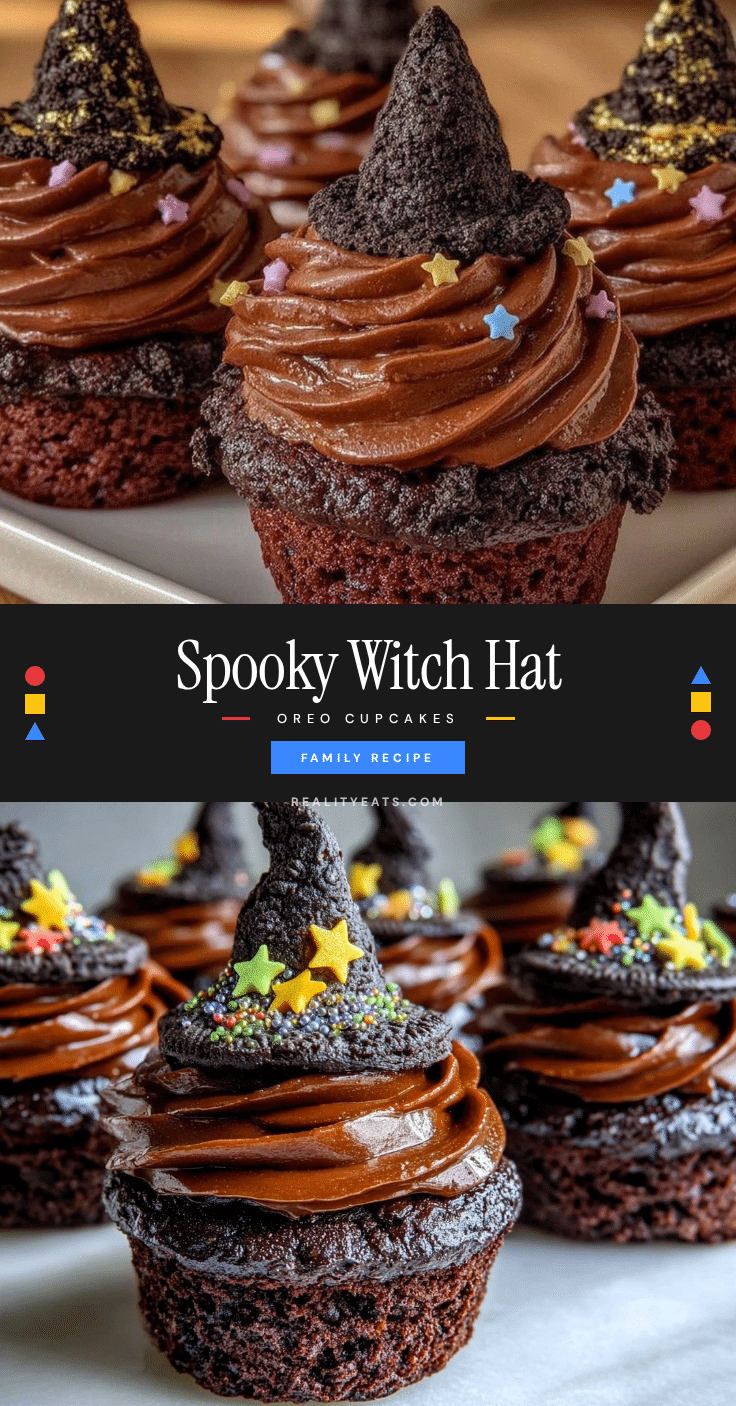
- Assemble the witch hats. Gently twist off the cream center from each Oreo cookie to create a flat brim. Place the Oreo on top of each cupcake. Using your piping bag, pipe a tall swirl of chocolate frosting in a cone shape onto the center of the Oreo to resemble a witch’s hat.
- Optional final touches. You can add a small candy or sprinkle at the tip of the hat for extra fun, or a thin ribbon of colored icing around the base of the frosting cone.
Watch for the frosting consistency—if it’s too soft, the hats won’t hold their shape; too stiff, and piping becomes a struggle. I’ve found chilling the frosting slightly helps if your kitchen is warm. Also, don’t forget to cool the cupcakes fully before decorating—warm cakes will cause the frosting to slide off the Oreo base.
Cooking Tips & Techniques
Getting the perfect witch hat cupcake means paying attention to a few crucial details. First, the batter’s consistency is key—thin batter equals moist cupcakes. Don’t skip the hot water; it really brings out the cocoa flavor.
When whipping the frosting, use softened butter but not melted. Melted butter makes the frosting greasy and runny, and that’s the last thing you want when piping those tall hat shapes. Start slow with the powdered sugar and cocoa powder to avoid a cloud of dust in your kitchen.
Twisting the Oreos apart takes some care—twist gently to keep the cookie intact for the brim. If a cookie breaks, just grab another; the look of a whole Oreo makes a difference. I remember one party when I ran out of Oreos and had to use chocolate wafer cookies instead—less crunchy but still worked.
Timing the frosting piping is a little like magic—pipe with steady pressure and a slow upward motion. If you’re in a hurry, chilling the frosting for a few minutes helps it hold shape better. Multitasking tip: while the cupcakes bake, make the frosting and prep your Oreos. This saves time and keeps the workflow smooth.
Variations & Adaptations
This recipe is super flexible, so you can tweak it to suit your party theme or dietary needs.
- Vegan Version: Use plant-based butter and milk substitutes, plus flax eggs (1 tbsp flaxseed meal + 3 tbsp water = 1 egg). Use vegan Oreos, which are dairy-free.
- Flavor Twists: Add a teaspoon of instant espresso powder to the batter for a mocha hat effect. Or swap vanilla extract for almond extract in the frosting for a nutty surprise.
- Seasonal Spin: Replace Oreos with ginger snaps or spiced cookies in fall for an autumnal vibe. Or use peppermint Oreos for a winter holiday party.
- Gluten-Free: Simply swap the flour for a good-quality gluten-free baking mix. Make sure your Oreos are gluten-free or use a gluten-free cookie alternative.
One time, I added edible glitter dust to the frosting for a sparkling witch hat effect—the kids loved it, and it made the cupcakes look even more festive.
Serving & Storage Suggestions
Serve these witch hat cupcakes at room temperature to let the chocolate and frosting flavors shine. Arranged on a dark platter or a Halloween-themed tray, they really pop. Pair them with simple drinks like milk or a mild fruit punch to balance the rich chocolate.
To store, keep the cupcakes in an airtight container at room temperature for up to 2 days. If your kitchen’s warm or you want to keep them longer, refrigerate them but bring to room temperature before serving for the best texture. These cupcakes freeze well too—wrap each cupcake individually in plastic wrap and place in a freezer-safe container. Thaw overnight in the fridge and let sit at room temp before serving.
Flavors actually deepen a bit after resting, so making them a day ahead can be a smart move for parties. Just be sure to add the Oreo brims and pipe the frosting fresh if possible to keep everything crisp and neat.
Nutritional Information & Benefits
Each cupcake is roughly 250-300 calories, depending on size and frosting amount. They provide a good dose of energy from the sugar and fats, perfect for active kids at parties. The cocoa powder adds antioxidants, and using buttermilk or milk adds some calcium.
This recipe isn’t low-sugar, so it’s definitely a treat, but it’s made with real ingredients—no artificial flavors or preservatives. If you want a lighter version, reduce sugar slightly or use a lower-fat frosting, though the classic version is what really nails that indulgent feel.
For families managing allergies, the recipe can be adapted to be dairy-free and gluten-free as noted. Just keep an eye on the Oreos or cookie choices, as some brands vary.
Conclusion
The Perfect Witch Hat Chocolate Cupcakes with Oreo Brim are one of those recipes that makes parties feel truly special without a ton of fuss. I love how they combine simplicity with a visual wow factor that kids adore. Plus, the chocolate flavor is rich and satisfying enough to please everyone, not just the little ones.
Feel free to customize the frosting flavors or cookie brims to fit your party theme or dietary needs. This recipe has been my go-to for Halloween celebrations and anytime I want to bring a little enchantment to the table.
If you try making these cupcakes, I’d love to hear how they turned out for you and any fun twists you came up with. Here’s to magical baking moments and happy little witches and wizards!
FAQs About Perfect Witch Hat Chocolate Cupcakes with Oreo Brim
Can I make these cupcakes ahead of time?
Yes, you can bake the cupcakes a day or two before the party. Store them in an airtight container and add the Oreo brims and pipe the frosting on the day of serving for the freshest look.
What if my frosting is too runny to hold the witch hat shape?
If your frosting is too soft, chill it in the fridge for 15-20 minutes, then try piping again. Using softened, not melted, butter helps prevent runny frosting from the start.
Can I use other cookies besides Oreos for the brim?
Absolutely! Chocolate wafer cookies or ginger snaps work well too. Just make sure they’re about the same size and sturdy enough to hold the frosting cone.
Is there a dairy-free version of this recipe?
Yes, swap the butter and milk in the frosting for plant-based alternatives and use vegan Oreos. You can also replace eggs with flax eggs in the cupcake batter.
How do I get the frosting to look like a perfect witch hat?
Use a piping bag fitted with a round or star tip. Pipe the frosting slowly in an upward spiral to create a cone shape, starting from the center of the Oreo brim. Practice helps, but the key is steady pressure and smooth motion.
For more fun party recipes, you might enjoy the crispy ham and cheese sticks or the soft sugar cookies with creamy icing—both perfect companions for your kid’s celebration table.
Pin This Recipe!
Perfect Witch Hat Chocolate Cupcakes with Oreo Brim Easy Kids Party Recipe

These witch hat cupcakes feature a rich chocolate sponge topped with creamy frosting shaped like a witch’s hat and an Oreo cookie brim, perfect for kids’ parties and Halloween celebrations.
- Prep Time: 20 minutes
- Cook Time: 20 minutes
- Total Time: 45 minutes
- Yield: 12 servings 1x
- Category: Dessert
- Cuisine: American
Ingredients
- 1 ½ cups all-purpose flour (180g)
- ¼ cup unsweetened cocoa powder (25g)
- 1 tsp baking powder
- ½ tsp baking soda
- ¼ tsp salt
- 1 cup sugar (200g)
- ½ cup vegetable oil (120ml)
- 2 large eggs (room temperature)
- 1 tsp vanilla extract
- ¾ cup buttermilk (180ml) or milk with 1 tbsp vinegar
- ½ cup hot water (120ml)
- 1 cup unsalted butter (230g), softened
- 3 cups powdered sugar (360g), sifted
- ½ cup unsweetened cocoa powder (50g)
- 1 tsp vanilla extract
- 2–3 tbsp heavy cream or whole milk
- 24 regular Oreo cookies
Instructions
- Preheat your oven to 350°F (175°C). Line your muffin tin with cupcake liners.
- In a large bowl, sift together the flour, cocoa powder, baking powder, baking soda, and salt. Whisk lightly to combine.
- In a separate bowl, whisk together the sugar, vegetable oil, eggs, and vanilla extract until smooth. Add the buttermilk and mix well.
- Slowly add the dry ingredients to the wet ingredients in batches, stirring gently with a spatula until just combined. Do not overmix.
- Stir in the hot water last. The batter will be thin.
- Spoon the batter evenly into the liners, filling each about two-thirds full.
- Bake for 18-20 minutes or until a toothpick inserted in the center comes out clean or with a few crumbs. Let cool in the pan for 5 minutes.
- Remove the cupcakes from the tin and cool completely on a cooling rack before frosting.
- Beat the softened butter until creamy. Gradually add powdered sugar and cocoa powder, alternating with heavy cream, until smooth and spreadable. Add vanilla last.
- Twist off the cream center from each Oreo cookie to create a flat brim. Place the Oreo on top of each cupcake.
- Using a piping bag fitted with a round or star tip, pipe a tall swirl of chocolate frosting in a cone shape onto the center of the Oreo to resemble a witch’s hat.
- Optionally, add a small candy or sprinkle at the tip of the hat or a thin ribbon of colored icing around the base of the frosting cone.
Notes
If frosting is too soft, chill it in the fridge for 15-20 minutes before piping. Use softened, not melted, butter for frosting. Twist Oreos gently to keep cookie intact. Cupcakes should be fully cooled before frosting to prevent melting. For gluten-free, swap flour with gluten-free blend and use gluten-free Oreos. For dairy-free, use plant-based butter and milk substitutes and vegan Oreos.
Nutrition
- Serving Size: 1 cupcake
- Calories: 275
- Sugar: 28
- Sodium: 180
- Fat: 14
- Saturated Fat: 7
- Carbohydrates: 36
- Fiber: 2
- Protein: 3
Keywords: witch hat cupcakes, chocolate cupcakes, Oreo cupcakes, kids party recipe, Halloween cupcakes, easy cupcakes, chocolate frosting, Oreo brim