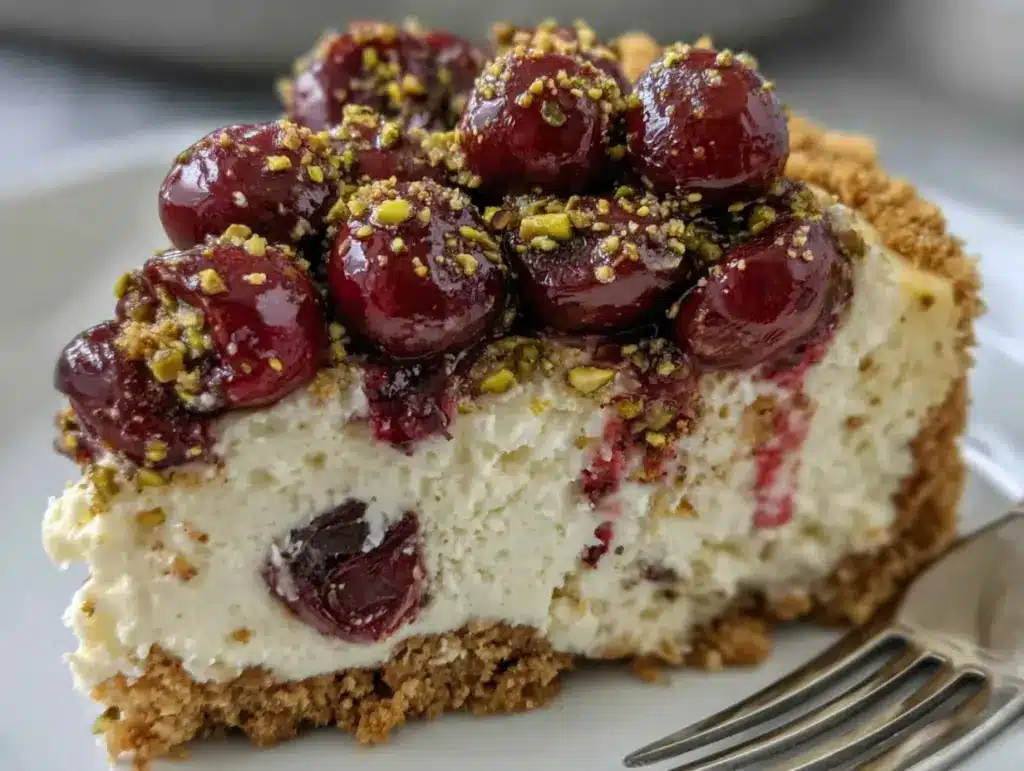
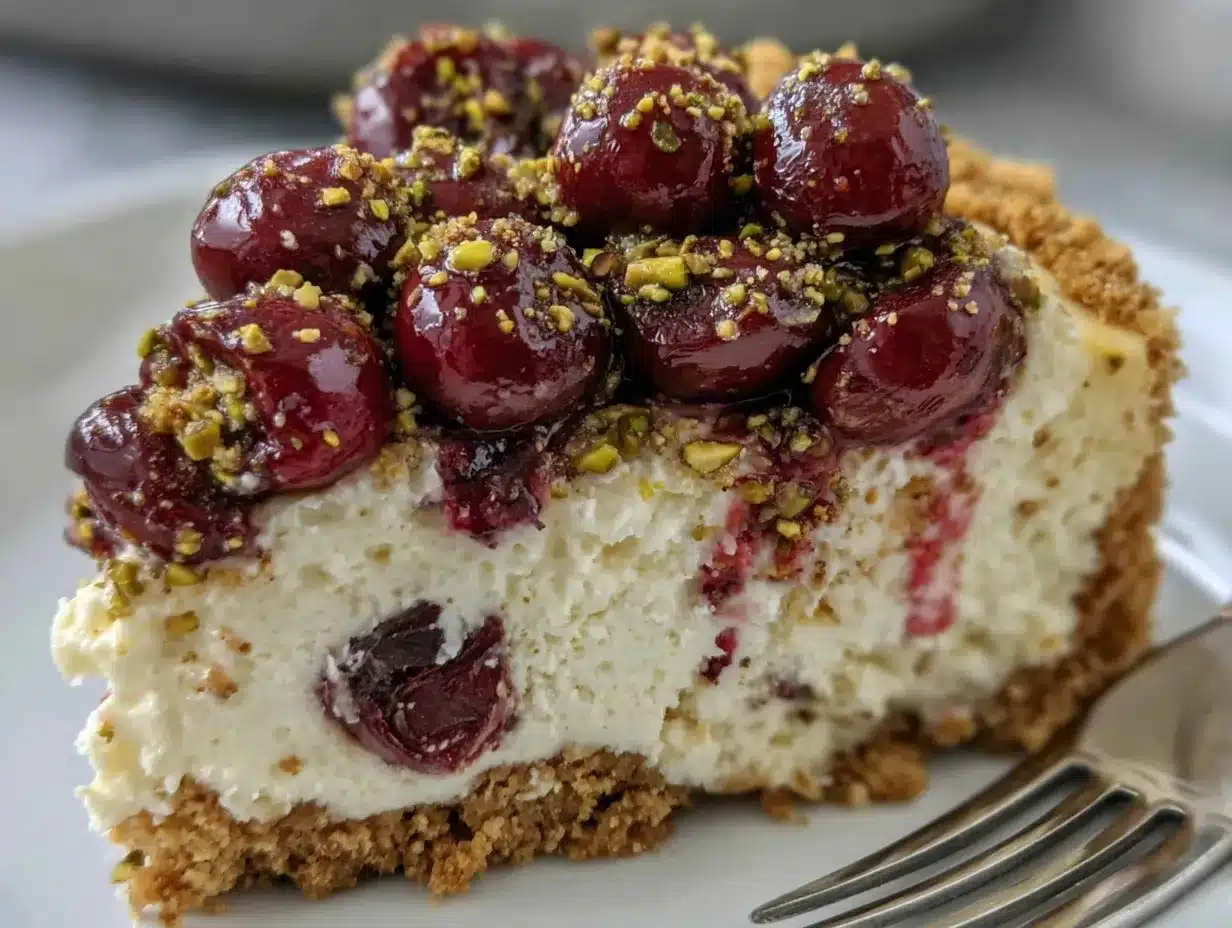
The first time I baked this perfect cherry pistachio cheesecake, I was aiming to impress for a family celebration—and honestly, it stole the show. The tangy cherries paired with the nutty crunch of pistachios created a flavor duo that felt both fancy and comforting. You know that moment when a dessert looks stunning and tastes even better? That’s exactly what this cheesecake brings to the table.
Cheesecake can sometimes feel intimidating, but this recipe breaks it down into manageable steps that anyone can follow—trust me, I’ve tested it more than a dozen times to get it just right. Whether you’re a seasoned baker or someone who usually sticks to simpler desserts, this cherry pistachio cheesecake is worth the effort. It’s rich, creamy, and has just the right balance of sweetness and texture that makes it perfect for special occasions.
What really hooks me about this recipe is how versatile it is. I remember serving it at a summer party where guests couldn’t stop talking about the crunchy pistachio topping and the luscious cherry swirls inside. Plus, cherries and pistachios aren’t your everyday cheesecake ingredients, which makes it feel extra special and a bit unexpected. If you’re looking for a dessert to wow your friends or family, this cheesecake is your new go-to.
Why You’ll Love This Recipe
- Quick & Easy: The recipe comes together smoothly, with most of the hands-on time under 30 minutes.
- Simple Ingredients: You probably already have cream cheese and cherries in your fridge or pantry, and pistachios add a delightful twist.
- Perfect for Special Occasions: Whether it’s a birthday, holiday, or just a weekend treat, this cheesecake fits the bill beautifully.
- Crowd-Pleaser: Kids, adults, and even picky eaters tend to love it; the flavors are balanced and inviting.
- Unbelievably Delicious: Creamy, tangy, sweet, and nutty all at once—the texture is spot on with a buttery crust and luscious filling.
This isn’t just any cheesecake recipe. The magic lies in swirling the cherry compote into the creamy filling and sprinkling chopped pistachios on top for a perfect crunch. After baking it a few times, I found that blending a portion of the pistachios into the crust makes it extra flavorful without overpowering the delicate cheesecake texture. It’s like the dessert has a little surprise in every bite.
Honestly, this recipe makes me feel proud every time I serve it. It’s that kind of dessert that makes people pause, savor, and ask for seconds. If you want an easy recipe that stands out, this cherry pistachio cheesecake is a delicious choice.
What Ingredients You Will Need
This recipe uses simple, wholesome ingredients to deliver bold flavor and satisfying texture without the fuss. Most of these are pantry staples, with the cherry and pistachio additions giving it that special touch.
- For the Crust:
- 1½ cups (150g) graham cracker crumbs (or digestive biscuits, crushed)
- ½ cup (70g) shelled pistachios, finely chopped (adds a lovely nutty flavor)
- ⅓ cup (75g) unsalted butter, melted (helps bind the crust)
- 2 tablespoons granulated sugar
- For the Cheesecake Filling:
- 24 oz (680g) cream cheese, softened (I prefer Philadelphia for smoothness)
- 1 cup (200g) granulated sugar
- 3 large eggs, room temperature
- 1 cup (240ml) sour cream (for that creamy tang)
- 1 teaspoon pure vanilla extract
- 2 tablespoons all-purpose flour (helps with structure)
- For the Cherry Swirl:
- 1½ cups (225g) fresh or frozen pitted cherries (thawed if frozen)
- ¼ cup (50g) granulated sugar
- 1 tablespoon lemon juice (brightens the cherry flavor)
- 1 teaspoon cornstarch (mixed with 1 tablespoon water for thickening)
- For the Topping:
- ⅓ cup (50g) shelled pistachios, roughly chopped (for crunch and color)
- Optional: powdered sugar for dusting
Feel free to swap graham cracker crumbs with gluten-free cookies if needed. For a dairy-free twist, try using cream cheese alternatives and plant-based sour cream, but the texture might be a little different. When picking cherries, I like to get ones that are firm and juicy, but frozen works perfectly well when fresh aren’t in season.
Equipment Needed
- 9-inch (23 cm) springform pan – this makes removing the cheesecake a breeze
- Mixing bowls – a medium and a large one for batter and cherry compote
- Electric mixer or stand mixer – to beat the cream cheese until silky smooth
- Spatula – for folding ingredients gently
- Saucepan – to cook the cherry compote
- Measuring cups and spoons – for precision
- Food processor or blender (optional) – handy if you want extra fine pistachio crumbs in the crust
If you don’t have a springform pan, a regular cake pan lined with parchment paper can work, but be careful when removing the cheesecake. I’ve tried both, and the springform pan really saves you from a cracked crust or messy edges. For budget-friendly options, any decent electric hand mixer will do just fine.
Detailed Preparation Method
- Prepare the crust: Preheat your oven to 325°F (163°C). In a bowl, mix graham cracker crumbs, finely chopped pistachios, sugar, and melted butter until everything feels like damp sand. Press this mixture evenly into the bottom of your 9-inch springform pan, about 1 inch thick. Pop it into the oven for 10 minutes, then let it cool while you prep the filling.
- Make the cherry compote: In a small saucepan over medium heat, combine cherries, sugar, and lemon juice. Stir until the sugar dissolves and the cherries release their juices, about 5 minutes. Mix cornstarch with water, then stir into the cherries. Cook until thickened, about 2 more minutes. Remove from heat and let cool completely. This step is key to avoid watery swirls in your cheesecake.
- Prepare the cheesecake filling: In a large mixing bowl, beat softened cream cheese with an electric mixer on medium speed until creamy and lump-free, about 3 minutes. Gradually add sugar, beating until smooth. Add eggs one at a time, mixing well after each addition. Stir in sour cream and vanilla extract. Finally, fold in the flour gently to avoid overmixing, which can cause cracks.
- Assemble the cheesecake: Pour half the cheesecake batter over the cooled crust. Spoon half of the cherry compote over the batter, then use a knife or skewer to swirl the cherries gently into the filling, creating a marbled effect. Repeat with the remaining batter and cherry compote, swirling again lightly.
- Bake: Place the springform pan on a baking sheet (to catch any drips) and bake at 325°F (163°C) for about 55–65 minutes. The edges should be set but the center still slightly jiggly when you gently shake the pan. Avoid overbaking; the cheesecake will continue to set as it cools.
- Cool and chill: Turn off the oven and leave the door slightly ajar. Let the cheesecake cool inside for 1 hour to prevent cracking. Then, refrigerate for at least 4 hours or overnight for best texture.
- Add pistachio topping and serve: Just before serving, sprinkle the roughly chopped pistachios on top. Optionally dust with powdered sugar for a pretty finish. Slice with a hot, dry knife for clean cuts.
Pro tip: If cracks appear, don’t sweat it—topping with cherries and pistachios hides them perfectly. Also, using room temperature ingredients helps everything blend smoothly and avoids lumps.
Cooking Tips & Techniques
Getting cheesecake just right can feel tricky, but a few tricks make all the difference. First, always start with room temperature cream cheese and eggs. Cold ingredients lead to lumpy batter, and nobody wants that.
When mixing, beat the cream cheese alone first until silky. Then add sugar and eggs gradually to avoid overworking the batter, which can cause cracks later.
Swirling the cherry compote is an art—don’t overmix or you’ll lose those lovely cherry pockets. Use a gentle hand with a skewer or knife for pretty marbling.
Baking low and slow is essential. High heat will crack the cheesecake or dry it out. Using a water bath can help maintain even heat and moisture, but I’ve had great results without it when baking at 325°F (163°C).
Lastly, cooling the cheesecake gradually prevents sudden temperature changes that cause cracking. Leaving it in the oven with the door ajar after baking is a lifesaver.
Honestly, I used to rush the cooling step and ended up with a cracked top every time. Patience here pays off big.
Variations & Adaptations
- Dietary Variation: Swap the graham cracker crust for a gluten-free almond flour crust to suit gluten sensitivities. Use lactose-free cream cheese and sour cream for dairy-free options, but expect a slight change in texture.
- Seasonal Variation: In spring or summer, replace the cherry compote with fresh strawberries or mixed berries for a fresh, fruity twist. Pistachios still pair beautifully.
- Flavor Twist: Add a hint of rose water or orange zest to the cherry compote for an aromatic upgrade. I tried this once for a holiday gathering, and it was a total hit.
- Cooking Method: This cheesecake can also be baked in a water bath for extra creaminess and crack prevention. Just wrap the pan in foil and place it in a larger pan filled with hot water.
- Texture Adjustment: For a lighter texture, fold in whipped cream into the batter before pouring it in the pan. It adds a mousse-like quality that’s delightful.
Serving & Storage Suggestions
This cherry pistachio cheesecake is best served chilled or at room temperature—about 20 minutes out of the fridge is perfect to bring out the flavors without melting the texture. I like to garnish with extra pistachios and a few fresh cherries for a bright presentation.
Pair it with a cup of black coffee or a light sparkling wine for a special occasion. It also complements a simple vanilla bean ice cream if you want to add an extra indulgent touch.
Store leftovers covered tightly in the refrigerator for up to 4 days. Cheesecake tends to taste even better the next day as flavors meld. For longer storage, freeze it wrapped well in plastic wrap and foil; thaw overnight in the fridge before serving.
Reheating? I usually don’t warm cheesecake, but if you prefer it softer, let slices sit at room temperature for 15-30 minutes before eating.
Nutritional Information & Benefits
A typical serving (about 1/12 of the cheesecake) contains roughly 350 calories, 28g fat, 18g carbohydrates, and 7g protein. The pistachios add healthy fats and a bit of fiber, while cherries bring antioxidants and vitamin C to the mix.
This cheesecake isn’t a low-calorie dessert, but it includes nutrient-rich ingredients compared to many store-bought options. Using real cream cheese and sour cream provides calcium and protein, while the pistachios contribute heart-healthy monounsaturated fats.
Keep in mind it contains nuts and dairy, so it’s not suitable for those with allergies. The recipe can be adapted for gluten-free diets by swapping crust ingredients.
From my experience as someone who enjoys treating themselves while watching nutrition, this dessert strikes a nice balance: indulgent yet made with quality ingredients that feel thoughtfully chosen.
Conclusion
If you’re after a dessert that’s both impressive and approachable, this perfect cherry pistachio cheesecake recipe fits the bill. It’s creamy, flavorful, and textured just right, with that wonderful cherry and nut combo delivering something a bit unexpected but totally delicious.
Don’t hesitate to experiment with the toppings or the berry swirl to make it your own. I love how versatile this cheesecake is—it feels special enough for celebrations but simple enough to whip up for a cozy weekend treat.
Give it a try, and I’d love to hear how you customize it or what moments you serve it for! Drop a comment below or share your photo if you make it. Happy baking—you’re going to nail this one!
FAQs About Perfect Cherry Pistachio Cheesecake
Can I make this cheesecake ahead of time?
Absolutely! In fact, it tastes better after chilling overnight. Just cover and refrigerate until ready to serve.
What’s the best way to prevent cracks on my cheesecake?
Use room temperature ingredients, don’t overmix, bake at a low temperature, and cool gradually by leaving the oven door slightly open after baking.
Can I use frozen cherries instead of fresh?
Yes, frozen cherries work perfectly as long as you thaw and drain excess juice before making the compote.
How should I store leftover cheesecake?
Keep leftovers refrigerated, tightly covered, for up to 4 days. You can also freeze slices wrapped well for up to 2 months.
Is it possible to make this cheesecake dairy-free or vegan?
With suitable dairy-free cream cheese and sour cream substitutes, you can adapt this recipe, but texture and flavor will vary. The pistachio crust works well dairy-free if you use plant-based butter.
Pin This Recipe!
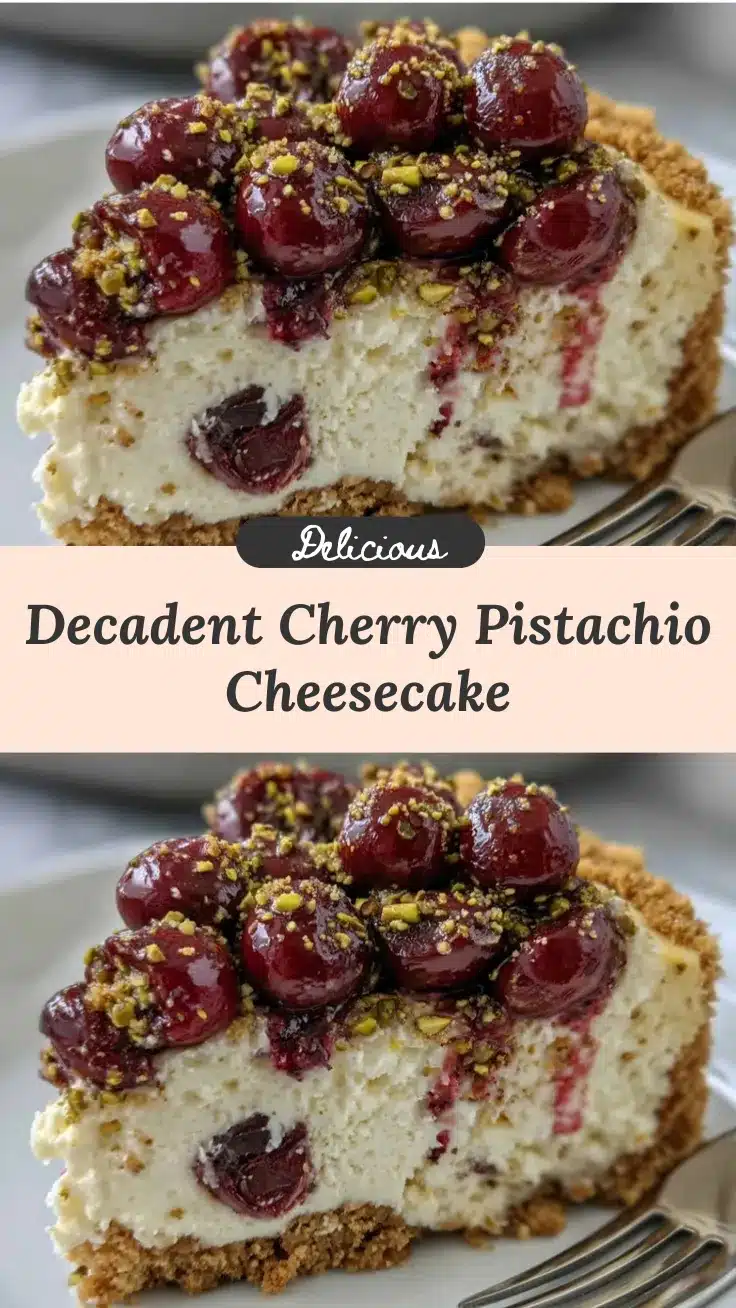
Perfect Cherry Pistachio Cheesecake

A rich and creamy cheesecake featuring tangy cherry swirls and a nutty pistachio crust, perfect for special occasions and crowd-pleasing desserts.
- Prep Time: 25 minutes
- Cook Time: 1 hour 15 minutes
- Total Time: 5 hours 40 minutes
- Yield: 12 servings 1x
- Category: Dessert
- Cuisine: American
Ingredients
- 1½ cups (150g) graham cracker crumbs or digestive biscuits, crushed
- ½ cup (70g) shelled pistachios, finely chopped
- ⅓ cup (75g) unsalted butter, melted
- 2 tablespoons granulated sugar
- 24 oz (680g) cream cheese, softened
- 1 cup (200g) granulated sugar
- 3 large eggs, room temperature
- 1 cup (240ml) sour cream
- 1 teaspoon pure vanilla extract
- 2 tablespoons all-purpose flour
- 1½ cups (225g) fresh or frozen pitted cherries, thawed if frozen
- ¼ cup (50g) granulated sugar
- 1 tablespoon lemon juice
- 1 teaspoon cornstarch mixed with 1 tablespoon water
- ⅓ cup (50g) shelled pistachios, roughly chopped
- Optional: powdered sugar for dusting
Instructions
- Preheat oven to 325°F (163°C). Mix graham cracker crumbs, finely chopped pistachios, sugar, and melted butter until mixture resembles damp sand. Press evenly into bottom of 9-inch springform pan about 1 inch thick. Bake for 10 minutes and let cool.
- In a small saucepan over medium heat, combine cherries, sugar, and lemon juice. Stir until sugar dissolves and cherries release juices, about 5 minutes. Add cornstarch mixture and cook until thickened, about 2 minutes. Remove from heat and cool completely.
- In a large bowl, beat softened cream cheese with an electric mixer on medium speed until creamy and lump-free, about 3 minutes. Gradually add sugar and beat until smooth. Add eggs one at a time, mixing well after each. Stir in sour cream and vanilla extract. Fold in flour gently.
- Pour half the cheesecake batter over cooled crust. Spoon half the cherry compote over batter and swirl gently with a knife or skewer. Repeat with remaining batter and cherry compote, swirling lightly.
- Place springform pan on a baking sheet and bake at 325°F (163°C) for 55–65 minutes until edges are set but center is slightly jiggly.
- Turn off oven, leave door slightly ajar, and let cheesecake cool inside for 1 hour. Refrigerate for at least 4 hours or overnight.
- Before serving, sprinkle roughly chopped pistachios on top and optionally dust with powdered sugar. Slice with a hot, dry knife for clean cuts.
Notes
Use room temperature ingredients to avoid lumps. Swirl cherry compote gently to keep marbled effect. Baking low and slow prevents cracks. Cooling gradually with oven door ajar helps prevent cracking. A water bath can be used for extra creaminess and crack prevention. For dairy-free or gluten-free adaptations, substitute ingredients accordingly.
Nutrition
- Serving Size: 1 slice (1/12 of che
- Calories: 350
- Fat: 28
- Carbohydrates: 18
- Protein: 7
Keywords: cherry cheesecake, pistachio cheesecake, homemade cheesecake, easy cheesecake recipe, special occasion dessert, creamy cheesecake, nutty crust