The smell of sharp cheddar and savory spices mingling in the kitchen always gets me pumped for game day. Honestly, I first whipped up this easy football cheese ball recipe during a last-minute party scramble, and it quickly became my go-to snack. There’s just something about a cheese ball shaped like a football—fun, festive, and totally crave-worthy—that brings everyone together around the TV. Whether you’re hosting a big tailgate or just hanging out with close friends, this recipe hits all the right notes.
I’ve made this football cheese ball dozens of times, tweaking the seasoning here and there until it felt just right. The creamy texture with that perfect hit of tang and a little crunch from the coating keeps everyone coming back for more. Plus, it’s a breeze to make, which means you have more time to enjoy the game instead of stressing in the kitchen. If you’re like me, juggling snacks with cheering, this easy football cheese ball is exactly what your game day needs.
You’ll find that this recipe is not just delicious but a crowd-pleaser for all ages. It’s especially great for folks who love classic flavors with a fun twist—and honestly, it’s a conversation starter every time. So, if you want a snack that’s easy to whip up, tastes fantastic, and adds a little festive flair to your game day spread, this easy football cheese ball recipe is all you need.
Why You’ll Love This Easy Football Cheese Ball Recipe
After testing this recipe through many game days and family gatherings, I can confidently say it’s a winner. Here’s why it stands out:
- Quick & Easy: Ready in under 20 minutes, making it perfect for last-minute snack needs or busy game days.
- Simple Ingredients: Uses pantry staples and common cheeses, so no crazy grocery runs.
- Perfect for Game Day: Adds a festive touch that’s just right for football parties and potlucks.
- Crowd-Pleaser: Kids and adults alike can’t resist digging in—always a hit with both picky eaters and cheese lovers.
- Unbelievably Delicious: Creamy, tangy, and slightly spicy with that satisfying cheesy bite.
What sets this football cheese ball apart? Well, it’s the little things—like using a blend of cream cheese and sharp cheddar for the best creamy-yet-fluffy texture, and rolling it in just the right mix of chopped nuts and herbs for a crunchy, flavorful coating. I’ve found that shaping it into a football gives a playful vibe that makes snack time extra fun, especially for kids who get all excited about the shape.
Honestly, this recipe isn’t just a snack; it’s a little game day tradition in my house now. It’s the kind of comfort food that makes you pause and savor every bite, and it’s perfect when you want to impress guests without fussing over complicated dishes. Give it a try, and you’ll see why it’s a staple at every gathering.
What Ingredients You Will Need
This easy football cheese ball recipe calls for simple, wholesome ingredients that come together to create a rich, flavorful snack. Most of these are things I always have on hand, which makes this recipe super convenient.
- Cream Cheese (8 oz / 226 g, softened) – The creamy base that binds the cheese ball and adds smooth richness.
- Sharp Cheddar Cheese (1 ½ cups / 170 g, shredded) – Provides that classic cheddar tang and melt-in-your-mouth texture.
- Worcestershire Sauce (1 tsp / 5 ml) – Adds depth and a subtle umami kick.
- Garlic Powder (½ tsp / 2.5 ml) – For a hint of savory warmth.
- Onion Powder (½ tsp / 2.5 ml) – Balances the garlic with mild sweetness.
- Hot Sauce (a few dashes, optional) – If you like a little heat, this amps up the flavor without overwhelming.
- Chopped Pecans or Walnuts (1 cup / 120 g) – Toasted and chopped for a crunchy coating that sticks perfectly.
- Chopped Fresh Parsley (2 tbsp / 8 g) – Adds a fresh herbal note and a pop of color.
- Green Onion (1 small, finely chopped) – Optional but recommended for a mild oniony bite mixed in.
- Salt & Pepper (to taste) – To balance and bring out all the flavors.
For best results, I like using full-fat cream cheese and a sharp, aged cheddar like Cabot or Tillamook. Toast your nuts lightly in a dry pan to bring out their flavor before chopping—trust me, it makes all the difference! If you want a gluten-free version, just double-check your Worcestershire sauce since some brands contain gluten.
Equipment Needed
- Mixing Bowl: A medium-sized bowl to combine all your ingredients comfortably.
- Electric Mixer or Hand Mixer: Helps to blend the cream cheese and cheddar smoothly, but you can mix by hand if you don’t have one.
- Measuring Cups and Spoons: For precise ingredient amounts (always a good idea to keep these handy!).
- Spatula: To scrape the bowl and help shape the cheese ball.
- Cutting Board and Knife: For chopping nuts, parsley, and green onion.
- Plate or Small Tray: To roll and shape the cheese ball into a football shape.
If you don’t have an electric mixer, no worries—just give the cream cheese a little extra time to soften and mix vigorously with a sturdy spoon. For the nuts, a quick chop with a chef’s knife works fine, but a food processor pulse is a handy shortcut if you have one. I love using a silicone spatula for easy scraping and shaping because it’s flexible and gentle.
Detailed Preparation Method
- Soften the Cream Cheese: Take your 8 ounces (226 g) of cream cheese out of the fridge about 30 minutes before starting. You want it soft but not melted. This makes mixing so much easier and helps the cheese ball hold together better.
- Mix the Base Ingredients: In your mixing bowl, combine the softened cream cheese with 1 ½ cups (170 g) shredded sharp cheddar cheese. Use an electric mixer on medium speed (or a sturdy spoon if mixing by hand) until creamy and well blended, about 2-3 minutes. The texture should be smooth with small cheese bits visible.
- Add Seasonings: Stir in 1 teaspoon (5 ml) Worcestershire sauce, ½ teaspoon (2.5 ml) garlic powder, ½ teaspoon (2.5 ml) onion powder, and a few dashes of hot sauce if you want some kick. Add finely chopped green onion (1 small) and season with salt and pepper to taste. Mix everything evenly.
- Prepare the Coating: Toast 1 cup (120 g) of pecans or walnuts in a dry skillet over medium heat for 3-4 minutes, stirring frequently to avoid burning. Let them cool, then chop coarsely. Mix chopped nuts with 2 tablespoons (8 g) fresh parsley on a plate or small tray.
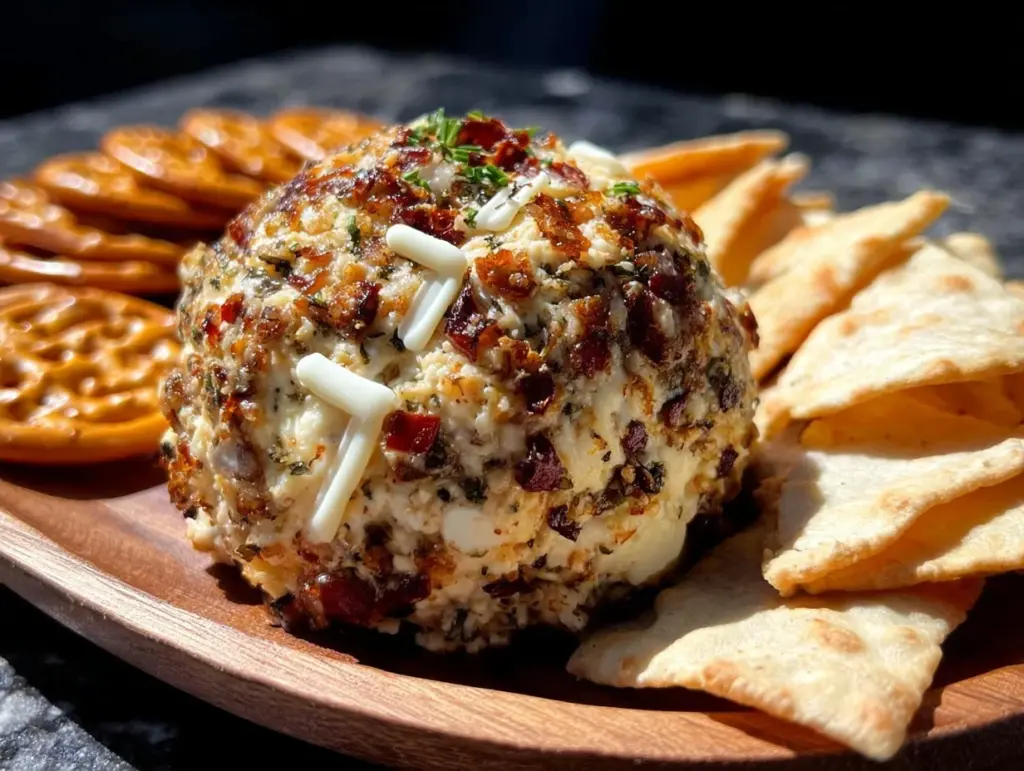
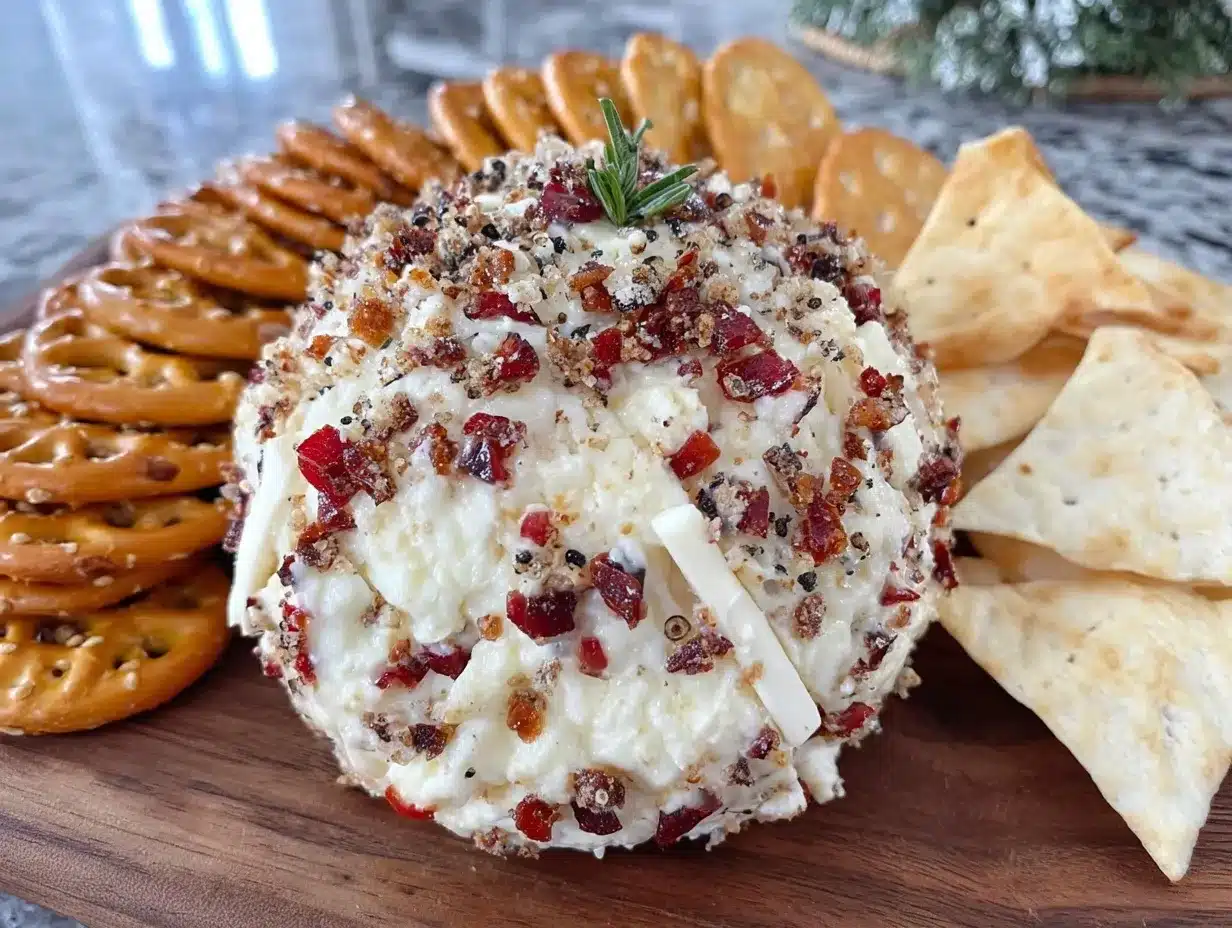
- Shape the Cheese Ball: Using your hands or a spatula, scoop the cheese mixture onto the nut and parsley mixture. Roll it gently to coat all sides evenly. Then shape the cheese ball into an oval football shape. Don’t worry if it’s not perfect—rustic charm is part of the fun!
- Add Football Details: Optional but fun: use thin strips of green onion or pretzel sticks to create the laces on top of your cheese football. This little touch really amps up the game day vibe.
- Chill: Wrap the cheese ball in plastic wrap and refrigerate for at least 1 hour before serving. This helps it firm up and allows flavors to meld perfectly.
- Serve: Bring the cheese ball out about 10 minutes before serving to soften slightly for the best spreadable texture. Arrange with crackers, sliced veggies, or pita chips for a winning snack platter.
If your cheese ball feels too soft after chilling, just let it sit at room temperature a bit longer before serving. And if it’s too firm, let it soften on the counter for 15 minutes. These little tweaks make all the difference!
Cooking Tips & Techniques
Here are some tips I picked up after a few trial runs that really help this recipe shine:
- Soften cream cheese properly: Take it out ahead of time or microwave for 10 seconds if you’re in a rush—too cold, and it’s tough to mix; too warm, and it gets runny.
- Toast nuts carefully: Keep the heat medium and stir often—burnt nuts taste bitter and will throw off the whole flavor.
- Mix evenly: Use an electric mixer for best results but hand mixing works if you’re persistent. Aim for a creamy texture with some visible cheese bits.
- Shape gently: Don’t press too hard rolling the cheese ball—it should hold together but not get mushy.
- Chill well: The resting time is key to firm up the cheese ball and let flavors marry. Don’t skip this step!
One goof I made early on was adding too much hot sauce—lesson learned: start with a little and add more if you want. Also, I once forgot to toast the nuts, and the coating was a bit bland—never again. Trust me, these small details really matter for a snack that wows.
Variations & Adaptations
This easy football cheese ball recipe is wonderfully flexible, so you can make it your own:
- Dietary Swap: Use dairy-free cream cheese and a vegan cheddar alternative to make it vegan-friendly. Nutritional yeast can add a cheesy kick if you want to boost flavor.
- Flavor Twist: Add chopped jalapeños or a teaspoon of smoked paprika for a smoky, spicy spin. Or mix in some crispy bacon bits for that savory punch.
- Nut-Free Version: Roll the cheese ball in finely chopped chives or sesame seeds if nuts aren’t an option.
- Seasonal Spin: Mix in dried cranberries or chopped fresh herbs like rosemary or thyme for a holiday vibe.
Personally, I once tried swapping pecans for toasted pepitas and added a sprinkle of chili powder in the coating—it was a game changer for a fall party. Feel free to experiment; this recipe is forgiving and fun!
Serving & Storage Suggestions
This easy football cheese ball is best served slightly chilled but not rock hard. Bring it out 10 to 15 minutes before your guests arrive to let it soften and become perfectly spreadable. Arrange it on a platter surrounded by an assortment of crackers, sliced cucumbers, bell pepper strips, and pretzels for a colorful and inviting spread.
Leftovers? Wrap the cheese ball tightly in plastic wrap and keep it in the refrigerator for up to 5 days. If you want to freeze it, do so for up to a month, but expect a slight change in texture once thawed. To reheat, simply thaw overnight in the fridge and bring to room temperature before serving.
Flavors actually deepen after a day or two in the fridge, so making it a day ahead can be a smart move for stress-free entertaining. Just remember to give it that little 10-minute rest before the big reveal!
Nutritional Information & Benefits
Per serving (assuming 8 servings): Approximately 220 calories, 19g fat, 6g protein, 2g carbs.
This football cheese ball packs a protein punch thanks to the combination of cream cheese and cheddar, making it a satisfying snack that helps keep hunger at bay. The nuts add healthy fats and a bit of fiber, rounding out the nutritional profile nicely. If you’re watching carbs, this is a low-carb option compared to many other game day snacks.
Note: Contains dairy and nuts, so watch out for allergies. For gluten-free diets, check your sauces and crackers served alongside.
From my experience as someone who loves tasty but straightforward recipes, this snack balances indulgence with a bit of nutrition—a perfect compromise on game day.
Conclusion
If you want a game day snack that’s easy, delicious, and brings a little fun to your party spread, this easy football cheese ball recipe is your best bet. It’s the kind of recipe that’s forgiving, quick to make, and loved by pretty much everyone who tries it. I love how it brings friends and family together, sparking smiles and second helpings.
Don’t be afraid to tweak the seasonings or toppings to suit your taste—this cheese ball is a blank canvas for your game day creativity. If you try it out, I’d love to hear about your favorite variations or any tricks you discover. Drop a comment, share your photos, or pass this recipe along to your fellow football fans!
Here’s to great snacks, good company, and unforgettable game days. Let’s get that cheese ball rolling!
FAQs About Easy Football Cheese Ball
How long can I store the football cheese ball?
Wrapped tightly, it keeps well in the fridge for up to 5 days. For longer storage, freeze it for up to a month.
Can I make this cheese ball ahead of time?
Absolutely! Making it a day ahead allows the flavors to meld beautifully and saves you time on game day.
What can I serve with the cheese ball?
Try an assortment of crackers, pita chips, sliced veggies like cucumbers and bell peppers, or pretzels for dipping.
Can I use other nuts besides pecans or walnuts?
Yes, toasted almonds, pepitas, or even sunflower seeds work great for the coating.
Is this recipe suitable for vegans?
Not as is, but you can substitute dairy-free cream cheese and vegan cheddar alternatives to make it vegan-friendly.
Pin This Recipe!

Easy Football Cheese Ball Recipe for Perfect Game Day Snacks

A quick and easy cheese ball shaped like a football, perfect for game day parties. Creamy, tangy, and coated with crunchy nuts and herbs, this snack is a crowd-pleaser for all ages.
- Prep Time: 10 minutes
- Cook Time: 5 minutes
- Total Time: 1 hour 15 minutes
- Yield: 8 servings 1x
- Category: Snack
- Cuisine: American
Ingredients
- 8 oz (226 g) cream cheese, softened
- 1 ½ cups (170 g) sharp cheddar cheese, shredded
- 1 tsp (5 ml) Worcestershire sauce
- ½ tsp (2.5 ml) garlic powder
- ½ tsp (2.5 ml) onion powder
- A few dashes hot sauce (optional)
- 1 cup (120 g) chopped pecans or walnuts, toasted
- 2 tbsp (8 g) chopped fresh parsley
- 1 small green onion, finely chopped (optional)
- Salt and pepper to taste
Instructions
- Soften the cream cheese by taking it out of the fridge about 30 minutes before starting.
- In a mixing bowl, combine the softened cream cheese with shredded sharp cheddar cheese. Mix with an electric mixer on medium speed or by hand until creamy and well blended, about 2-3 minutes.
- Stir in Worcestershire sauce, garlic powder, onion powder, hot sauce (if using), finely chopped green onion, salt, and pepper. Mix evenly.
- Toast the pecans or walnuts in a dry skillet over medium heat for 3-4 minutes, stirring frequently. Let cool, then chop coarsely.
- Mix the chopped nuts with fresh parsley on a plate or small tray.
- Scoop the cheese mixture onto the nut and parsley mixture and roll gently to coat all sides evenly. Shape the cheese ball into an oval football shape.
- Optionally, use thin strips of green onion or pretzel sticks to create laces on top of the cheese football.
- Wrap the cheese ball in plastic wrap and refrigerate for at least 1 hour to firm up and meld flavors.
- Before serving, bring the cheese ball out about 10 minutes early to soften slightly. Serve with crackers, sliced veggies, or pita chips.
Notes
Use full-fat cream cheese and sharp aged cheddar for best flavor. Toast nuts lightly to enhance flavor. If you want a gluten-free version, check Worcestershire sauce ingredients. Bring cheese ball to room temperature before serving for best spreadability. Variations include using dairy-free cheeses for vegan option or rolling in chives or sesame seeds for nut-free version.
Nutrition
- Serving Size: Approximately 1/8 of
- Calories: 220
- Fat: 19
- Carbohydrates: 2
- Protein: 6
Keywords: football cheese ball, game day snacks, cheese ball recipe, easy cheese ball, party appetizer, football party food