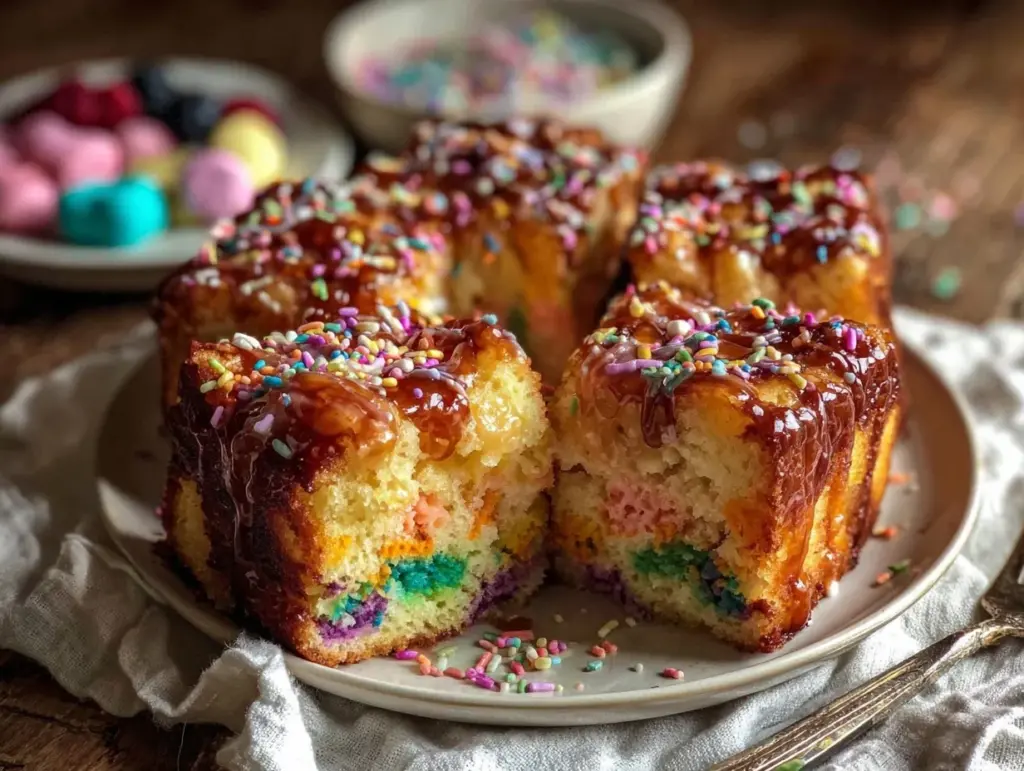
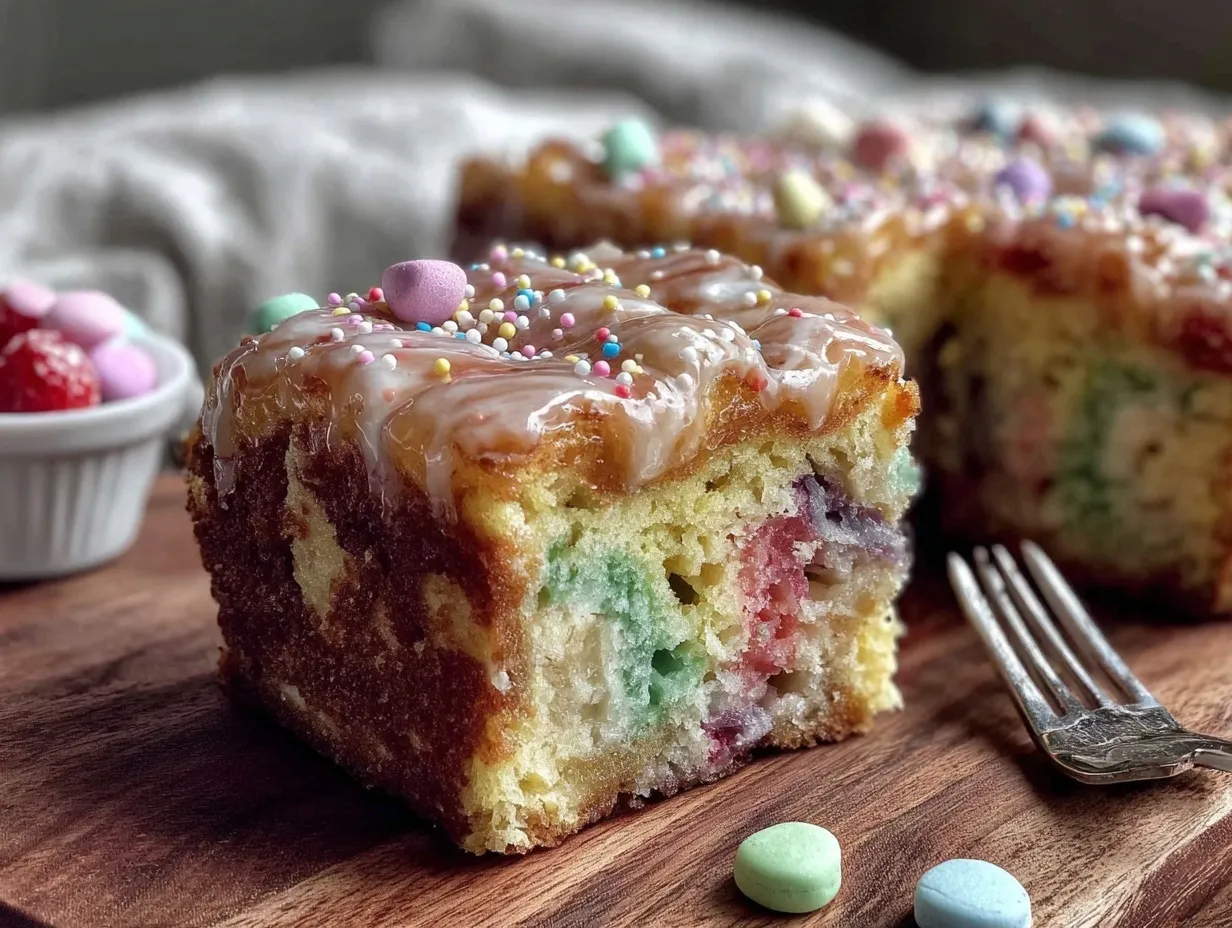
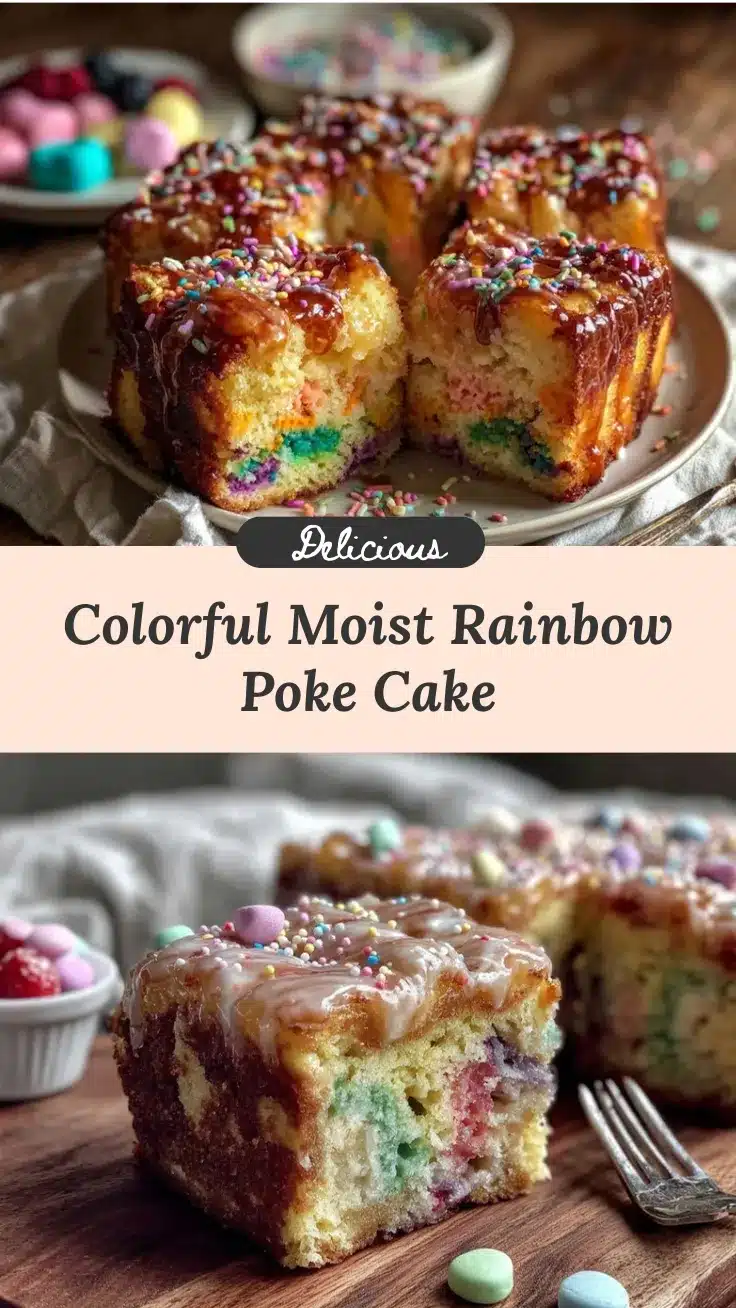
The first time I baked this rainbow poke cake, honestly, it felt like a party on my kitchen counter. Imagine cutting into a moist, fluffy cake and finding all those vibrant, colorful layers peeking through—it’s like a surprise every bite! I wasn’t expecting such a fun and simple dessert to become my go-to for birthdays and potlucks. This irresistible rainbow poke cake isn’t just about looks; it’s the perfect blend of moist texture and sweet, creamy filling that instantly lifts your mood.
Years ago, I stumbled upon the idea of “poke cakes,” and it quickly became a favorite technique to transform ordinary boxed cakes into a luscious, flavorful treat. Adding the rainbow colors just took it to a whole new level. I’ve made this recipe dozens of times, tweaking it for the best balance between sweetness and moisture. If you’re wondering why you should try this rainbow poke cake, let me just say—it’s a showstopper that’s surprisingly easy to pull off.
Whether you’re baking for a family gathering, a cheerful birthday party, or just craving a colorful dessert that feels as joyful as it looks, this rainbow poke cake recipe is a must. It’s moist, colorful, and packed with enough flavor to make you forget all those complicated dessert recipes you’ve tried before. Plus, you don’t need to be a pro baker to nail it. Trust me, once you make this cake, you’ll keep coming back for more.
Why You’ll Love This Recipe
After baking this rainbow poke cake more times than I can count, here’s why it’s become such a favorite around my home:
- Quick & Easy: You can have this cake ready in under an hour, making it perfect for last-minute celebrations or when you just want a sweet treat fast.
- Simple Ingredients: No need to hunt down fancy stuff; most of what you need is probably sitting in your pantry right now.
- Perfect for Occasions: Whether it’s a birthday, holiday, or casual weekend dessert, this cake brings the fun and color everyone loves.
- Crowd-Pleaser: Kids and adults both adore the surprise of the rainbow layers and the creamy filling that makes every slice feel special.
- Unbelievably Moist & Flavorful: The poke technique means every bite is soaked in sweet, tangy pudding, creating a texture combo that’s downright addictive.
This isn’t just any poke cake. The way the rainbow colors bleed through the pudding filling gives it a magical look that’s impossible to resist. Plus, the balance of flavors is just right—not overly sweet but perfectly satisfying. It’s like a nostalgic twist on a classic, with a fresh, playful vibe that lifts your spirits instantly. Trust me, every time I serve this rainbow poke cake, people’s faces light up—and that’s why I keep making it.
What Ingredients You Will Need
This recipe calls for straightforward, easy-to-find ingredients that come together to create bold flavor and that moist texture you crave. Here’s what you’ll need:
- Boxed white cake mix (about 15.25 oz / 432 g) – I prefer Betty Crocker for reliable fluffiness
- Eggs (3 large, room temperature) – helps bind and add richness
- Water (1 cup / 240 ml) – to hydrate the cake mix
- Vegetable oil (1/3 cup / 80 ml) – keeps the cake moist
- Instant vanilla pudding mix (1 package, 3.4 oz / 96 g) – the key to that creamy filling
- Milk (2 cups / 480 ml, cold) – to whisk with the pudding mix
- Food coloring gels (red, orange, yellow, green, blue, purple) – vibrant colors that won’t water down the batter
- Whipped topping (8 oz / 227 g, thawed) – to spread on top for a cool, creamy finish
- Rainbow sprinkles (optional, about 1/2 cup / 60 g) – adds extra fun texture and color on top
If you’re looking to keep it gluten-free, swap the cake mix with a gluten-free white cake mix—just be sure it’s one you trust for fluffiness. For dairy-free versions, you can use almond or oat milk and a dairy-free whipped topping. I’ve tried these swaps myself, and while texture shifts slightly, the flavor stays delightful. Also, I recommend using gel food coloring instead of liquid because it gives you those bright, vivid hues without thinning the batter.
Equipment Needed
To make this rainbow poke cake, you won’t need anything too fancy, but having the right tools helps a lot:
- 9×13-inch baking pan – standard size, perfect for even baking and easy slicing
- Mixing bowls – at least two: one for the cake batter, one for the pudding mix
- Electric mixer or whisk – I usually go with a hand mixer to save time and effort
- Measuring cups and spoons – accuracy matters, especially for pudding and liquids
- Spoon or skewer – for poking holes in the baked cake so the pudding seeps in
- Spatula – to spread the whipped topping evenly
If you don’t have a hand mixer, no worries—whisking by hand works fine, just takes a bit more muscle. For the poking tool, a wooden skewer or even the handle of a wooden spoon does the trick. I started with a fork once, but that made the holes too small, and the pudding didn’t soak through as well. Budget-wise, all these are pretty basic kitchen staples, so you’re likely set!
Detailed Preparation Method
- Preheat your oven to 350°F (175°C). Grease your 9×13-inch pan lightly with butter or nonstick spray. This helps the cake release cleanly without sticking.
- Prepare the cake batter. In a large bowl, combine the boxed white cake mix, 3 large eggs, 1 cup (240 ml) water, and 1/3 cup (80 ml) vegetable oil. Use your hand mixer on medium speed for about 2 minutes until smooth and lump-free.
- Divide the batter evenly into six smaller bowls. Aim for about 1 cup (240 ml) of batter per bowl. This step is key to getting those vibrant rainbow layers.
- Add food coloring gels. To each bowl, add a different color: red, orange, yellow, green, blue, and purple. Stir gently until the color is evenly mixed. Remember, gel colors are concentrated, so a little goes a long way.
- Layer the colored batters in the pan. Starting with red, spoon about 1/3 cup (80 ml) of batter into the center of the pan. Then add orange directly on top of the red, then yellow on top of orange, and so on, ending with purple. The batter will spread out and create concentric circles that bake into a rainbow pattern.
- Bake for 35 to 40 minutes. Check doneness by inserting a toothpick into the center; it should come out clean or with just a few moist crumbs. Avoid overbaking to keep the cake moist.
- While the cake bakes, prepare the pudding mixture. In a medium bowl, whisk together the instant vanilla pudding mix and 2 cups (480 ml) cold milk for about 2 minutes until thickened. Chill in the fridge until ready to use.
- Once the cake is done, let it cool for 10 minutes. Then, using a wooden skewer or the handle of a wooden spoon, poke holes all over the cake, spacing about 1 inch (2.5 cm) apart. This step lets the pudding seep in and keep the cake wonderfully moist.
- Pour the prepared pudding evenly over the cake. Spread gently with a spatula to cover the entire surface, letting it fill the holes.
- Refrigerate the cake for at least 2 hours. This resting time allows the pudding to soak fully into the cake layers.
- Before serving, spread the whipped topping evenly on the cake’s surface. Top with rainbow sprinkles for that extra festive touch.
- Slice and serve chilled. Each bite reveals colorful layers and creamy pockets that make this cake truly irresistible.
Cooking Tips & Techniques
Here are some tricks I’ve picked up while making this rainbow poke cake that can help you nail it every time:
- Don’t overmix the batter. Once the ingredients come together, stop mixing. Overworking flour leads to dense cakes, and that’s the last thing you want.
- Use gel food coloring. Liquid colors can thin your batter and dull the colors. Gels give you those bright, vibrant rainbow layers.
- Make sure to poke the holes while the cake is still warm. If the cake cools completely, the pudding won’t seep in as well.
- Chill the cake long enough. At least 2 hours in the fridge is crucial, or better yet, overnight. The flavors meld and the cake becomes super moist.
- Don’t skip the whipped topping. It balances the sweetness and adds a light, creamy finish.
- Use a toothpick to test doneness. It’s better than relying solely on baking time since ovens vary.
One time, I accidentally poked too few holes, and the pudding mostly stayed on top—lesson learned! Also, spreading the pudding gently helps avoid breaking the cake. I’ve found that layering colors carefully creates the prettiest rainbow effect, so take your time with that step.
Variations & Adaptations
This rainbow poke cake is great for customizing. Here are some ways to switch it up:
- Dietary twists: Use gluten-free cake mix and dairy-free pudding and whipped topping for allergy-friendly versions.
- Flavor swaps: Try chocolate or lemon pudding instead of vanilla for a different taste profile.
- Seasonal touches: Add fresh berries or edible flowers on top during summer for a fresh vibe.
- Cooking method: You can bake this in cupcake liners for individual servings—just reduce baking time to about 18 minutes.
- Personal favorite: I once added a thin layer of cream cheese frosting over the whipped topping for a tangy contrast. It was a hit!
Feel free to swap out the colors or skip some for a pastel look. Honestly, the poke cake technique is forgiving and fun to experiment with!
Serving & Storage Suggestions
Serve this rainbow poke cake chilled or at room temperature—it’s delicious either way. I like to slice it into generous squares and plate with a scoop of vanilla ice cream or a dollop of fresh whipped cream for extra indulgence.
Pair it with a hot cup of coffee or a cold glass of milk to balance the sweetness. For parties, it makes a colorful centerpiece that’s sure to get conversations started.
Store leftovers covered in the refrigerator for up to 4 days. The cake actually gets better after a day as the flavors develop and the pudding fully soaks in. If you want to freeze it, wrap tightly in plastic wrap and foil, and freeze for up to 2 months. Thaw overnight in the fridge before serving.
Reheat gently if you like warm cake, but I prefer it cold—the creamy pudding stays silky, and the colors remain vivid.
Nutritional Information & Benefits
An average slice (about 1/12th of the cake) contains roughly 280 calories, with 4 grams of protein, 40 grams of carbohydrates, and 10 grams of fat. Key ingredients like eggs and milk provide essential nutrients, while the pudding adds calcium and a creamy texture without heavy cream.
This recipe can easily be adapted for gluten-free or dairy-free diets, making it accessible for many. While it’s a sweet treat, the portion size and moistness help satisfy cravings without overdoing it. I find it a great dessert to share, especially when you want something colorful and fun but not overly rich.
From a wellness perspective, I like that it uses simple pantry staples and avoids complicated frosting or heavy buttercream, making it a lighter, joyful dessert option.
Conclusion
This irresistible rainbow poke cake is truly a delightful mix of moist texture, colorful fun, and delicious flavor. It’s one of those recipes that brings a smile to everyone’s face, no matter the occasion. I love how easy it is to make yet feels special enough for celebrations.
Feel free to tweak the colors, pudding flavors, or toppings to match your mood or event. Baking this cake has become a happy ritual for me, and I hope it becomes one for you too.
If you try this recipe, please leave a comment or share how you made it your own—I love hearing your stories and tips! Remember, baking should be fun, colorful, and a little bit magical. Happy baking!
FAQs
What is a poke cake?
A poke cake is a baked cake where you poke holes after baking, then pour pudding, gelatin, or another filling over it. The filling seeps into the holes, making the cake extra moist and flavorful.
Can I use homemade cake batter instead of boxed mix?
Yes! Homemade white cake batter works great. Just make sure it’s thick enough to hold the colors and bake evenly.
How do I make sure the pudding fills the holes well?
Poke the holes while the cake is still warm and use a spoon or spatula to spread the pudding evenly over the surface, letting it seep in naturally.
Can I make this cake ahead of time?
Absolutely. In fact, chilling it overnight helps the pudding soak in better and enhances the flavor and moisture.
What if I don’t have all the food coloring colors?
No problem! Use whatever colors you have, or even create a pastel version by using less coloring. The cake will still be delicious and fun.
Pin This Recipe!
Rainbow Poke Cake

A moist, colorful, and easy-to-make poke cake featuring vibrant rainbow layers soaked in creamy vanilla pudding and topped with whipped topping and sprinkles. Perfect for celebrations and crowd-pleasing dessert.
- Prep Time: 15 minutes
- Cook Time: 35-40 minutes
- Total Time: 2 hours 50 minutes
- Yield: 12 servings 1x
- Category: Dessert
- Cuisine: American
Ingredients
- Boxed white cake mix (about 15.25 oz / 432 g)
- 3 large eggs, room temperature
- 1 cup (240 ml) water
- 1/3 cup (80 ml) vegetable oil
- 1 package instant vanilla pudding mix (3.4 oz / 96 g)
- 2 cups (480 ml) cold milk
- Food coloring gels (red, orange, yellow, green, blue, purple)
- 8 oz (227 g) whipped topping, thawed
- Rainbow sprinkles (optional, about 1/2 cup / 60 g)
Instructions
- Preheat your oven to 350°F (175°C). Grease a 9×13-inch baking pan lightly with butter or nonstick spray.
- In a large bowl, combine the boxed white cake mix, 3 large eggs, 1 cup water, and 1/3 cup vegetable oil. Use a hand mixer on medium speed for about 2 minutes until smooth and lump-free.
- Divide the batter evenly into six smaller bowls, about 1 cup of batter per bowl.
- Add a different food coloring gel to each bowl: red, orange, yellow, green, blue, and purple. Stir gently until evenly mixed.
- Layer the colored batters in the pan by spooning about 1/3 cup of red batter into the center, then orange on top of red, yellow on orange, green on yellow, blue on green, and purple on top. The batter will spread out creating concentric circles.
- Bake for 35 to 40 minutes. Check doneness by inserting a toothpick into the center; it should come out clean or with a few moist crumbs.
- While the cake bakes, whisk together the instant vanilla pudding mix and 2 cups cold milk in a medium bowl for about 2 minutes until thickened. Chill in the fridge until ready to use.
- Let the cake cool for 10 minutes after baking. Using a wooden skewer or the handle of a wooden spoon, poke holes all over the cake about 1 inch apart.
- Pour the prepared pudding evenly over the cake, spreading gently with a spatula to cover the surface and fill the holes.
- Refrigerate the cake for at least 2 hours to allow the pudding to soak in fully.
- Before serving, spread the whipped topping evenly over the cake and sprinkle with rainbow sprinkles if desired.
- Slice and serve chilled.
Notes
[‘Do not overmix the batter to avoid dense cake.’, ‘Use gel food coloring for vibrant colors without thinning the batter.’, ‘Poke holes while the cake is still warm for best pudding absorption.’, ‘Chill the cake for at least 2 hours or overnight for best flavor and moistness.’, ‘Use a toothpick to test cake doneness instead of relying solely on baking time.’, ‘Spreading pudding gently helps avoid breaking the cake.’, ‘For gluten-free or dairy-free versions, substitute cake mix, milk, pudding, and whipped topping accordingly.’]
Nutrition
- Serving Size: 1 slice (1/12th of c
- Calories: 280
- Fat: 10
- Carbohydrates: 40
- Protein: 4
Keywords: rainbow poke cake, poke cake, colorful dessert, easy cake recipe, moist cake, birthday cake, party dessert