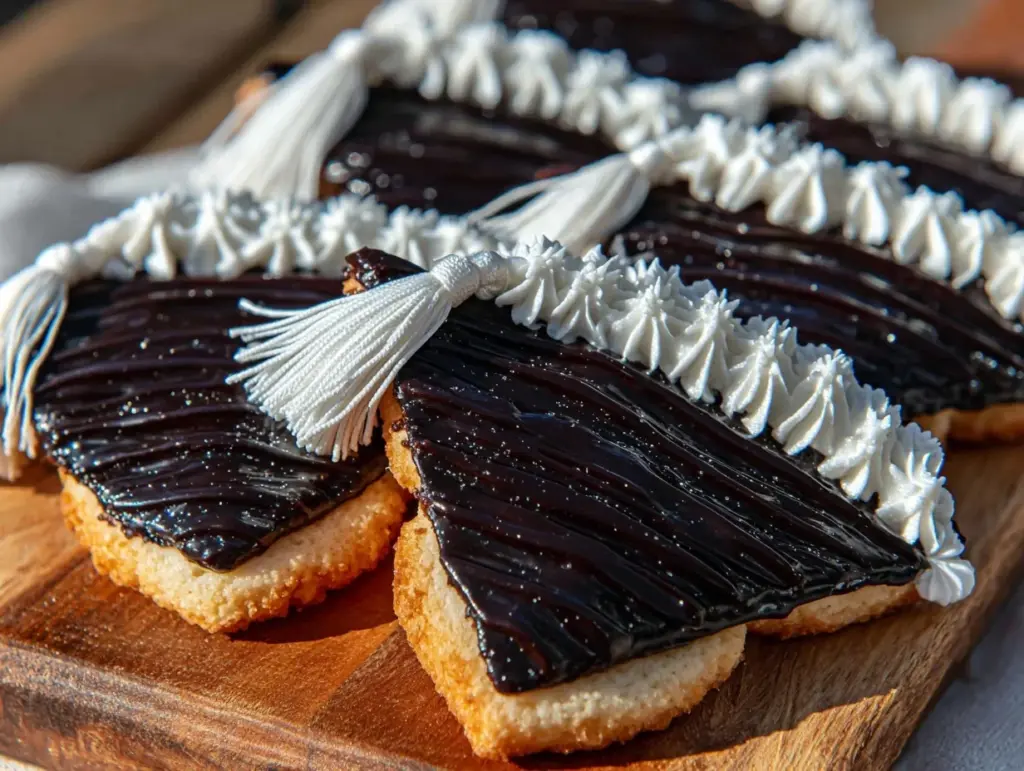
“You seriously think we can pull off those fancy graduation cap cookies in one afternoon?” my sister texted, skepticism dripping through her words. I was knee-deep in flour and frosting, half-hoping the royal icing wouldn’t turn into a disaster. Honestly, I wasn’t sure either; I’m not really a baker, and decorating cookies always felt a little out of my league. But with a graduation party looming, I needed something special yet doable—something that screamed celebration without requiring a pastry degree.
As the afternoon sun filtered through the kitchen window, the scent of vanilla sugar dough filled the air. My niece bounced excitedly nearby, occasionally sneaking a little dough ball when she thought I wasn’t looking. The royal icing, once intimidating, became a playful canvas, and before long, those little graduation caps started to look less like a Pinterest fail and more like the stars of the party. It was a bit messy, sure, but that’s the charm—perfectly imperfect and utterly festive.
What stuck with me after that day wasn’t just the cookies themselves, but how easy and satisfying the whole process was. These weren’t just any sugar cookies; they were a sweet nod to achievement, tied up with a bow of royal icing that anyone could master. It’s the kind of recipe that sits comfortably between simple and special, making every bite feel like a small celebration.
So if you’re looking for a treat that’s festive, fun, and surprisingly straightforward, these Easy Festive Graduation Cap Sugar Cookies with Royal Icing might just be your next go-to. Trust me—once you try them, you’ll understand why they’ve become a little tradition around here.
Why You’ll Love This Recipe
After making these sugar cookies a handful of times, I can confidently say this recipe hits the sweet spot for any graduation celebration. Here’s why it deserves a spot in your recipe box:
- Quick & Easy: From dough to decorated cookie, you can wrap this up in about 2 hours, including drying time. Perfect for last-minute party prep or casual weekend baking.
- Simple Ingredients: No need for specialty stores—most items are pantry staples like butter, sugar, and eggs. I usually grab King Arthur flour for consistent results.
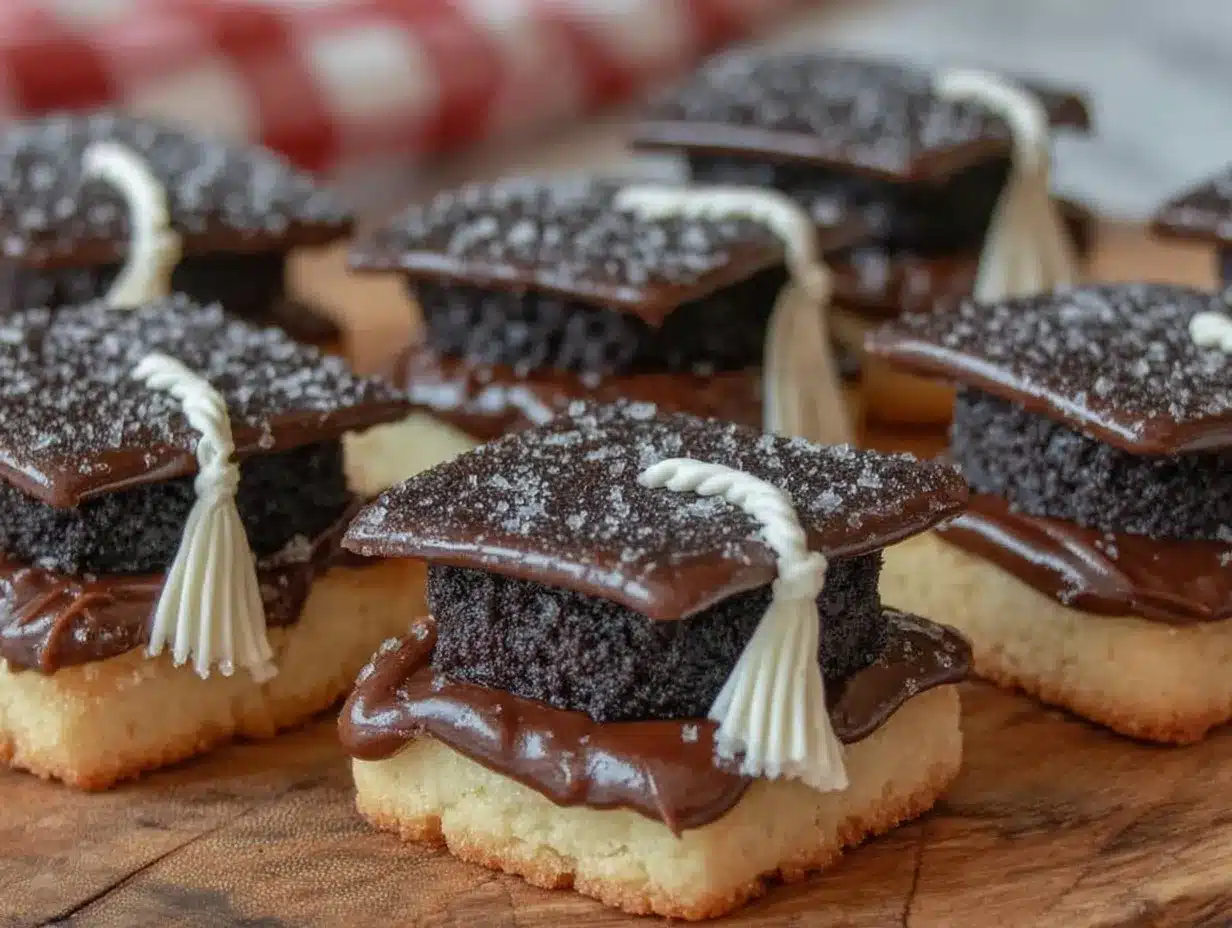
- Perfect for Graduation Parties: The cookie shape and royal icing design scream celebration without being over the top, making them great for showers, parties, or gifts.
- Crowd-Pleaser: Kids and adults alike love these. The buttery, tender cookie with smooth royal icing hits that nostalgic sweet spot.
- Unbelievably Delicious: Unlike some sugar cookies that can be dry or crumbly, these stay soft yet hold their shape beautifully, thanks to precise chilling and baking.
This isn’t just another sugar cookie recipe; the trick lies in the royal icing consistency and a slightly tangy twist in the dough that balances the sweetness. Plus, decorating these caps is a low-pressure way to get creative without needing professional skills—honestly, it’s more fun than stressful!
And if you want to mix up your dessert table, pairing these with savory bites like crispy ham and cheese sticks makes for a perfect balance of flavors and textures at any gathering.
What Ingredients You Will Need
This recipe calls for straightforward ingredients that come together to create a cookie that’s both tender and sturdy enough for royal icing decoration. Here’s the breakdown:
- For the Sugar Cookie Dough:
- 2 ¾ cups (345g) all-purpose flour (I prefer King Arthur for consistent texture)
- 1 teaspoon baking powder
- ½ teaspoon salt
- 1 cup (227g) unsalted butter, softened (room temperature for easy creaming)
- 1 ½ cups (300g) granulated sugar
- 1 large egg, room temperature
- 1 teaspoon pure vanilla extract (the aroma here really makes a difference)
- 1 tablespoon sour cream or Greek yogurt (adds slight tang and softness)
- For the Royal Icing:
- 3 cups (360g) powdered sugar, sifted
- 2 tablespoons meringue powder (available in baking aisles, essential for stability)
- 4 to 5 tablespoons warm water (adjust for icing consistency)
- Gel food coloring (black and gold recommended for that classic graduation look)
- Optional: edible gold glitter or sprinkles for a festive touch
Don’t sweat it if you can’t find meringue powder—some folks swap it with egg whites, but meringue powder is safer and easier to work with, especially if kids are helping. For a gluten-free twist, almond flour can replace some of the all-purpose flour, but expect a slightly different texture.
Seasonal substitutions? Not so much here—it’s pretty much a year-round favorite. But if you want to add a little flair, try incorporating a teaspoon of cinnamon or orange zest into the dough for a subtle twist.
Equipment Needed
To make these graduation cap sugar cookies, here’s what you’ll want on hand:
- Mixing bowls (medium and large)
- Electric mixer (handheld or stand mixer makes creaming butter and sugar much easier)
- Measuring cups and spoons (accuracy is key!)
- Rolling pin (a non-stick or lightly floured surface works best)
- Graduation cap cookie cutter (if you can’t find one, a square cutter plus a small triangle for the tassel does the trick)
- Baking sheets lined with parchment paper or silicone baking mats
- Cooling racks (to keep cookies crisp and help icing dry evenly)
- Plastic squeeze bottles or piping bags with small round tips for royal icing application
- Small bowls for mixing colors
If you don’t have a cookie cutter shaped like a graduation cap, I once used a sharp knife to freehand the shape with decent results—it’s all about the fun rather than perfection! For piping, disposable piping bags are budget-friendly and easy to clean up, but if you bake often, investing in reusable silicone bags is worth it.
Preparation Method
- Mix Dry Ingredients: In a medium bowl, whisk together 2 ¾ cups (345g) all-purpose flour, 1 teaspoon baking powder, and ½ teaspoon salt. Set aside.
- Cream Butter and Sugar: Using an electric mixer, beat 1 cup (227g) softened unsalted butter with 1 ½ cups (300g) granulated sugar on medium speed until light and fluffy—about 3-4 minutes. This step is crucial for tender cookies.
- Add Egg and Flavor: Beat in 1 large room temperature egg, 1 teaspoon vanilla extract, and 1 tablespoon sour cream or Greek yogurt until just combined.
- Combine Wet and Dry: Gradually add the flour mixture to the wet ingredients, mixing on low speed. Scrape down the bowl as needed. The dough should come together without being sticky.
- Chill the Dough: Shape dough into two discs, wrap tightly in plastic wrap, and refrigerate for at least 1 hour (or up to overnight). This step prevents spreading and makes rolling easier.
- Preheat Oven: Set your oven to 350°F (175°C) about 15 minutes before baking.
- Roll and Cut: On a lightly floured surface, roll out one disc of dough to about ¼ inch (6 mm) thickness. Use your graduation cap cookie cutter to cut shapes, then transfer carefully to lined baking sheets, spacing about 1 inch (2.5 cm) apart.
- Bake: Bake cookies for 8-10 minutes or until edges just start to turn golden. Avoid overbaking to keep them soft.
- Cool: Let cookies cool on the baking sheet for 5 minutes, then transfer to wire racks to cool completely before decorating.
- Prepare Royal Icing: In a bowl, combine 3 cups (360g) sifted powdered sugar and 2 tablespoons meringue powder. Add 4 tablespoons warm water and beat until stiff peaks form, about 5-7 minutes. Adjust consistency with more water or sugar for piping or flooding.
- Color and Decorate: Divide icing into small bowls. Tint with gel colors—use black for the cap, gold for the tassel. Pipe outlines first, then flood the areas. Use a toothpick to spread icing evenly and pop air bubbles.
- Dry: Allow decorated cookies to dry at room temperature for at least 4 hours or overnight for the best finish.
If your icing is too thick, add water a teaspoon at a time. Too thin? Add powdered sugar gradually. A quick tip: store royal icing in an airtight container with plastic wrap pressed on the surface to prevent crusting if you’re decorating over multiple days.
Cooking Tips & Techniques
Getting royal icing just right can feel tricky, but here’s what I’ve learned from my trial-and-error baking days:
- Chill the Dough: Don’t skip chilling. It’s the secret to clean shapes and minimal spreading. I once tried skipping this step, and my caps looked more like blobs!
- Consistent Dough Thickness: Use rolling pin guides or thickness rings to keep cookies uniform. Otherwise, some will bake faster and others remain underdone.
- Royal Icing Stiffness: For outlining, keep icing stiff enough to hold shape. For flooding, thin it to a syrupy consistency that levels out smoothly.
- Practice Piping: Before decorating cookies, test your icing flow on parchment paper. It saves a lot of frustration.
- Patience with Drying: Let icing dry completely before stacking or packaging. Otherwise, you’ll end up with smudges or broken decorations.
- Multitasking: While cookies bake or chill, prep your icing colors or clean up for a smoother workflow.
One time, I rushed the drying step, and the tassels smeared terribly—lesson learned! With these tips, your cookie decorating will feel less like a high-stress art project and more like a joyful craft session.
Variations & Adaptations
Want to put a personal spin on these festive cookies? Here are some ideas I’ve tried or that work well:
- Flavor Variations: Add almond extract instead of vanilla for a delicate nutty aroma. Or stir in a tablespoon of cocoa powder for chocolate sugar cookies.
- Dietary Adaptations: Use gluten-free all-purpose flour blends and replace butter with vegan margarine for dairy-free versions. The texture may vary slightly but still works beautifully.
- Alternative Decorations: Instead of royal icing, try a colored glaze made with powdered sugar and milk. It’s quicker but less sturdy. Or use edible markers to draw cap details for a low-effort approach.
- Seasonal Flavors: For a spring graduation, add a hint of lemon zest to the dough for brightness. In fall, a sprinkle of cinnamon or nutmeg feels cozy.
- Different Shapes: If graduation caps aren’t your style, these dough and icing techniques work great with stars, diplomas, or even simple circles.
Personally, I once swapped the gold tassel for a bright school color using colored sanding sugar, which added a fun sparkle kids loved. Feel free to get creative and make these cookies your own!
Serving & Storage Suggestions
These sugar cookies shine best when served at room temperature. I usually arrange them on a festive platter with some fresh fruit or pair them alongside a batch of fresh southwest chipotle salad to balance the sweet with something savory and crisp.
To store, place cookies in a single layer in an airtight container. They keep well at room temperature for up to 5 days. For longer storage, freeze undecorated cookies wrapped tightly in plastic wrap; thaw and decorate when ready.
If you’ve already decorated, store in a dry, cool spot—not the fridge—to avoid condensation that can ruin the icing. When reheating, avoid the microwave; instead, let cookies come to room temp naturally to keep texture intact.
Over time, the flavors meld beautifully—the vanilla deepens, and the cookie softens just enough without losing structure. Honestly, sometimes I prefer them a day old!
Nutritional Information & Benefits
While these cookies are an indulgence, they’re made with real ingredients and no preservatives. Here’s a rough estimate per cookie (based on 24 cookies):
| Nutrient | Amount |
|---|---|
| Calories | 130 kcal |
| Fat | 6g (3.5g saturated) |
| Carbohydrates | 18g |
| Sugar | 11g |
| Protein | 1g |
The butter provides some healthy fats, and the egg adds a bit of protein. Using sour cream or Greek yogurt in the dough adds moisture and a subtle tang, which helps reduce the need for extra sugar.
Keep in mind these cookies contain gluten, dairy, and eggs, so they’re not suitable for those with those allergies unless adapted.
From a wellness standpoint, I find them a lovely treat to enjoy mindfully during celebrations, balancing joy with moderation.
Conclusion
Easy Festive Graduation Cap Sugar Cookies with Royal Icing are more than just pretty party favors—they’re a delicious way to mark milestones with something homemade and heartfelt. The recipe is approachable, flexible, and reliably tasty.
Whether you stick to the classic black and gold or add your own creative twist, these cookies invite you to celebrate with flavor and fun. I love how they bring everyone around the table together, sharing smiles over a sweet treat that looks impressive without fuss.
Feel free to experiment with colors, flavors, or shapes to make your version unique. And hey, if you want another cookie recipe that’s soft and dreamy, the soft sugar cookies with creamy icing are a perfect follow-up to try.
Happy baking, and here’s to sweet celebrations worth savoring!
FAQs
Can I make the dough ahead of time?
Absolutely! The dough can be wrapped and refrigerated for up to 3 days or frozen for up to 3 months. Just thaw before rolling and cutting.
How long does royal icing take to dry?
Royal icing usually dries to the touch in about 2 hours, but for best results and to avoid smudging, let it dry overnight.
What if I don’t have a graduation cap cookie cutter?
No worries! Use a square cookie cutter and a small triangle cutter to assemble a cap shape, or cut freehand with a knife.
Can I use regular food coloring instead of gel?
Gel food coloring is best because it doesn’t thin the icing, but in a pinch, you can use regular coloring—just add sparingly.
How do I store decorated cookies without ruining the icing?
Store in an airtight container at room temperature. Avoid stacking or refrigerating to keep icing intact.
Pin This Recipe!

Easy Festive Graduation Cap Sugar Cookies Recipe with Royal Icing Tutorial

These festive graduation cap sugar cookies are quick and easy to make, featuring a tender sugar cookie base decorated with smooth royal icing. Perfect for graduation parties, they combine simple ingredients with a fun decorating process suitable for all skill levels.
- Prep Time: 30 minutes
- Cook Time: 10 minutes
- Total Time: 2 hours
- Yield: 24 cookies 1x
- Category: Dessert
- Cuisine: American
Ingredients
- 2 ¾ cups (345g) all-purpose flour
- 1 teaspoon baking powder
- ½ teaspoon salt
- 1 cup (227g) unsalted butter, softened
- 1 ½ cups (300g) granulated sugar
- 1 large egg, room temperature
- 1 teaspoon pure vanilla extract
- 1 tablespoon sour cream or Greek yogurt
- 3 cups (360g) powdered sugar, sifted
- 2 tablespoons meringue powder
- 4 to 5 tablespoons warm water
- Gel food coloring (black and gold recommended)
- Optional: edible gold glitter or sprinkles
Instructions
- Mix dry ingredients: In a medium bowl, whisk together flour, baking powder, and salt. Set aside.
- Cream butter and sugar: Using an electric mixer, beat softened butter with granulated sugar on medium speed until light and fluffy, about 3-4 minutes.
- Add egg and flavor: Beat in egg, vanilla extract, and sour cream or Greek yogurt until just combined.
- Combine wet and dry: Gradually add the flour mixture to the wet ingredients, mixing on low speed until dough comes together without being sticky.
- Chill the dough: Shape dough into two discs, wrap tightly in plastic wrap, and refrigerate for at least 1 hour or up to overnight.
- Preheat oven to 350°F (175°C).
- Roll and cut: On a lightly floured surface, roll out one disc of dough to about ¼ inch (6 mm) thickness. Use a graduation cap cookie cutter to cut shapes and transfer to lined baking sheets, spacing about 1 inch apart.
- Bake cookies for 8-10 minutes or until edges just start to turn golden. Avoid overbaking to keep them soft.
- Cool cookies on baking sheet for 5 minutes, then transfer to wire racks to cool completely before decorating.
- Prepare royal icing: In a bowl, combine powdered sugar and meringue powder. Add 4 tablespoons warm water and beat until stiff peaks form, about 5-7 minutes. Adjust consistency with more water or sugar as needed.
- Color and decorate: Divide icing into small bowls. Tint with gel colors—black for the cap, gold for the tassel. Pipe outlines first, then flood areas. Use a toothpick to spread icing evenly and pop air bubbles.
- Dry decorated cookies at room temperature for at least 4 hours or overnight for best finish.
Notes
Chill the dough to prevent spreading and ensure clean shapes. Adjust royal icing consistency for outlining (stiff) and flooding (thin). Let icing dry completely before stacking or packaging to avoid smudges. Dough can be refrigerated up to 3 days or frozen up to 3 months. Use gel food coloring for best results. Store decorated cookies in an airtight container at room temperature, avoid refrigeration to protect icing.
Nutrition
- Serving Size: 1 cookie
- Calories: 130
- Sugar: 11
- Fat: 6
- Saturated Fat: 3.5
- Carbohydrates: 18
- Protein: 1
Keywords: graduation cookies, sugar cookies, royal icing, festive cookies, easy cookie recipe, party cookies, decorated cookies


