“Hey, you brought the dessert, right?” That text popped up just as I was about to sigh and admit defeat after a whirlwind day of errands and last-minute party prep. Honestly, I wasn’t sure what would even pass muster after such a chaotic afternoon. But then, I remembered this quick, no-bake gem I’d stumbled on one lazy Sunday while fiddling around with some leftover Oreos and cream cheese. The result? A stunning red velvet Oreo Patriotic Icebox Cake that somehow stole the show—and my skepticism—at the 4th of July barbecue.
It wasn’t meant to be fancy. I was just trying to whip up something easy, festive, and cool—because let’s face it, summer heat and turning on the oven don’t mix well. What made it stick wasn’t just the vibrant red velvet layers or the crunch of those classic Oreos, but the way it gathered everyone around the table, sparking smiles and second helpings. It’s become my go-to for celebrations where you want a crowd-pleaser that’s effortless but still feels special.
That night, as we cracked open a few cold drinks and the cake started disappearing slice by slice, I realized this recipe was more than just a quick fix. It’s one of those treats that quietly promises a little joy, a touch of nostalgia, and a burst of flavor without the fuss. If you’ve ever wrestled with what to bring to a party or needed a showstopper that doesn’t demand hours in the kitchen, this red velvet Oreo icebox cake might just become your secret weapon, too.
Why You’ll Love This Recipe
After testing this red velvet Oreo icebox cake several times (okay, maybe more than several), I can say with confidence it’s one of the easiest festive desserts you’ll make—and it doesn’t skimp on wow factor. Here’s why it’s a winner:
- Quick & Easy: Assembles in about 20 minutes, then just chill. Perfect for those days when you want a celebration-ready dessert fast.
- Simple Ingredients: No obscure items here. You probably have most of these in your pantry or fridge—Oreos, cream cheese, whipped topping, and red velvet cake mix.
- Perfect for Patriotic Celebrations: The red, white, and blue theme is spot on for Independence Day or any summer gathering where you want to impress without stress.
- Crowd-Pleaser: Kids love it, adults can’t get enough, and it’s always the first to vanish from the dessert table.
- Unbelievably Delicious: The creamy layers paired with crunchy Oreos and that subtle cocoa kick from the red velvet make for a flavor and texture combo that feels like pure indulgence.
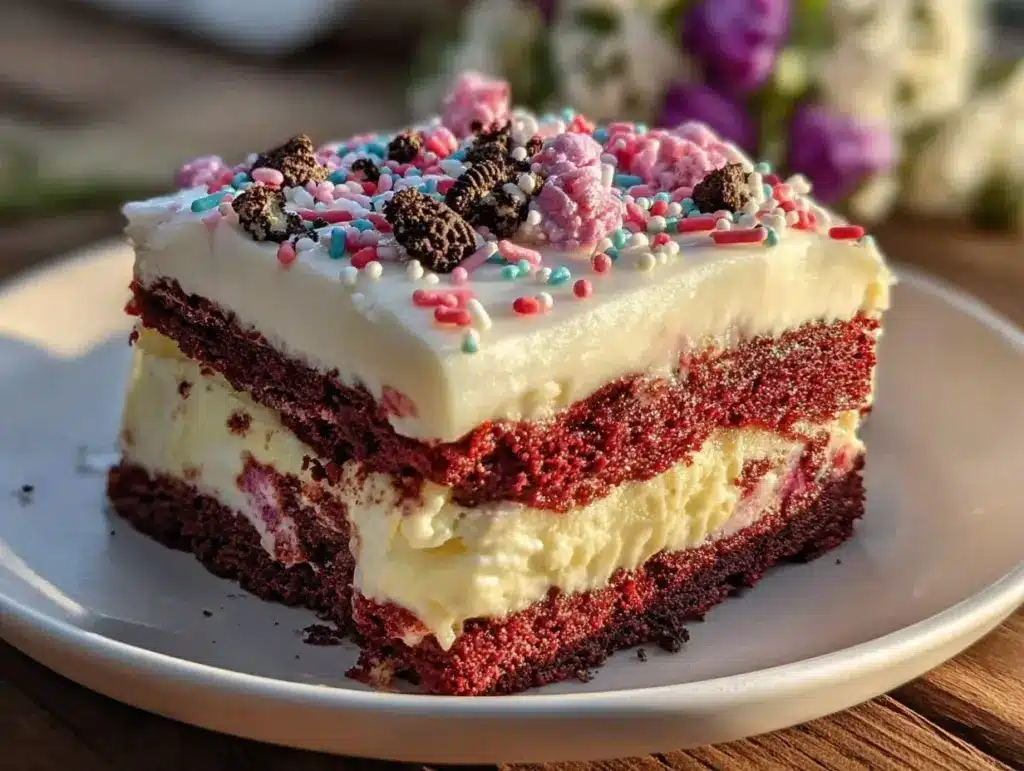
What sets this icebox cake apart is the unique layering of crushed Red Velvet Oreos with a velvety cream cheese whipped filling that’s lightly sweetened and smooth. I’ve tried other icebox cakes, but this one nails the balance between creamy, crunchy, and festive. Plus, there’s no baking involved beyond the cake mix for the crumbs, so it’s a dream when the oven is off-limits.
Honestly, this cake is like comfort food’s fun cousin—familiar, approachable, but with a fun, celebratory twist. It’s the kind of recipe I trust to bring smiles and keep things easy, whether it’s the neighborhood potluck or a spontaneous backyard bash.
What Ingredients You Will Need
This recipe uses straightforward, pantry-friendly ingredients to deliver a festive and flavorful icebox cake without complicated prep. Most components are staples or easy to find, making this a breeze to pull together.
- Red Velvet Oreos: About 2 packs (15.25 oz / 432 g each). These are the star here for that vibrant color and signature cocoa flavor. If you can’t find the red velvet version, regular Oreos work, but the theme won’t be the same.
- Cream Cheese: 8 oz (225 g), softened. I recommend using full-fat cream cheese for the richest texture—Philadelphia brand is my go-to for consistency.
- Heavy Whipping Cream: 1 cup (240 ml), cold. For whipping to fluffy perfection. You can substitute with chilled coconut cream for a dairy-free option.
- Powdered Sugar: ¾ cup (90 g). Adds the right touch of sweetness without graininess.
- Vanilla Extract: 1 teaspoon (5 ml). A little flavor booster that ties the cream layers together.
- Red Food Coloring (optional): Just a few drops if you want extra pop in your cream layers, but the Oreos usually provide enough color.
- Fresh Blueberries and Strawberries: For garnish and patriotic flair. About 1 cup (150 g) sliced strawberries and ½ cup (75 g) blueberries.
If you want to switch things up, crushed graham crackers or chocolate wafer cookies work well in place of Oreos for a different texture and taste. And if you’re aiming for a lighter version, swapping heavy cream for Greek yogurt can work but expect a less fluffy finish.
Equipment Needed
- Mixing Bowls: One large for the cream cheese and another for whipping cream. Glass or metal bowls chill better if you refrigerate them before use.
- Electric Mixer: A handheld or stand mixer makes whipping the cream and beating the cream cheese smooth much faster and easier.
- Spatula: For folding the whipped cream into the cream cheese mixture gently without losing volume.
- 9×13-inch (23×33 cm) Glass or Ceramic Baking Dish: Ideal for layering the cake. Glass helps you see the layers, which is a neat touch for serving.
- Food Processor or Plastic Bag and Rolling Pin: To crush the Oreos finely and evenly.
- Measuring Cups and Spoons: For precise ingredient amounts.
Don’t have a food processor? No worries — just toss the Oreos in a sturdy plastic bag and crush them with a rolling pin or even the bottom of a heavy pan. It’s a little less uniform, but honestly, that rustic charm works perfectly here.
Preparation Method

- Prepare the Oreo crumbs: Place the Red Velvet Oreos in a food processor and pulse until finely crushed. If you don’t have one, place Oreos in a zip-top bag and gently crush with a rolling pin until you get fine crumbs. Set aside about 1 cup (100 g) of crumbs for topping later.
- Make the cream filling: In a large bowl, beat the softened cream cheese with ¾ cup (90 g) powdered sugar and 1 teaspoon (5 ml) vanilla extract until smooth and creamy—about 2-3 minutes with an electric mixer.
- Whip the heavy cream: In a chilled bowl, whip the cold heavy cream until stiff peaks form. This usually takes 3-5 minutes on medium-high speed. Be careful not to overbeat or it will start turning into butter.
- Combine the cream cheese mixture and whipped cream: Gently fold the whipped cream into the cream cheese mixture using a spatula. Use slow, sweeping motions to keep the mixture light and airy without deflating the whipped cream.
- Assemble the cake: Spread a thin layer of the cream filling on the bottom of the 9×13-inch (23×33 cm) dish. Sprinkle a layer of Oreo crumbs evenly over the cream. Repeat layers—cream, then crumbs—until you use all the cream and most of the crumbs, reserving some crumbs for the top.
- Chill and garnish: Cover the cake with plastic wrap and refrigerate for at least 4 hours, preferably overnight. This resting time allows the crumbs to soften slightly and the flavors to meld. Just before serving, top with the reserved Oreo crumbs and fresh blueberries and strawberry slices arranged to mimic the patriotic theme.
If your cream looks too thick or stiff at any point, a quick whisk with a splash of milk can loosen it gently. And the smell? The sweet cocoa from the Oreos mixing with the vanilla cream is probably the best tease before you even get to taste it.
Cooking Tips & Techniques
Getting the right texture for this icebox cake is mostly about handling the cream layers with care. Here are a few things I learned the hard way:
- Don’t rush the chilling: The magic happens while the cake rests. The crumbs soften and absorb moisture, turning into a cake-like texture. Cutting into it too soon will give you a crumbly mess.
- Beat cream cheese smooth: Cream cheese can be stubborn if cold, so make sure it’s softened to room temperature. Otherwise, you’ll end up with lumps in your cream filling.
- Whip cream to stiff peaks: Soft peaks won’t give the filling enough body, but overwhipping can cause graininess or butter formation. Keep a close eye and stop when peaks stand straight up without drooping.
- Fold gently: When mixing whipped cream into cream cheese, fold slowly and carefully to keep it light and fluffy. Vigorous stirring deflates the air you just whipped in.
- Crush Oreos evenly: Fine crumbs layer better and make the cake easier to slice neatly. Coarse chunks can cause uneven texture and messy serving.
Out of impatience, I once skipped chilling overnight and ended up with a sad, crumbly scoop rather than a slice. Lesson learned! Also, if you want to prep early, this cake keeps well in the fridge for up to 3 days, so it’s great for planning ahead.
Variations & Adaptations
Feel free to tweak this red velvet Oreo icebox cake to suit your tastes or dietary needs. Here are some ideas I’ve tried or thought about:
- Gluten-Free Version: Use gluten-free Oreos and make sure your powdered sugar is gluten-free certified. The texture stays just as dreamy.
- Berry Swap: Instead of strawberries and blueberries, try fresh raspberries or blackberries for a different tartness that pairs well with the sweet cream.
- Chocolate Lover’s Twist: Add a layer of chocolate ganache between the cream and Oreo crumbs or mix cocoa powder into the cream cheese filling for a richer chocolate flavor.
- Dairy-Free Alternative: Substitute cream cheese with dairy-free cream cheese and use coconut whipped topping instead of heavy cream. The taste is slightly different but still delicious.
- Patriotic Layers: Make distinct red (using food coloring), white (plain cream), and blue (mix in a few mashed blueberries) cream layers for a more visual patriotic effect.
One time, I swapped in the cream cheese filling from my favorite pumpkin pie bars recipe just for fun—it was surprisingly good and added a hint of spice that worked well for a fall twist on this classic.
Serving & Storage Suggestions
This icebox cake is best served chilled, straight from the fridge. The cool cream and softened Oreos make it refreshing, especially on hot days. Slice with a sharp knife dipped in warm water for clean edges.
For a festive presentation, arrange fresh berries in flag-inspired patterns or scatter edible silver stars on top. Pair it with a cold glass of milk, iced coffee, or a sparkling lemonade for a truly summery vibe.
Store leftovers covered tightly with plastic wrap or in an airtight container in the refrigerator. It keeps well for up to 3 days, and flavors actually deepen after a day or two. Avoid freezing as the texture of the cream filling can change and separate upon thawing.
Nutritional Information & Benefits
Estimated per serving (based on 12 servings): approximately 320 calories, 20g fat, 32g carbohydrates, 3g protein. This dessert is rich and indulgent, so best enjoyed in moderation.
Key ingredients like cream cheese provide calcium and protein, while the berries add antioxidants and a burst of vitamin C. If you’re looking for a dessert that feels celebratory but still offers some nutritional perks, the fresh fruit garnish helps balance the richness.
This cake is naturally gluten-free if you choose gluten-free Oreos, and can be adapted for dairy-free diets as mentioned. It’s a festive treat that fits many occasions without complicated dietary hurdles.
Conclusion
This Favorite Red Velvet Oreo Patriotic Icebox Cake has become my reliable party dessert for a reason—it’s simple, stunning, and seriously delicious. Whether you’re juggling last-minute plans or want to impress without stress, this recipe has your back. The mix of creamy, crunchy, and festive colors is just right for celebrations that call for a sweet touch.
I love how this recipe invites customization, so you can tweak it to suit your crowd or mood. Plus, it pairs wonderfully with easy savory bites like crispy ham and cheese sticks or a fresh, zesty salad like the fresh southwest chipotle salad to round out your celebration menu.
Give it a try and let me know how it turns out in your kitchen. I’d love to hear your favorite tweaks or stories from your own celebrations. Here’s to sweet moments and simple joys!
FAQs
Can I make this icebox cake ahead of time?
Yes! It actually tastes better after chilling overnight, which allows the flavors to meld and the texture to soften perfectly.
What if I can’t find Red Velvet Oreos?
Regular Oreos work fine, but you can also use chocolate wafer cookies or graham crackers for a different texture and flavor.
Can I make this cake dairy-free?
Absolutely. Use dairy-free cream cheese and coconut whipped topping instead of heavy cream for a tasty alternative.
How do I get clean slices when serving?
Dip your knife in hot water and wipe it dry before slicing. This helps cut through the creamy layers smoothly without squishing.
Is this recipe gluten-free?
It can be, if you use gluten-free Oreos or substitute with gluten-free cookies. Always double-check labels to be sure.
Pin This Recipe!

Favorite Red Velvet Oreo Icebox Cake Recipe

A quick, no-bake red velvet Oreo icebox cake perfect for patriotic celebrations, combining creamy layers with crunchy Oreos for a festive and crowd-pleasing dessert.
- Prep Time: 20 minutes
- Cook Time: 0 minutes
- Total Time: 4 hours 20 minutes
- Yield: 12 servings 1x
- Category: Dessert
- Cuisine: American
Ingredients
- 2 packs Red Velvet Oreos (15.25 oz / 432 g each)
- 8 oz (225 g) cream cheese, softened
- 1 cup (240 ml) heavy whipping cream, cold
- 3/4 cup (90 g) powdered sugar
- 1 teaspoon (5 ml) vanilla extract
- Red food coloring (optional)
- 1 cup (150 g) sliced fresh strawberries
- 1/2 cup (75 g) fresh blueberries
Instructions
- Place the Red Velvet Oreos in a food processor and pulse until finely crushed. If you don’t have one, place Oreos in a zip-top bag and gently crush with a rolling pin until you get fine crumbs. Set aside about 1 cup (100 g) of crumbs for topping later.
- In a large bowl, beat the softened cream cheese with 3/4 cup (90 g) powdered sugar and 1 teaspoon (5 ml) vanilla extract until smooth and creamy—about 2-3 minutes with an electric mixer.
- In a chilled bowl, whip the cold heavy cream until stiff peaks form, about 3-5 minutes on medium-high speed. Be careful not to overbeat.
- Gently fold the whipped cream into the cream cheese mixture using a spatula with slow, sweeping motions to keep the mixture light and airy.
- Spread a thin layer of the cream filling on the bottom of a 9×13-inch (23×33 cm) dish. Sprinkle a layer of Oreo crumbs evenly over the cream. Repeat layers—cream, then crumbs—until all cream and most crumbs are used, reserving some crumbs for the top.
- Cover the cake with plastic wrap and refrigerate for at least 4 hours, preferably overnight. Just before serving, top with the reserved Oreo crumbs and fresh blueberries and strawberry slices arranged for a patriotic theme.
Notes
Do not rush chilling; the cake needs at least 4 hours to soften and meld flavors. Use softened cream cheese for smooth filling. Whip cream to stiff peaks but avoid overwhipping. Fold whipped cream gently to keep mixture airy. Crush Oreos finely for better layering and neat slices. For clean slices, dip knife in hot water and dry before cutting. Cake keeps well refrigerated up to 3 days; avoid freezing.
Nutrition
- Serving Size: 1 slice (1/12th of c
- Calories: 320
- Fat: 20
- Carbohydrates: 32
- Protein: 3
Keywords: red velvet, Oreo, icebox cake, no-bake dessert, patriotic dessert, 4th of July, easy dessert, crowd-pleaser


