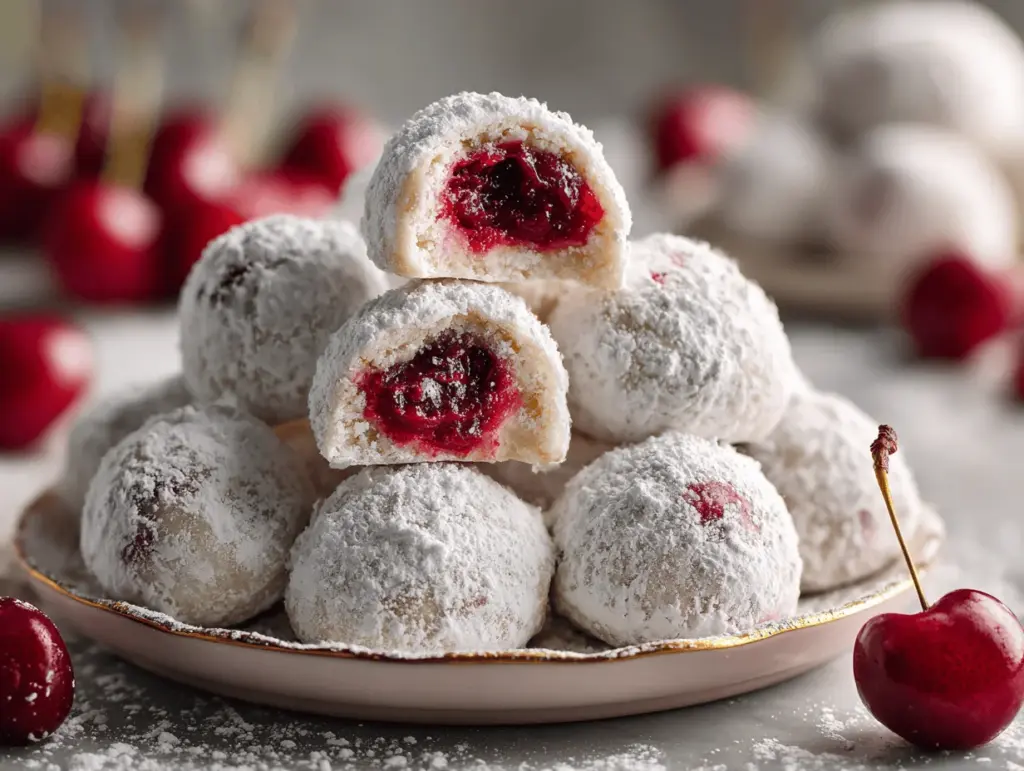
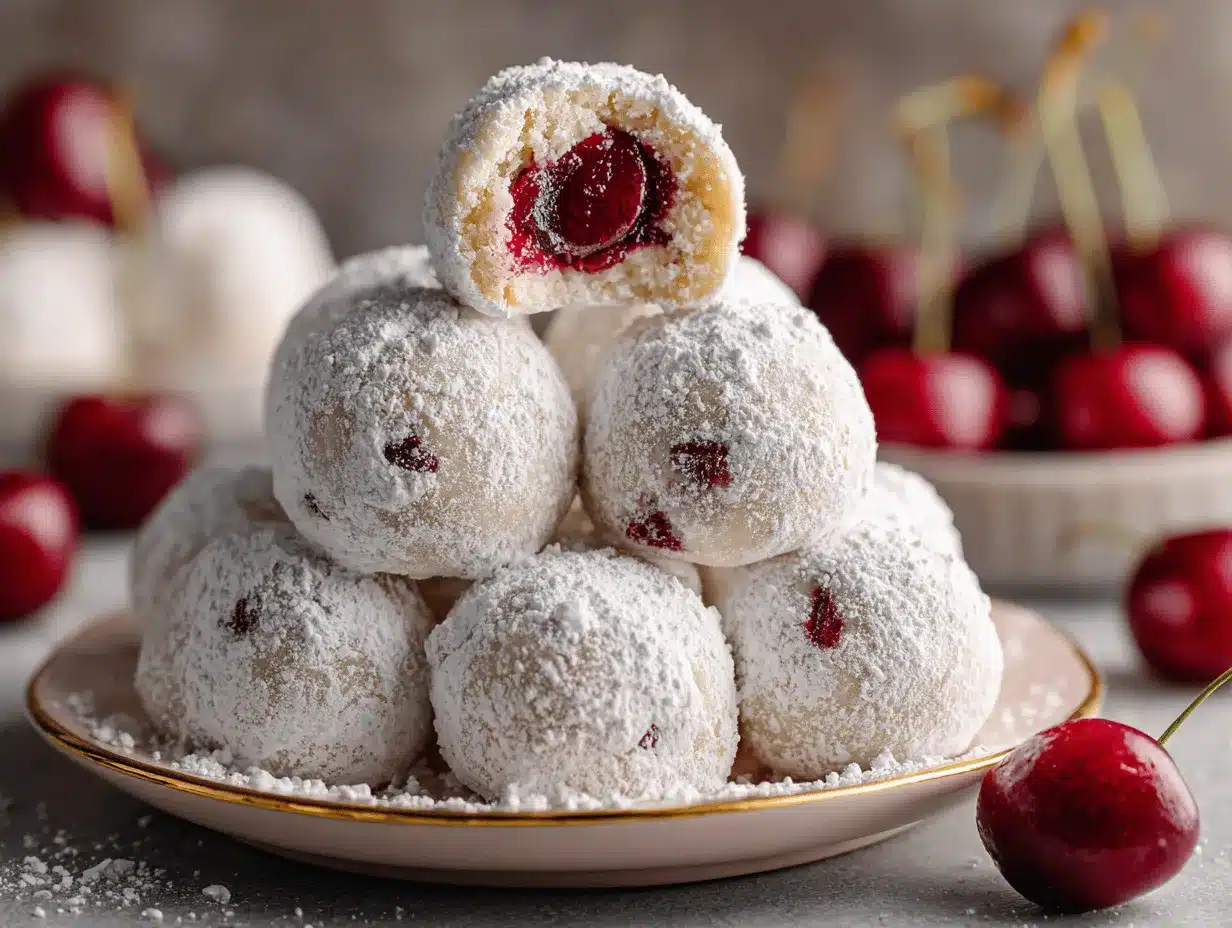
The first time I bit into a cherry snowball cookie, it was like a burst of winter magic—soft, buttery, and that cheerful pop of candied cherry in the center. You know that feeling when you’re wrapped in a cozy blanket, sipping cocoa, and holiday music is playing in the background? That’s exactly what these cherry snowball cookies taste like. Honestly, I stumbled onto this recipe during a family baking session—my grandma always added a secret ingredient (spoiler: it’s a dash of almond extract). And let me tell you, these cookies have become a non-negotiable part of our holiday dessert table ever since.
I’ve baked a lot of cookies over the years, but something about cherry snowball cookies keeps me coming back. Maybe it’s the way the powdered sugar clings to your fingers, or the surprise of a sweet, red cherry tucked inside. If you’re looking for a treat that’s both nostalgic and eye-catching (seriously, these are Pinterest-perfect), this is the recipe for you. Plus, they’re great for gifting, sharing at cookie swaps, or just making your own kitchen smell like a holiday wonderland. If you love easy recipes that look impressive, cherry snowball cookies absolutely fit the bill. Kids can help shape the dough, and they’re always wowed by the “hidden treasure” in the middle.
As someone who’s tested this recipe more times than I can count (and tweaked it until perfection), I can confidently say these cherry snowball cookies are foolproof. Whether you’re a seasoned baker or a total beginner, you’ll get gorgeous, melt-in-your-mouth results. And if you’re hunting for a festive, crowd-pleasing dessert for your next holiday gathering, trust me—these cookies will steal the show. Ready to make your kitchen smell like the holidays? Let’s get baking!
Why You’ll Love This Cherry Snowball Cookies Recipe
If you’re hunting for a cookie that checks all the boxes—beautiful, easy, nostalgic, and downright delicious—cherry snowball cookies are calling your name. I’ve baked these for everything from office potlucks to quiet December nights, and they never last long. Here’s why I keep coming back to this recipe (and why you will, too):
- Quick & Easy: You can whip up a batch in under an hour! No complicated steps or fancy gadgets required. Perfect for last-minute holiday baking or when you just need a sweet treat, fast.
- Simple Ingredients: Everything you need is probably already sitting in your pantry. Flour, butter, powdered sugar, and those bright red cherries—no hunting the grocery store for obscure items.
- Perfect for Gifting and Sharing: The cookies look like little snowballs, dusted with powdered sugar and hiding a cherry surprise. They’re adorable in holiday tins, and everyone loves getting homemade cookies.
- Crowd-Pleaser: Kids adore the sweetness and the fun of discovering a cherry inside. Grown-ups appreciate the buttery, melt-in-your-mouth texture (and honestly, they get gobbled up at every cookie exchange I’ve attended).
- Unbelievably Delicious: The combination of buttery shortbread, a hint of almond, and the juicy pop of cherry is pure comfort food. Close your eyes, take a bite, and you’re instantly in holiday heaven.
What sets my cherry snowball cookies apart? For starters, I blend the dough just until it comes together—no over-mixing—which keeps the cookies tender and light. I also chill the dough before baking, so the cookies keep their snowball shape and don’t spread into pancakes. And that little dash of almond extract? It brings out the cherry flavor and takes these cookies from good to next-level yum.
This recipe isn’t just about taste—it’s a whole experience. Imagine serving a platter of these at your next holiday get-together: they’re festive, photogenic, and guaranteed to spark conversation. Whether you’re making memories with family, impressing your friends, or just treating yourself, cherry snowball cookies are a holiday tradition worth starting (or keeping alive!).
What Ingredients You Will Need
This cherry snowball cookies recipe is all about simple, wholesome ingredients coming together for a festive, flavorful result. Most of these items are pantry staples, and there’s plenty of flexibility if you want to swap things in or out. Here’s what you’ll need to make a batch of irresistible cherry snowball cookies:
- Unsalted Butter, softened (1 cup / 226g): The base of the dough—gives that rich, melt-in-your-mouth texture. I prefer using European-style butter for a bit more flavor, but any good-quality unsalted butter works.
- Powdered Sugar (1/2 cup / 60g): Adds sweetness and helps create a tender, delicate crumb. You’ll also need extra for rolling the cookies after baking.
- All-Purpose Flour (2 1/4 cups / 280g): The backbone of the cookie. For a gluten-free version, I’ve had success with a 1:1 gluten-free baking blend (just check that it includes xanthan gum).
- Cornstarch (1/4 cup / 30g): Optional, but it gives the cookies a silkier, lighter bite. If you skip it, just add an extra 1/4 cup flour.
- Salt (1/2 tsp): Balances out the sweetness. Don’t skip it!
- Almond Extract (1/2 tsp): The secret ingredient! Just a hint boosts the cherry flavor. If you’re not a fan, substitute with vanilla extract.
- Vanilla Extract (1 tsp): Rounds out the flavors—real vanilla makes a difference, but use what you have.
- Maraschino Cherries, drained and patted dry (30–36 cherries): The star! Look for bright, plump cherries. Rinse them and pat dry thoroughly so the cookies hold together. You can also use candied glace cherries in a pinch.
- Chopped Pecans or Walnuts (1/2 cup / 60g, optional): For a bit of crunch and nutty flavor. Leave them out if you prefer nut-free, or substitute with chopped almonds for extra almond flavor.
- Extra Powdered Sugar for Rolling: After baking, this is what makes them look like snowballs! Sift it for the fluffiest coating.
Ingredient Notes & Substitutions:
- For a dairy-free version, use a plant-based butter that’s meant for baking. I’ve tried Earth Balance with good results.
- If you can’t find maraschino cherries, try dried cherries soaked in a little warm water for 10 minutes, then drained and patted dry. The texture is a little different, but still tasty!
- Want to make them extra festive? Add a few drops of red or green food coloring to the dough, or sprinkle with colored sanding sugar after rolling in powdered sugar.
- Swap in lemon extract or orange zest for a citrusy twist (especially nice if you’re pairing with a cup of tea).
Equipment Needed
One of my favorite things about these cherry snowball cookies is how little equipment you need—no stand mixer or fancy baking gadgets required. Here’s what you’ll want to have ready:
- Mixing Bowls: At least two—one for the butter/sugar mixture, and one for the dry ingredients. I’ve used everything from glass to metal, and they all work fine.
- Hand Mixer or Stand Mixer (optional): You can cream the butter and sugar by hand with a sturdy wooden spoon, but an electric mixer definitely makes things easier (especially if your butter isn’t super soft).
- Measuring Cups and Spoons: For accuracy! I always recommend scooping and leveling your flour for best results.
- Baking Sheet(s): Line with parchment paper or a silicone baking mat for easy cleanup and even baking. I’ve found rimmed sheets help keep everything tidy.
- Small Cookie Scoop or Tablespoon: For portioning out even dough balls. Not mandatory—you can roll by hand—but it speeds things up and keeps the cookies uniform.
- Wire Cooling Rack: Helps the cookies cool quickly, so they don’t get soggy on the bottom.
- Fine Mesh Sieve or Sifter: For dusting the cookies with powdered sugar after baking. You can use a small strainer if that’s what you have on hand.
- Paper Towels: For drying those cherries thoroughly—don’t skip this step!
If you’re baking with kids, I recommend using a silicone mat instead of parchment so the cookies don’t slide around. And if you don’t have a cookie scoop, just use a heaping tablespoon and roll the dough between your palms. Honestly, some of my favorite batches were made with nothing but a bowl, a spoon, and a lot of holiday spirit!
How to Make Cherry Snowball Cookies – Step by Step
-
Cream the Butter & Sugar:
In a large mixing bowl, beat together 1 cup (226g) softened unsalted butter and 1/2 cup (60g) powdered sugar using a hand mixer or stand mixer. Mix on medium speed for 2-3 minutes, until light and fluffy. If mixing by hand, use a sturdy wooden spoon and a little elbow grease—it’s a workout, but worth it! Scrape down the sides of the bowl as you go.
-
Add Flavorings:
Mix in 1 teaspoon vanilla extract and 1/2 teaspoon almond extract. Beat until just combined. The almond extract isn’t overpowering, but it really brings out the cherry flavor (trust me—don’t skip it unless you have to!).
-
Combine Dry Ingredients:
In a separate bowl, whisk together 2 1/4 cups (280g) all-purpose flour, 1/4 cup (30g) cornstarch, and 1/2 teaspoon salt. If you’re adding nuts, toss in 1/2 cup (60g) finely chopped pecans or walnuts. Whisking helps keep the cookies tender and evenly mixed.
-
Mix the Dough:
Gradually add the dry ingredients to the butter mixture. Mix on low speed (or by hand) until just combined. Don’t overmix—it’s okay if the dough looks a little crumbly; it should hold together when pressed. If it feels too dry, add 1–2 teaspoons milk (or cherry juice) until it comes together.
-
Prep the Cherries:
Drain the maraschino cherries well, then pat them dry with paper towels. Any extra moisture will make the dough too sticky, so give them a good blot. If your cherries are extra-large, cut them in half—you’ll want about 30–36 pieces.
-
Shape the Cookies:
Scoop about 1 tablespoon of dough (25g) and flatten it slightly in your palm. Place a cherry in the center, then wrap the dough around it, rolling gently to seal and form a smooth ball. Place on a lined baking sheet, spacing cookies about 2 inches (5 cm) apart.
-
Chill the Dough Balls (Important!):
Pop the tray in the fridge for at least 20 minutes (or up to 2 hours). Chilling helps the cookies keep their shape and prevents spreading. If you skip this step, your “snowballs” might look more like pancakes—still tasty, but not as cute.
-
Bake:
Preheat your oven to 350°F (175°C). Bake the chilled cookies for 14–16 minutes, until the bottoms are just turning golden and the tops look set. They shouldn’t brown much on top—watch closely near the end, because they go from perfect to overbaked fast!
-
Cool & Roll in Sugar:
Let the cookies cool on the baking sheet for 5 minutes, then transfer to a wire rack. While still slightly warm, roll each cookie in sifted powdered sugar. For the best “snowball” look, roll them again once fully cooled. Don’t be shy—more sugar means more snowy effect!
Troubleshooting Tips:
If the dough is too sticky to handle, chill it for 10–15 minutes or add a sprinkle more flour.
If cookies crack while shaping, just pinch the dough back together. They’ll still bake up beautifully.
If cherries poke through, patch with a bit of extra dough.
Pro Tip: For super-smooth snowballs, roll the dough balls between your palms until they’re seamless. And if you like your cookies extra sweet, dust them with more powdered sugar just before serving!
Expert Tips & Techniques for Perfect Snowball Cookies
- Don’t Overmix the Dough: You want everything just combined—overworking leads to tough cookies. I learned this the hard way in my first batch (they were more like snowball pucks!).
- Chill the Dough: This step keeps the cookies from spreading and helps them keep that round, classic snowball look. If you’re in a rush, even a quick 15-minute chill makes a difference.
- Dry Your Cherries Thoroughly: Any extra juice can make the dough soggy or cause the cookies to crack. I sometimes blot each cherry twice, just in case.
- Even Sizing: Using a cookie scoop ensures all your cookies bake evenly. If you don’t have one, measure with a tablespoon and roll gently.
- Double Rolling in Sugar: For the most “snowy” effect, roll the cookies in powdered sugar while warm, then again once completely cool. This tip came from my grandma—and she always had the prettiest cookie trays.
- Watch the Bake Time: These cookies can go from pale to too-browned quickly. Set a timer and check at the 13-minute mark, especially if your oven runs hot.
- Prevent Flat Cookies: If your dough is too warm when baking, the cookies might spread. Chilling is key. If they do spread, they’ll still taste delicious—just a little less snowball-like.
- Add a Pinch of Love: Okay, maybe not a real ingredient, but I swear these always taste better when baked with family or friends around. There’s something magical about baking together, even if flour ends up everywhere.
Honestly, I’ve made every mistake in the book with these—too much flour, not enough chilling, forgetting to dry the cherries (oops!). But each batch taught me a little trick to make the next one better. Now, they come out picture-perfect every time, and yours will too!
Variations & Adaptations
One of the best things about cherry snowball cookies is how customizable they are. Over the years, I’ve played around with different flavors and dietary tweaks—here are my favorite ways to make them your own:
- Gluten-Free: Swap the all-purpose flour for a 1:1 gluten-free baking blend (make sure it includes xanthan gum). The cookies will be just as tender, and no one will guess they’re gluten-free!
- Chocolate-Dipped: After the cookies cool, dip half of each one in melted dark or white chocolate. Sprinkle with festive sprinkles or chopped nuts for extra flair. My kids call these “fancy snowballs.”
- Nut-Free Version: Leave out the chopped nuts, or replace with sunflower seeds for a little crunch. The cookies will still be rich and buttery.
- Citrus Twist: Add 1 teaspoon grated orange or lemon zest to the dough for a bright, zesty flavor. It pairs beautifully with the cherries—especially for springtime celebrations.
- Different Cherries: Use dried cherries for a chewier bite, or try green candied cherries for a colorful holiday look. I once mixed red and green cherries for a Christmas party, and they were a hit.
- Vegan Adaptation: Substitute vegan butter and use an egg replacer if needed (though this dough doesn’t require eggs). Choose vegan-friendly powdered sugar if you’re strict vegan.
My personal favorite? I once added a spoonful of cherry preserves to the dough for double cherry flavor. The cookies were a little softer, but oh-so-good! Don’t be afraid to experiment—you might just invent a new family tradition.
Serving & Storage Suggestions
Cherry snowball cookies are best enjoyed fresh, but they’re also sturdy enough for gifting and storing. Here’s how to get the most out of every batch:
- Serving: Serve at room temperature, arranged on a festive platter or in a pretty tin. They look gorgeous sprinkled with extra powdered sugar just before serving (adds to the “fresh snow” look!). Pair with hot chocolate, mulled wine, or a mug of tea for the ultimate holiday treat.
- Storing: Once fully cooled and rolled in sugar, store cookies in an airtight container at room temperature for up to 5 days. Layer with parchment paper to keep the sugar coating intact.
- Freezing: These freeze beautifully! Place cooled, un-sugared cookies in a single layer on a baking sheet, freeze until solid, then transfer to a zip-top bag or airtight container. Thaw at room temperature, then roll in fresh powdered sugar before serving.
- Reheating: If you want that fresh-baked taste, warm cookies in a 250°F (120°C) oven for 5–7 minutes. Let cool slightly, then roll in more sugar.
- Flavor Note: The cherry flavor actually deepens after a day or two, making these cookies perfect for baking ahead. They’re just as good (if not better) on day two or three!
Whether you’re serving these at a party or tucking them into holiday gift boxes, cherry snowball cookies always deliver a sweet surprise.
Nutritional Information & Benefits
Here’s a rough breakdown for each cherry snowball cookie (based on a batch of 30):
- Calories: ~110
- Fat: 6g
- Carbohydrates: 13g
- Protein: 1g
- Sugar: 6g
Health Benefits: Thanks to the cherries, you get a little boost of antioxidants and vitamin C (not to mention that lovely color!). Almond extract and nuts provide healthy fats, and you can adjust sugar to taste. For gluten-free or dairy-free diets, simple swaps make these cookies accessible to almost everyone. Just note they do contain tree nuts (if you use them) and butter, so check with guests if allergies are a concern.
From a wellness perspective, cherry snowball cookies are a sweet treat meant for sharing and celebrating. A couple with a cup of tea feels absolutely indulgent—and, honestly, that’s what the holidays are all about.
Conclusion
Cherry snowball cookies aren’t just cute—they’re pure holiday joy in every bite. With their melt-in-your-mouth texture, a surprise cherry center, and a dusting of “snow,” these cookies are bound to become a new favorite for your family. I love how easy they are to bake, how they light up a cookie platter, and how people’s eyes light up when they find the cherry inside.
Don’t be afraid to make these your own! Try a new extract, swap in your favorite nuts, or dip them in chocolate for extra fun. However you bake them, these cookies are a celebration—of flavor, of tradition, and of time spent together. If you give this recipe a try, I’d love to hear your twist! Leave a comment, share a photo, or let me know how your batch turned out. Happy baking, and may your holidays be extra sweet!
Frequently Asked Questions
Can I make cherry snowball cookies without nuts?
Absolutely! Just leave the nuts out, and the cookies will still be soft, buttery, and delicious. You can substitute with seeds or skip them entirely for a nut-free version.
Do I have to chill the dough before baking?
Chilling is highly recommended. It helps the cookies keep their round shape and prevents spreading. Even 20 minutes in the fridge makes a big difference.
Can I use fresh cherries instead of maraschino cherries?
Fresh cherries have a lot of moisture, which can affect the dough. If using fresh, pit and chop them, then dry thoroughly. The flavor will be different, but still tasty!
How do I keep the powdered sugar coating from melting?
Let the cookies cool before rolling in sugar, and roll them a second time when fully cooled. Store in an airtight container away from humidity to keep them looking snowy.
Can these cookies be frozen?
Yes! Freeze un-sugared cookies, then thaw and roll in fresh powdered sugar before serving. They keep well for up to 2 months in the freezer.
PrintCherry Snowball Cookies

Cherry Snowball Cookies are soft, buttery holiday treats with a surprise maraschino cherry center, dusted in powdered sugar for a festive, snowy look. These nostalgic cookies are easy to make, perfect for gifting, and guaranteed to be a crowd-pleaser at any holiday gathering.
- Prep Time: 25 minutes
- Cook Time: 16 minutes
- Total Time: 1 hour
- Yield: 30–36 cookies 1x
- Category: Dessert
- Cuisine: American
Ingredients
- 1 cup unsalted butter, softened
- 1/2 cup powdered sugar, plus extra for rolling
- 2 1/4 cups all-purpose flour
- 1/4 cup cornstarch (optional, or substitute with 1/4 cup more flour)
- 1/2 teaspoon salt
- 1/2 teaspoon almond extract
- 1 teaspoon vanilla extract
- 30–36 maraschino cherries, drained and patted dry
- 1/2 cup chopped pecans or walnuts (optional)
- Extra powdered sugar for rolling
Instructions
- In a large mixing bowl, beat together softened butter and powdered sugar with a hand mixer or stand mixer on medium speed for 2-3 minutes, until light and fluffy. Scrape down the sides as needed.
- Mix in vanilla extract and almond extract until just combined.
- In a separate bowl, whisk together flour, cornstarch, and salt. If using nuts, add chopped pecans or walnuts.
- Gradually add the dry ingredients to the butter mixture. Mix on low speed or by hand until just combined. If dough is too dry, add 1–2 teaspoons milk or cherry juice until it comes together.
- Drain maraschino cherries and pat dry thoroughly with paper towels. If cherries are large, cut them in half to yield about 30–36 pieces.
- Scoop about 1 tablespoon of dough and flatten slightly in your palm. Place a cherry in the center, wrap dough around it, and roll gently to seal and form a smooth ball. Place on a lined baking sheet, spacing cookies about 2 inches apart.
- Chill the tray of dough balls in the fridge for at least 20 minutes (up to 2 hours) to prevent spreading.
- Preheat oven to 350°F (175°C). Bake chilled cookies for 14–16 minutes, until bottoms are just golden and tops are set. Do not overbake.
- Cool cookies on the baking sheet for 5 minutes, then transfer to a wire rack. While still slightly warm, roll each cookie in sifted powdered sugar. For best snowy effect, roll again once fully cooled.
Notes
Chill dough balls before baking to prevent spreading. Dry cherries thoroughly to avoid soggy dough. For extra snowy effect, roll cookies in powdered sugar twice. For gluten-free, use a 1:1 gluten-free flour blend. Nuts are optional; omit for nut-free version. Cookies freeze well before rolling in sugar.
Nutrition
- Serving Size: 1 cookie
- Calories: 110
- Sugar: 6
- Sodium: 45
- Fat: 6
- Saturated Fat: 3.5
- Carbohydrates: 13
- Fiber: 0.5
- Protein: 1
Keywords: cherry snowball cookies, holiday cookies, Christmas cookies, powdered sugar cookies, maraschino cherry cookies, festive dessert, easy cookie recipe, nut-free cookies, gluten-free cookies, almond extract cookies


