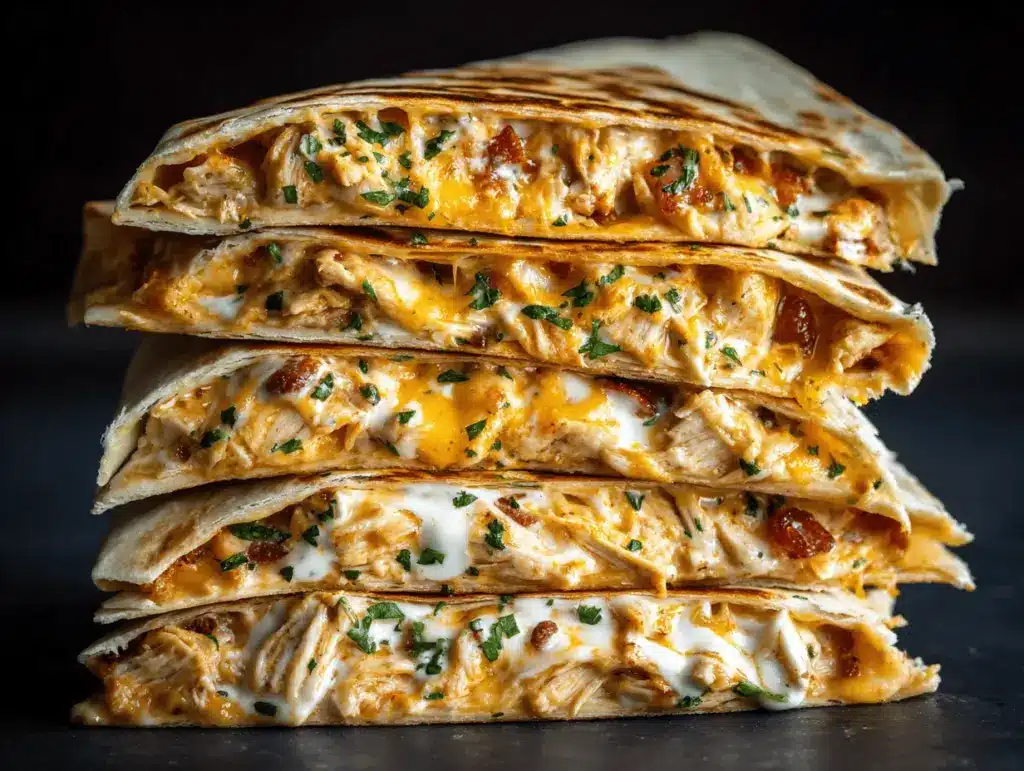
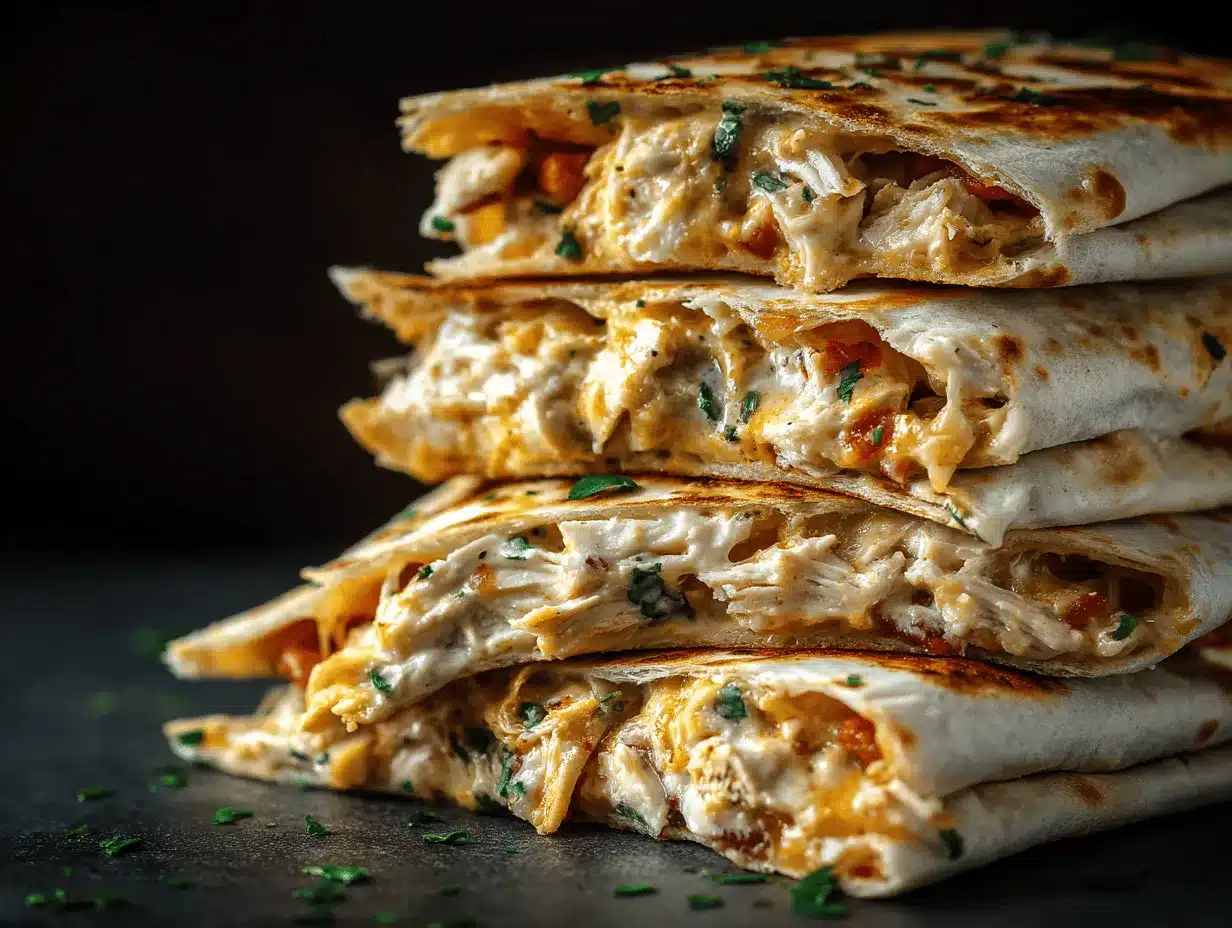
The sizzle of bacon, the aroma of garlicky chicken, and gooey rivers of melted cheese—these Cheesy Garlic Chicken Bacon Ranch Wraps are seriously next-level. I’m talking about a meal that makes your kitchen smell like a cozy bistro but comes together faster than you can say “What’s for dinner?” If you’ve ever had one of those wild evenings when you desperately needed something everyone would actually eat (without complaints or leftovers), you’re in the right spot. This recipe was born out of one of those nights—when I looked in my fridge, found random odds and ends, and somehow ended up with a wrap so delicious, my family asked for it again the next day. No exaggeration.
If you’re a fan of bold, comforting flavors—think ranch, crispy bacon, tender chicken, and heaps of cheese—you’re about to fall in love. These wraps are the ultimate answer to busy weeknights, picky eaters, or those times when you want something homemade but not fussy. As a food blogger who’s tested more wraps than I care to admit, I can honestly say these are among my favorites—there’s just something magical about that cheesy garlic combo. Whether you’re feeding a crowd, packing lunches, or just craving a seriously satisfying bite, Cheesy Garlic Chicken Bacon Ranch Wraps deliver every single time.
I’ve played with dozens of chicken bacon ranch recipes, but this one nails the balance between flavor and speed. Plus, it’s endlessly flexible and can be prepped ahead (a total win if your evenings are as unpredictable as mine). Ready to make your weeknight dinners way more exciting? Let’s get rolling!
Why You’ll Love These Cheesy Garlic Chicken Bacon Ranch Wraps
- Quick & Easy: You can whip these up in just 30 minutes—honestly, most of the time is just letting the bacon crisp up. Minimal prep, maximum flavor.
- Simple Ingredients: Every single thing here is a pantry or fridge staple. No need to go hunting for anything fancy.
- Perfect for Any Occasion: They make an awesome dinner, but I’ve packed them for road trips, wrapped them for school lunches, and even served them at parties (just slice into pinwheels—so cute!).
- Crowd-Pleaser: Kids, adults, even my pickiest friend—everyone devours these. The combination of cheese, ranch, and bacon is just irresistible.
- Unbelievably Delicious: The gooey cheese, juicy chicken, and smoky bacon wrapped up in a garlicky tortilla? It’s a comfort food jackpot. You’ll want seconds—trust me.
What really sets these Cheesy Garlic Chicken Bacon Ranch Wraps apart is the garlic-infused butter that takes the flavor over the top. I blend a little fresh garlic into melted butter and brush it onto the tortillas before toasting. That tiny step makes a huge difference—your whole kitchen will smell amazing, and you’ll get that golden, crispy finish that makes these wraps feel way more special than your average sandwich.
And you know what? These wraps aren’t just about indulgence. They’re also practical. I’ve prepped the filling ahead of time, wrapped them up, and grilled them fresh for dinner after soccer practice. They reheat well, too, so leftovers never go to waste. Whether you’re cooking for one, a hungry family, or just want something you can eat with your hands on the couch, these wraps fit right in. Honestly, they’re that good—the kind of meal that makes you pause after the first bite because it’s just that satisfying. Give them a try and see for yourself!
What Ingredients You Will Need
This recipe uses simple, everyday ingredients to create big flavors and the dreamiest, meltiest wraps. Most items are probably already in your fridge or pantry—no wild shopping trips required! Here’s what you need for the Cheesy Garlic Chicken Bacon Ranch Wraps:
- Chicken Breast, cooked and shredded (about 2 cups or 250g; I often use rotisserie for convenience, but any leftover or freshly cooked chicken works great)
- Bacon, cooked until crispy and chopped (6 strips; thick-cut is my favorite for extra crunch, but any kind works)
- Shredded Cheese (1 1/2 cups / 170g; I like a blend of mozzarella and sharp cheddar for meltiness and flavor)
- Large Flour Tortillas (4-6, depending on size; burrito-size works best for easy rolling. Whole wheat or low-carb tortillas are fine, too.)
- Ranch Dressing (1/3 cup / 80ml; use your favorite brand or homemade—Hidden Valley is a classic, but homemade is extra tasty if you have time)
- Fresh Garlic (2 cloves, minced; for making that garlicky butter you’ll brush on the wraps)
- Unsalted Butter (2 tablespoons / 28g, melted; this helps the wraps get golden and crisp in the pan)
- Chopped Green Onions (optional, for extra bite and color; about 2 tablespoons)
- Salt & Pepper (just a pinch, to taste)
Optional Toppings & Add-ins:
- Diced Tomatoes (for freshness and a pop of color)
- Chopped Romaine or Baby Spinach (if you want to sneak in some greens or add crunch)
- Jalapeño Slices (for a spicy kick—totally optional, but I love it!)
- Avocado Slices or Guacamole (for creaminess)
Ingredient Notes & Swaps:
- If you’re gluten-free, swap in your favorite GF tortillas. I’ve tried Siete brand and they work well, just heat them a bit to avoid cracking.
- For a lighter version, use turkey bacon and a light ranch dressing. I’ve done this and nobody noticed the difference!
- If you don’t eat pork, try smoked turkey or beef bacon—it still brings that savory, smoky bite.
- No ranch on hand? Stir together a quick blend of mayo, Greek yogurt, dried dill, parsley, garlic powder, and a splash of lemon. Homemade ranch in seconds.
There’s a lot of room to play here, so don’t stress if you’re missing one or two things. The heart of the wrap—the cheesy, garlicky, chicken-bacon filling—is forgiving and full of flavor either way.
Equipment Needed
- Large Skillet or Grill Pan: For crisping up the wraps—nonstick works best, but stainless steel is fine with a little extra butter. I’ve used both, and as long as you don’t walk away, nothing sticks!
- Mixing Bowl: To toss together the chicken, bacon, cheese, and ranch. A medium-sized bowl is perfect.
- Spatula: For flipping the wraps. A wide, sturdy spatula makes it much easier to keep everything together.
- Sharp Knife & Cutting Board: For chopping bacon, chicken, and any fresh toppings.
- Small Bowl & Pastry Brush (Optional): For mixing and brushing the melted garlic butter onto the tortillas. If you don’t have a pastry brush, just use the back of a spoon—it works in a pinch.
- Paper Towels: For draining bacon and wiping excess grease if needed. Seriously, don’t skip this—no one likes a soggy wrap.
If you don’t have a grill pan, a regular frying pan does the trick. For prepping ahead, I sometimes wrap them in foil and pop them in a toaster oven to crisp up later—super convenient. And if you’re on a budget, don’t worry—no fancy gadgets are required. Just a sharp knife, a skillet, and some hunger!
How to Make Cheesy Garlic Chicken Bacon Ranch Wraps
-
Prep the Chicken and Bacon (5-10 minutes):
- If using raw chicken, cook 2 medium chicken breasts (about 250g total) in a skillet with a splash of oil, salt, and pepper until no longer pink—about 6-8 minutes per side. Let cool slightly, then shred with two forks.
- For the bacon, cook 6 strips in a large skillet over medium heat until crispy, about 8 minutes. Drain on paper towels, then chop into bite-sized pieces.
- Tip: If you’re in a rush, use rotisserie chicken and pre-cooked bacon bits (just warm them up in the pan for a minute to get them crisp).
-
Mix the Filling (2 minutes):
- In a medium bowl, combine shredded chicken, chopped bacon, 1 1/2 cups (170g) shredded cheese, 1/3 cup (80ml) ranch dressing, and 2 tablespoons green onions if using. Toss until everything is evenly coated.
- Add a pinch of salt and pepper to taste.
- Note: This filling can be made up to 2 days ahead and stored covered in the fridge—makes dinner super easy!
-
Prepare the Garlic Butter (2 minutes):
- Melt 2 tablespoons (28g) unsalted butter in a small bowl. Stir in 2 minced garlic cloves.
- Have a pastry brush or spoon ready for the next step.
-
Assemble the Wraps (3-5 minutes):
- Lay out 4-6 large flour tortillas. Spread about 3/4 cup of the chicken mixture across the lower third of each tortilla. Top with optional greens, tomatoes, or avocado if desired.
- Roll up tightly, folding in the sides as you go to keep everything tucked in.
- Brush both sides of each wrap with the garlic butter. Don’t skimp—it adds so much flavor!
-
Crisp the Wraps (8-10 minutes):
- Heat your skillet or grill pan over medium heat. Place wraps seam-side down and cook for 2-3 minutes per side, pressing gently with a spatula, until golden brown and the cheese is melted.
- If your pan is small, work in batches. Keep cooked wraps warm in a low oven (about 200°F/95°C) if needed.
- Sensory cue: Listen for a gentle sizzle and look for a golden, slightly crisp exterior. The cheese should be visibly melted and oozy at the edges.
- If the wraps brown too quickly, lower the heat—garlic can burn fast.
-
Serve and Enjoy:
- Slice wraps in half, serve warm, and watch them disappear! Don’t forget a little extra ranch on the side for dipping.
- Optional: Sprinkle with extra green onions or a pinch of fresh parsley for color.
Troubleshooting Tips: If your wrap starts to unroll in the pan, place it seam-side down first and press gently with a spatula. To avoid sogginess, don’t overfill; less is more when rolling. And if you’re making a big batch ahead, crisp them up just before serving for the best texture.
Cooking Tips & Techniques
After making these cheesy garlic chicken bacon ranch wraps a dozen times, I’ve picked up a few tricks:
- Warm Tortillas First: A quick zap in the microwave (10-15 seconds) makes tortillas more pliable and less likely to tear. Cold tortillas are almost guaranteed to crack—learned that the hard way!
- Don’t Overstuff: It’s tempting to pile in as much as possible, but too much filling means you can’t seal the wrap and everything spills out. Stick to about 3/4 cup per large tortilla.
- Use a Heavy Pan: If you have a cast iron skillet, now’s the time to break it out. The weight helps get the wraps extra crisp without burning.
- Let the Cheese Melt Slowly: Cook over medium—not high—heat. It gives the cheese time to melt and the outside to get golden without scorching the garlic butter.
- Keep Wraps Warm: If you’re making several wraps, keep them on a baking sheet in a 200°F (95°C) oven while you finish the rest. This keeps everything melty and fresh for serving.
- Troubleshooting: If the filling seems dry, add a drizzle more ranch. If it’s too wet, sprinkle in a little extra cheese to bind it up.
- Cleanup Hack: Line your skillet with a piece of parchment if you’re worried about cheese oozing out and sticking (especially helpful if you’re using a stainless steel pan).
I’ve definitely scorched a few wraps by rushing—so trust me, steady medium heat is your friend. And if you’re multitasking (because, let’s face it, who isn’t?), set a timer so you don’t forget them on the stove!
Variations & Adaptations
One thing I love about these cheesy garlic chicken bacon ranch wraps is how you can change them up depending on what you have or what you need. Here are some of my favorite twists:
- Low-Carb/Keto: Swap flour tortillas for low-carb or almond flour wraps. Use full-fat ranch and skip the tomatoes if you’re watching carbs. I’ve done this for a friend on keto—still incredible!
- Spicy Kick: Add sliced jalapeños or a sprinkle of crushed red pepper flakes to the filling. You can even use pepper jack cheese for an extra punch. My husband loves this version!
- Veggie-Loaded: Toss in roasted red peppers, sautéed mushrooms, or spinach for extra nutrition and flavor. This is my go-to for sneaking veggies into my kids’ meals—they barely notice under all that cheese.
- Different Proteins: Leftover turkey, grilled steak, or even shredded rotisserie pork all work beautifully. I once made these with leftover Thanksgiving turkey and cranberry ranch—unreal!
- Dairy-Free: Use a vegan cheese and dairy-free ranch (there are some great options now!) and vegan butter for brushing the tortillas. It’s not quite as melty, but still super satisfying.
- Allergen Swaps: Gluten-free tortillas and nut-free ranch keep these safe for most allergies. Always double-check ingredient labels, especially if feeding a crowd.
Honestly, my personal favorite is swapping in BBQ sauce for half the ranch and adding a handful of cilantro. It gives a smoky, tangy twist that’s perfect for summer nights. Don’t be afraid to experiment—these wraps are super forgiving!
Serving & Storage Suggestions
For the best flavor and texture, serve these wraps hot off the skillet. That’s when the cheese is gooey and the tortillas are perfectly crisp. Arrange them on a platter, sliced in half for easy grabbing, and sprinkle with fresh herbs or extra green onions for a pop of color. If you want to make it a meal, serve with a simple green salad, potato wedges, or a bowl of tomato soup (my personal favorite combo!).
They also pair perfectly with a cold glass of lemonade, iced tea, or even a light beer. If you’re serving a crowd, try cutting the wraps into pinwheels and sticking a toothpick in each—perfect for parties or game day snacks.
Storage: Leftover wraps can be wrapped tightly in foil or plastic wrap and stored in the fridge for up to 3 days. For longer storage, freeze individually wrapped (without fresh veggies) for up to 2 months. To reheat, unwrap and toast in a skillet over medium heat until warmed through and crisp, or warm in a 350°F (175°C) oven for 10-12 minutes. Microwaving works in a pinch, but the tortilla won’t be as crisp (still tasty, though!).
Pro tip: The flavors meld and get even better after a night in the fridge—so don’t be shy about making extras for quick lunches or late-night snacks!
Nutritional Information & Benefits
Each cheesy garlic chicken bacon ranch wrap (using large flour tortillas and full toppings) has about 480 calories, 28g protein, 25g fat, and 36g carbs. This is a ballpark estimate—actual numbers will vary based on your specific brands and add-ins. They’re a good source of protein, calcium (hello, cheese!), and B vitamins from the chicken and bacon.
If you use whole wheat tortillas or add spinach, you’ll get a fiber boost, too. For gluten-free or keto diets, using specialty wraps keeps them easy to fit into your plan. Allergy note: These wraps contain dairy (cheese, ranch), gluten (tortillas), and pork (bacon), so always check ingredient labels if you’re cooking for someone with restrictions.
From a wellness perspective, I love that these wraps feel like indulgence but can easily be tweaked to suit your nutritional needs. They’re filling, satisfying, and don’t leave you hungry an hour later. Plus, they’re definitely kid-approved in my house!
Conclusion
If you’re looking for a quick, satisfying dinner that checks every box—flavorful, easy, family-friendly—these Cheesy Garlic Chicken Bacon Ranch Wraps are it. With their golden, garlicky crunch, creamy ranch filling, and melty cheese, they’re guaranteed to become a regular in your meal rotation. I make these whenever I need something everyone will eat (with no complaints!), and they never disappoint.
Don’t be afraid to riff on the recipe—swap in your favorite cheese, try a new sauce, or sneak in some veggies. That’s the beauty of wraps like these; they’re as flexible as you need them to be. I hope these wraps bring as much joy to your table as they have to mine. If you try them, let me know how you customized yours—share your version in the comments or tag me on Pinterest. Happy cooking, and may your dinners always be cheesy, crispy, and a little bit messy—in the best possible way!
Frequently Asked Questions
Can I make cheesy garlic chicken bacon ranch wraps ahead of time?
Absolutely! You can assemble the wraps (without toasting) up to 24 hours in advance and store them in the fridge. When ready to serve, just brush with garlic butter and crisp them up in a skillet.
What’s the best way to reheat leftover wraps?
For best results, reheat in a skillet over medium heat until the outside is crisp and the filling is hot. You can also use a toaster oven or bake at 350°F (175°C) for 10-12 minutes. Microwaving works, but the texture won’t be as crisp.
Can I freeze these wraps?
Yes! Wrap them tightly in foil or plastic (without fresh veggies) and freeze for up to 2 months. Thaw overnight in the fridge and reheat in a skillet or oven for the best texture.
What can I use instead of ranch dressing?
If you don’t have ranch, try a simple mix of mayo, Greek yogurt, garlic powder, dill, and a splash of lemon juice. Caesar dressing or even chipotle mayo are fun alternatives, too!
Are there gluten-free or dairy-free options for these wraps?
Yes! Use gluten-free tortillas and dairy-free cheese/ranch for allergy-friendly wraps. There are plenty of great options at most grocery stores now, so everyone can enjoy these cheesy garlic chicken bacon ranch wraps.
PrintCheesy Garlic Chicken Bacon Ranch Wraps

These Cheesy Garlic Chicken Bacon Ranch Wraps combine crispy bacon, garlicky chicken, melty cheese, and creamy ranch in a golden, toasted tortilla. Ready in just 30 minutes, they’re the ultimate quick and satisfying dinner for busy weeknights.
- Prep Time: 10 minutes
- Cook Time: 20 minutes
- Total Time: 30 minutes
- Yield: 4-6 wraps (4-6 servings) 1x
- Category: Main Course
- Cuisine: American
Ingredients
- 2 cups cooked and shredded chicken breast (about 250g, rotisserie or leftover works)
- 6 strips bacon, cooked until crispy and chopped
- 1 1/2 cups shredded cheese (mozzarella and sharp cheddar blend recommended)
- 4–6 large flour tortillas (burrito-size preferred; whole wheat or low-carb optional)
- 1/3 cup ranch dressing
- 2 cloves fresh garlic, minced
- 2 tablespoons unsalted butter, melted
- 2 tablespoons chopped green onions (optional)
- Salt and pepper, to taste
- Optional: diced tomatoes
- Optional: chopped romaine or baby spinach
- Optional: jalapeño slices
- Optional: avocado slices or guacamole
Instructions
- If using raw chicken, cook 2 medium chicken breasts in a skillet with oil, salt, and pepper until no longer pink (6-8 minutes per side). Let cool and shred with two forks. If using rotisserie or leftover chicken, shred as needed.
- Cook 6 strips of bacon in a large skillet over medium heat until crispy (about 8 minutes). Drain on paper towels and chop into bite-sized pieces.
- In a medium bowl, combine shredded chicken, chopped bacon, shredded cheese, ranch dressing, and green onions if using. Toss until evenly coated. Season with salt and pepper to taste.
- Melt butter in a small bowl and stir in minced garlic.
- Lay out tortillas. Spread about 3/4 cup of the chicken mixture across the lower third of each tortilla. Add optional greens, tomatoes, or avocado if desired.
- Roll up tightly, folding in the sides. Brush both sides of each wrap with garlic butter.
- Heat a large skillet or grill pan over medium heat. Place wraps seam-side down and cook for 2-3 minutes per side, pressing gently with a spatula, until golden brown and cheese is melted. Work in batches if needed.
- Slice wraps in half and serve warm, with extra ranch for dipping if desired. Garnish with extra green onions or parsley.
Notes
Warm tortillas before assembling to prevent cracking. Don’t overstuff wraps for easier rolling. Filling can be made up to 2 days ahead. For gluten-free, use GF tortillas; for dairy-free, use vegan cheese and ranch. Leftovers reheat well in a skillet or oven. Wraps can be frozen (without fresh veggies) for up to 2 months.
Nutrition
- Serving Size: 1 wrap
- Calories: 480
- Sugar: 3
- Sodium: 950
- Fat: 25
- Saturated Fat: 10
- Carbohydrates: 36
- Fiber: 2
- Protein: 28
Keywords: chicken bacon ranch wraps, cheesy garlic wraps, easy dinner, 30 minute meal, skillet wrap, family friendly, meal prep, lunch wrap, American, comfort food


