The sound of laughter, twinkling lights, and that unmistakable aroma of rich chocolate mingling with tart cherries—these are the moments I wait for every holiday season. Chocolate Cherry Snowball Cookies aren’t just a treat in my house, they’re tradition. I still remember the first time I made them—my kitchen was a mess, my apron was dusted in powdered sugar, and my kids kept sneaking bites of the dough. Honestly, they’re the kind of cookie that brings everyone together, even if you’re just baking solo late at night.
I stumbled onto this recipe years ago while trying to reinvent classic snowball cookies for a cookie swap. I wanted something extra special—something that would stand out on a crowded holiday cookie platter. Adding chocolate and cherries was a game changer. The bittersweet cocoa and chewy cherries tucked into a buttery, melt-in-your-mouth dough? It’s the perfect balance of nostalgia and newness. These Chocolate Cherry Snowball Cookies have been my go-to ever since, especially for festive gatherings where I want to wow without stressing out.
If you’re looking for an easy, crowd-pleasing cookie that’s packed with flavor and a little bit of holiday magic, you’ve come to the right place. I’ve tested this recipe through dozens of batches—tweaking ingredients, swapping brands, and perfecting the process. You don’t need fancy equipment, and you definitely don’t need to be a pro baker. Whether you’re baking for a cookie exchange, gifting homemade treats, or just craving something sweet with your coffee, these cookies deliver. Let’s get baking!
Why You’ll Love This Recipe
- Quick & Easy: You’ll have a batch ready in under 40 minutes, making them perfect for last-minute guests or busy holiday schedules.
- Simple Ingredients: Most of these are pantry staples—no wild goose chases through the grocery store.
- Perfect for Festive Gatherings: These cookies look absolutely gorgeous on a holiday platter, and their flavor is so unique that everyone asks for the recipe.
- Crowd-Pleaser: Kids love the surprise of chocolate and cherries inside, and adults appreciate the classic snowball texture with a twist.
- Unbelievably Delicious: The combination of cocoa, finely chopped cherries, and buttery dough is downright addictive.
So, what sets these Chocolate Cherry Snowball Cookies apart from the usual snowball fare? For starters, I blend dried cherries into the dough rather than just adding them whole. This gives you little bursts of flavor in every bite and a chewy texture that contrasts beautifully with the crumbly cookie. The cocoa isn’t overwhelming—it’s just enough to make the chocolate flavor shine without overpowering the cherries.
I’ve tried this recipe with everything from chopped pecans to white chocolate chips, and while those are fun experiments, nothing beats the classic combo. It’s the kind of cookie that makes you pause after the first bite. There’s something so comforting about the way the flavors mingle, and the snowy coating of powdered sugar just screams winter coziness. You’ll love serving these at parties, but, let’s face it, you might end up keeping a secret stash for yourself!
If you want a holiday treat that’s both elegant and irresistible, these cookies are your ticket. They’re forgiving, fun to make, and even better to eat. Trust me, once you try them, you’ll be hooked.
What Ingredients You Will Need
This recipe uses straightforward, approachable ingredients—nothing fancy, but each one plays a role in creating the perfect Chocolate Cherry Snowball Cookie. I like to keep things simple, but I’ll throw in a few personal tips for getting the best flavor and texture.
- For the Dough:
- 1 cup (226g) unsalted butter, softened (room temperature is key for easy mixing)
- 1/2 cup (60g) powdered sugar (plus more for rolling)
- 2 teaspoons vanilla extract (I prefer pure vanilla for depth)
- 2 cups (240g) all-purpose flour (King Arthur has never let me down)
- 1/4 cup (25g) unsweetened cocoa powder (Dutch-process works well for a richer flavor)
- 1/4 teaspoon salt (balances sweetness)
- For the Mix-Ins:
- 3/4 cup (100g) dried cherries, finely chopped (I use Montmorency for a tart pop—look for unsweetened if possible)
- 1/2 cup (90g) mini chocolate chips (semisweet or dark, your call)
- For Rolling:
- Additional powdered sugar (about 1/2 cup/60g for that snowy finish)
These ingredients are pretty forgiving if you need to make substitutions. Swap dried cranberries for cherries if that’s what you have. For gluten-free cookies, use a 1:1 gluten-free flour blend (I’ve had good results with Bob’s Red Mill). Want it dairy-free? Substitute vegan butter, but make sure it’s the stick kind for proper texture.
If you’re feeling adventurous, add a pinch of cinnamon or a drop of almond extract for a nutty undertone. I’ve even swapped the mini chips for chopped dark chocolate—super decadent! The most important thing is to use good-quality cherries and cocoa, since they’re the stars here. No need for expensive brands, just pick ones you love.
One last tip: If your cherries are a little dry, soak them in warm water for 10 minutes, then drain and blot dry before chopping. This keeps the cookies from getting too crumbly. Happy prepping!
Equipment Needed
- Mixing Bowls: One large for the dough, one small for prepping cherries.
- Hand Mixer or Stand Mixer: Either works—hand mixing is fine if you’ve got some muscle!
- Measuring Cups & Spoons: Accuracy is your friend here, especially with flour and cocoa.
- Baking Sheet: Standard half-sheet pan, lined with parchment for easy cleanup.
- Cookie Scoop or Tablespoon: Helps portion dough evenly (I use a #40 scoop for uniform balls).
- Cooling Rack: Optional, but helps prevent soggy bottoms.
- Small Sifter: For rolling cookies in powdered sugar—keeps things neat.
If you don’t have a mixer, just use a sturdy spoon and a bit of elbow grease. For parchment, wax paper works in a pinch, though it can stick a bit. I’ve baked these on silicone mats and they work just as well. Cookie scoops come in all sizes—if you don’t have one, just eyeball it and roll with your hands. Maintenance tip: Wash your cookie scoop right away—the dough really sticks!
Budget tip: Dollar store mixing bowls and measuring cups do the trick. No need for anything fancy. I’ve lost count of how many batches I’ve made with my ancient hand mixer, so don’t worry if your gear is basic.
Preparation Method
- Prep the Ingredients:
- Finely chop the dried cherries (about 5 minutes). If they’re extra firm, soak them in warm water for 10 minutes, then drain and blot dry.
- Measure out all ingredients. Trust me, having everything ready makes the process smoother.
- Cream the Butter and Sugar:
- In a large bowl, beat 1 cup (226g) unsalted butter and 1/2 cup (60g) powdered sugar until fluffy, about 3 minutes. It should look pale and creamy.
- Add 2 teaspoons vanilla extract and mix until combined.
- Tip: If your butter is too cold, microwave it for just a few seconds—don’t melt!
- Add the Dry Ingredients:
- In a separate bowl, whisk together 2 cups (240g) all-purpose flour, 1/4 cup (25g) unsweetened cocoa powder, and 1/4 teaspoon salt.
- Gradually add the dry ingredients to the butter mixture, mixing on low speed until just combined. Dough will be thick.
- Warning: Overmixing toughens the cookies—stop when it’s just mixed.
- Fold in the Cherries and Chocolate Chips:
- Stir in 3/4 cup (100g) chopped dried cherries and 1/2 cup (90g) mini chocolate chips. Use a spatula for even distribution.
- Dough may look crumbly—that’s okay! Gently squeeze it together with your hands if needed.
- Shape the Cookies:
- Using a cookie scoop or tablespoon, portion dough into balls about 1 inch (2.5cm) in diameter. You’ll get about 24 cookies.
- Roll them gently between your palms for a smooth, round shape.
- Place on lined baking sheet, spacing them about 1 inch apart.
- Bake:
- Bake at 350°F (175°C) for 12-15 minutes. Cookies should be set but not browned—edges may feel firm, centers will be soft.
- Sensory cue: You’ll smell the chocolate and cherries mingling… that’s your signal!
- Cool and Roll in Sugar:
- Let cookies cool on the pan for 5 minutes (they’re fragile when hot), then transfer to a cooling rack.
- While still slightly warm, roll cookies in powdered sugar (about 1/2 cup/60g). For extra snowy look, roll again once fully cooled.
- Storage:
- Store cookies in an airtight container at room temperature for up to 1 week or freeze for up to 2 months.
Troubleshooting: If cookies flatten, your butter may have been too soft. Chill dough for 15 minutes before shaping. If dough is too dry, add 1 tablespoon milk. Too sticky? Add a spoonful of flour. These little tweaks make all the difference!
I always bake a test cookie first—every oven has its quirks. Just don’t stress; these cookies are forgiving and always taste amazing.
Cooking Tips & Techniques
I’ve baked hundreds of snowball cookies over the years, and a few tried-and-true tips make all the difference. First, use room temperature butter—it creams better, which means fluffier cookies. If you forget to take the butter out, a quick zap in the microwave (no melting!) does the trick.
Don’t skip the double roll in powdered sugar. The first roll sticks to the warm cookie, and the second gives that classic snowball look. I learned this the hard way after my first batch looked more “mudball” than “snowball.”
If you’re multitasking, shape all the cookies then pop the tray in the fridge while you preheat the oven. Chilled dough holds its shape better and prevents spreading. And, hey, if you’re baking with kids, let them help with the rolling—it’s messy, but totally worth it for the memories.
The biggest mistake? Overmixing the dough. I’ve ruined more than one batch by getting carried away with the mixer. Mix until just combined and switch to hand mixing for the cherries and chips.
Variations & Adaptations
One of the best things about Chocolate Cherry Snowball Cookies is how easy they are to customize for different tastes and dietary needs. Here are some of my favorite tweaks:
- Gluten-Free: Swap the all-purpose flour for a 1:1 gluten-free baking blend. I’ve used Bob’s Red Mill with great results—no one could tell the difference.
- Dairy-Free: Use vegan butter and dairy-free mini chocolate chips. The cookies stay tender and flavorful.
- Seasonal Twist: Try dried cranberries or blueberries instead of cherries for a summer spin. Chopped dried apricots work well, too.
- Nut Lovers: Add 1/2 cup (60g) finely chopped pecans or walnuts to the dough for crunch and depth. I did this for a Thanksgiving batch—major hit!
- Flavor Boost: A pinch of cinnamon or a dash of almond extract adds a cozy undertone. Orange zest is another winner for a citrusy holiday vibe.
If you want to play with cooking methods, try baking in a mini muffin tin for perfectly round cookies with a little crust on the bottom. You can also flatten the dough slightly for a more traditional cookie shape. For kids with nut allergies, leave out any nuts and double-check your chocolate chips for cross-contamination.
Serving & Storage Suggestions
These Chocolate Cherry Snowball Cookies are best served at room temperature, dusted with a fresh coat of powdered sugar. I love arranging them on a festive platter with sprigs of rosemary or a handful of fresh cherries for color—Pinterest-perfect, honestly!
Pair them with a mug of hot cocoa, spiced tea, or a glass of milk (for kids and grown-ups alike). They’re also wonderful alongside a cheese board for something sweet at the end. For holiday parties, stack them in pretty cellophane bags or small tins for easy gifting.
To store, keep the cookies in an airtight container at room temperature for up to a week. They actually taste even better on day two when the flavors have mingled. For longer storage, freeze the cookies in layers with parchment between for up to two months. Thaw at room temperature and dust with powdered sugar before serving.
Reheating isn’t usually necessary, but if you like your cookies extra tender, pop them in a 300°F (150°C) oven for 3-4 minutes. The chocolate inside gets gooey again—so good. I’ve found the cherry flavor gets deeper after a few days. Just be sure to keep them tightly sealed so they don’t dry out.
Nutritional Information & Benefits
Here’s a quick look at the nutritional profile (per cookie, about 25g):
- Calories: ~120
- Fat: 6g
- Carbohydrates: 16g
- Sugar: 8g
- Protein: 1g
These cookies are indulgent but use real butter for healthy fats, and cherries add antioxidants and fiber. Cocoa offers a little magnesium and antioxidants, too—so you can feel good about treating yourself. For gluten-free or dairy-free diets, simple swaps keep the recipe accessible. Watch out for potential allergens: butter, chocolate chips (may contain soy or dairy), and flour.
Personally, I love knowing my cookies aren’t just empty calories. The cherries add a pop of nutrition, and using good cocoa means you’re getting a bit of the good stuff with every bite. Moderation is key, but hey, holidays are for celebrating!
Conclusion
If you’re searching for the perfect festive cookie—one that’s easy, beautiful, and packed with flavor—these Chocolate Cherry Snowball Cookies are it. They’re simple enough for a beginner and impressive enough for any holiday table. I love how versatile they are, and honestly, I’ve never met anyone who didn’t want a second cookie.
Feel free to tweak the recipe to fit your tastes or dietary needs. That’s part of the fun—making it your own. Every time I bake these, I’m reminded of cozy nights, happy gatherings, and the magic of sharing homemade treats.
Ready to try? Leave a comment below if you make these, share your tips, or tag me with your cookie pictures! I’d love to hear your spin on this holiday favorite. Wishing you a season full of sweet moments and delicious cookies (and maybe a little powdered sugar on your nose)!
Frequently Asked Questions
Can I use fresh cherries instead of dried?
Fresh cherries have too much moisture for this recipe. Dried cherries give the right chewy texture and concentrated flavor.
Do Chocolate Cherry Snowball Cookies freeze well?
Yes! Freeze in layers with parchment paper for up to two months. Thaw at room temperature, then roll in extra powdered sugar before serving.
How do I keep my cookies from flattening?
If your cookies spread, chill the dough for 15 minutes before baking. Using room temperature butter (not melted) also helps.
Can I make these gluten-free?
Absolutely! Use a 1:1 gluten-free baking blend. I’ve had great results—no need to change anything else in the recipe.
What’s the best way to chop dried cherries?
Use a sharp knife and cut into small pieces. If they’re sticky, dust them with a little flour or powdered sugar to keep them from clumping.
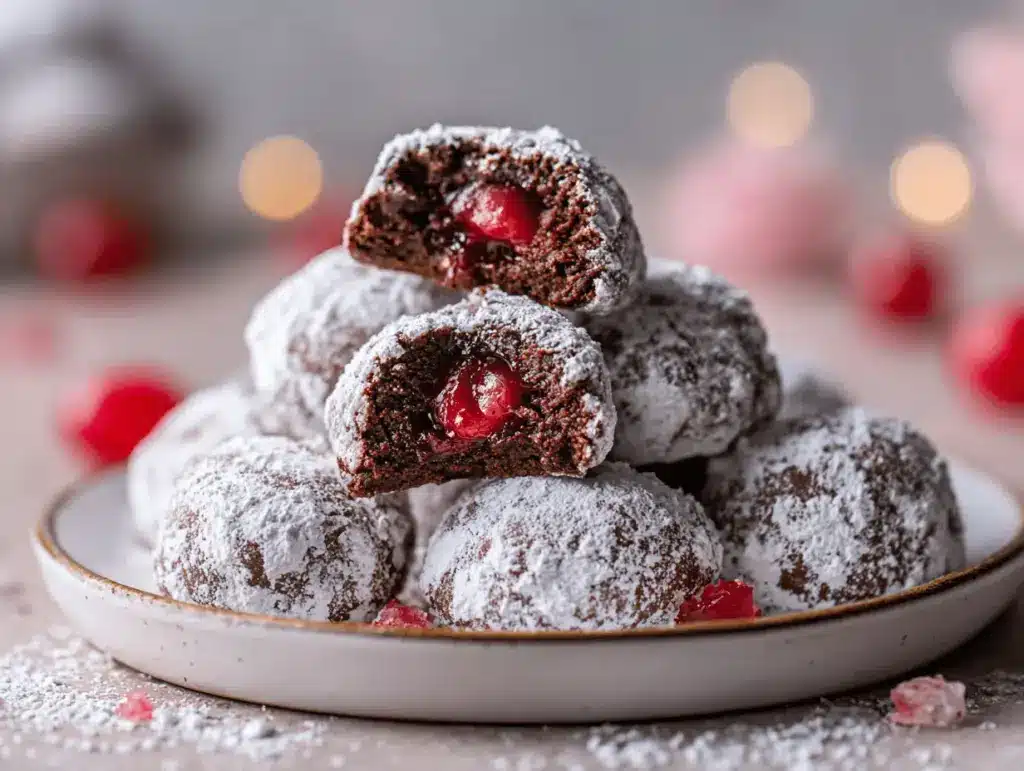
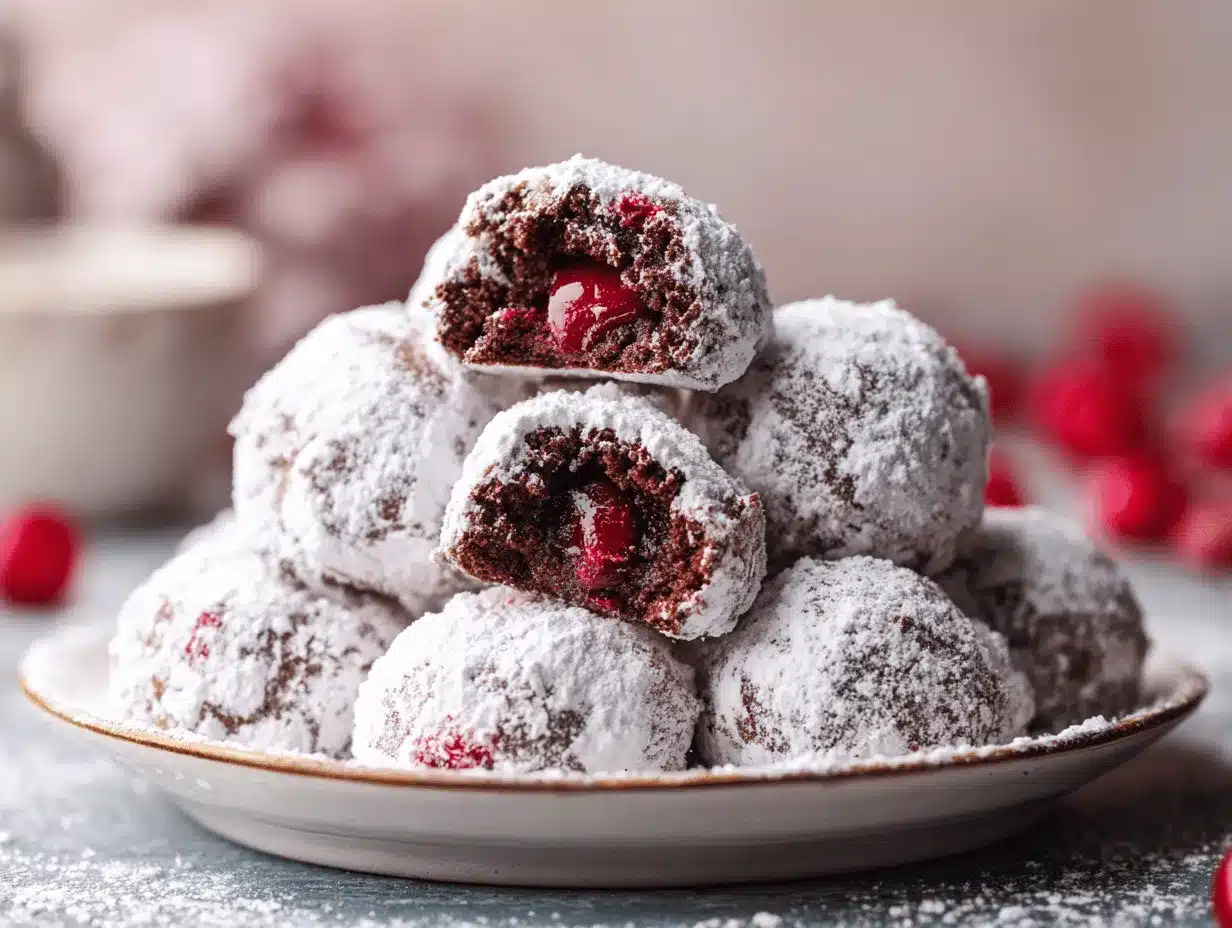
Chocolate Cherry Snowball Cookies

Chocolate Cherry Snowball Cookies are a festive twist on the classic snowball cookie, featuring a buttery cocoa dough studded with chewy dried cherries and mini chocolate chips, all rolled in snowy powdered sugar. These easy, crowd-pleasing cookies are perfect for holiday gatherings, cookie swaps, or gifting.
- Prep Time: 15 minutes
- Cook Time: 15 minutes
- Total Time: 35-40 minutes
- Yield: 24 cookies 1x
- Category: Dessert
- Cuisine: American
Ingredients
- 1 cup (226g) unsalted butter, softened
- 1/2 cup (60g) powdered sugar, plus more for rolling
- 2 teaspoons vanilla extract
- 2 cups (240g) all-purpose flour
- 1/4 cup (25g) unsweetened cocoa powder (Dutch-process preferred)
- 1/4 teaspoon salt
- 3/4 cup (100g) dried cherries, finely chopped
- 1/2 cup (90g) mini chocolate chips (semisweet or dark)
- Additional powdered sugar (about 1/2 cup/60g) for rolling
Instructions
- Finely chop the dried cherries. If they are extra firm, soak in warm water for 10 minutes, then drain and blot dry.
- Measure out all ingredients before starting.
- In a large bowl, beat the softened butter and powdered sugar until fluffy and pale, about 3 minutes.
- Add vanilla extract and mix until combined.
- In a separate bowl, whisk together flour, cocoa powder, and salt.
- Gradually add the dry ingredients to the butter mixture, mixing on low speed until just combined. Do not overmix.
- Fold in the chopped dried cherries and mini chocolate chips with a spatula. If dough is crumbly, gently squeeze together with hands.
- Using a cookie scoop or tablespoon, portion dough into 1-inch balls (about 24 cookies). Roll between palms for a smooth shape.
- Place dough balls on a parchment-lined baking sheet, spacing about 1 inch apart.
- Bake at 350°F (175°C) for 12-15 minutes, until set but not browned. Centers will be soft.
- Let cookies cool on the pan for 5 minutes, then transfer to a cooling rack.
- While still slightly warm, roll cookies in powdered sugar. For extra snowy look, roll again once fully cooled.
- Store in an airtight container at room temperature for up to 1 week or freeze for up to 2 months.
Notes
For best results, use room temperature butter and avoid overmixing the dough. Double roll cookies in powdered sugar for the classic snowball look. Dough can be chilled before baking to prevent spreading. For gluten-free or dairy-free adaptations, use a 1:1 gluten-free flour blend or vegan butter and dairy-free chocolate chips. Store cookies in an airtight container; they taste even better the next day.
Nutrition
- Serving Size: 1 cookie (about 25g)
- Calories: 120
- Sugar: 8
- Sodium: 30
- Fat: 6
- Saturated Fat: 3.5
- Carbohydrates: 16
- Fiber: 1
- Protein: 1
Keywords: chocolate cherry snowball cookies, holiday cookies, Christmas cookies, easy cookie recipe, powdered sugar cookies, cherry cookies, chocolate cookies, festive cookies, cookie exchange, homemade cookies


