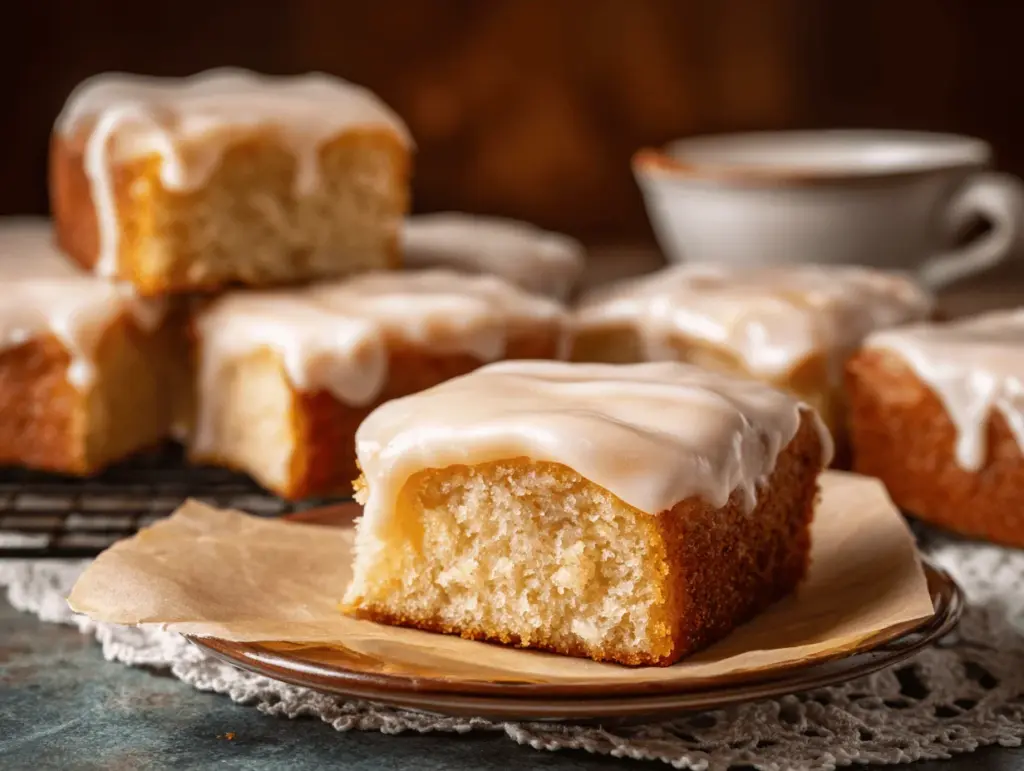
The second that sweet maple glaze hits the warm, fluffy donut bars, my kitchen fills with that unmistakable bakery smell—cozy, nostalgic, and just a little bit magical. I can’t help it: maple donut bars instantly take me back to childhood Saturday mornings, standing in line at our tiny local donut shop, nose pressed up against the glass, hoping they hadn’t sold out yet. Now, I get to make them fresh at home whenever the craving hits… which, honestly, is way more often than I’d like to admit.
What I love most about this maple donut bars recipe is how shockingly simple it is. You don’t need a deep fryer, fancy mixer, or even a donut pan—just a basic baking dish and a handful of pantry staples. The result? Thick, pillowy bars topped with the silkiest maple glaze, perfect for sharing (or not). This recipe has become my go-to for lazy weekend treats, quick potluck contributions, and surprise after-school snacks. If you’re looking for a dessert that’s both comforting and a total crowd-pleaser, you’ve landed in the right place. Trust me: after testing these maple donut bars more times than I care to admit (quality control is important!), I can say with confidence that this one’s a keeper for busy families, sweet-toothed friends, or anyone who loves a little nostalgia baked right in.
Why You’ll Love This Maple Donut Bars Recipe
Okay, let’s get real for a second—there are a million dessert bar recipes out there, but these maple donut bars are in a league of their own. If you’re on the fence, here’s why I think you’ll fall head over heels for this recipe:
- Quick & Easy: You can whip up a batch in under an hour, start to finish. No yeast, no fuss, just simple mixing, baking, and glazing. Perfect for those “I need something sweet, now!” days.
- Simple Ingredients: We’re talking basic flour, sugar, butter, and pure maple syrup. Nothing weird or hard to find—if you bake even occasionally, you probably have everything on hand.
- Perfect for Any Occasion: These are just as at home on a brunch buffet as they are wrapped up in school lunchboxes or served after dinner. Trust me, they always disappear fast.
- Crowd-Pleaser: Kids, picky eaters, maple skeptics—everyone goes back for seconds. I’ve brought these to potlucks, baby showers, you name it, and there’s never a crumb left.
- Unbelievably Delicious: The combo of soft, cakey donut bar and rich maple glaze is the kind of treat that makes you close your eyes and sigh on the first bite. It’s comfort food, plain and simple.
But what really sets this maple donut bars recipe apart is how it nails that classic donut shop flavor without the need for frying or special pans. I use a little technique I picked up from a retired baker friend—mixing the batter gently and baking in a shallow pan—to get that perfect tender crumb. The maple glaze is pure nostalgia, sweet but not cloying, and it sets up perfectly for slicing (no sticky fingers!). Baking these at home means you control the sweetness, the thickness of the glaze, even the size of each bar. Plus, you get to enjoy them fresh, when they’re at their absolute best. If you ask me, that’s the real secret ingredient.
What Ingredients You Will Need
This recipe uses simple, wholesome ingredients to deliver bold flavor and that classic donut shop texture—without any complicated steps or hard-to-find items. Every ingredient has a job to do, from making the bars pillowy to giving the glaze its signature maple kick. Here’s what you need for these maple donut bars:
- For the Donut Bars:
- 1 3/4 cups (220g) all-purpose flour (unbleached preferred for best crumb)
- 1 tsp baking powder (for lift)
- 1/2 tsp baking soda (gives a soft, fluffy texture)
- 1/2 tsp salt (balances the sweetness)
- 1/2 cup (115g) unsalted butter, softened (adds richness; use vegan butter if needed)
- 3/4 cup (150g) granulated sugar (just the right amount of sweetness)
- 2 large eggs, room temperature (for structure and moisture)
- 1/2 cup (120ml) sour cream or Greek yogurt (I’ve used both—sour cream for classic, yogurt for a lighter touch)
- 1/4 cup (60ml) whole milk (for a tender crumb; sub almond or oat milk if dairy-free)
- 2 tsp pure vanilla extract (rounds out the flavor)
- For the Maple Glaze:
- 1/4 cup (60g) unsalted butter, melted (smooths the glaze)
- 1/3 cup (80ml) pure maple syrup (use the real stuff—Grade A or B both work, but B is more robust)
- 1 1/2 cups (180g) powdered sugar, sifted (for a silky glaze)
- 1/2 tsp maple extract (optional, but gives that classic donut flavor—use a good brand like McCormick)
- 1-2 tbsp whole milk or cream (adjusts glaze consistency)
- Pinch of salt (brings out the maple notes)
Ingredient Tips: For the fluffiest bars, use room temperature eggs and dairy. If you want to make these gluten-free, swap in a 1:1 gluten-free baking flour (I’ve had great results with King Arthur’s blend). No maple extract? Just bump up the syrup a tad and let the real maple flavor shine through. You can also try adding a sprinkle of toasted pecans on top if you’re feeling fancy—it’s a nice touch for autumn.
Equipment Needed
You don’t need any fancy tools to pull off these maple donut bars—just a few basics you probably already have. Here’s what I use:
- Mixing bowls: One large for the batter, one medium for the glaze. Glass or stainless steel works best.
- Hand mixer or stand mixer: Makes creaming the butter and sugar a breeze, but you can do it by hand with a sturdy spatula if you’re feeling strong.
- Whisk: For blending the glaze smooth.
- 9×9-inch (23x23cm) baking pan: I love my old Pyrex, but any metal or ceramic pan works. If you only have an 8×8, just bake a bit longer and your bars will be extra thick (not a bad thing!).
- Parchment paper or nonstick spray: Makes lifting out the bars so much easier. I always line my pan for neat slices.
- Offset spatula or butter knife: For spreading the batter and glaze smoothly.
- Wire rack: Cools the bars faster, but if you don’t have one, just use a cutting board.
If you’re missing a hand mixer, don’t sweat it—just mix a bit longer by hand. I’ve made these in a rental kitchen with barely more than a wooden spoon, and they still turned out. Just be sure to keep your baking pan in good shape; old scratched metal can bake unevenly. Pro tip: A silicone spatula makes cleanup way easier, especially with sticky maple glaze.
How to Make Maple Donut Bars
- Prep Your Pan and Oven:
Preheat oven to 350°F (175°C). Line a 9×9-inch (23x23cm) baking pan with parchment, leaving some overhang for easy removal. Lightly grease the paper and sides. This helps the bars release cleanly—trust me, sticky edges are no fun. - Mix Dry Ingredients:
In a medium bowl, whisk together 1 3/4 cups (220g) flour, 1 tsp baking powder, 1/2 tsp baking soda, and 1/2 tsp salt. Set aside. This ensures even leavening—no surprise baking soda pockets! - Cream Butter and Sugar:
In a large bowl, beat 1/2 cup (115g) softened butter and 3/4 cup (150g) sugar with an electric mixer on medium speed for about 2 minutes, until light and fluffy. If mixing by hand, use a sturdy spatula and a little elbow grease. - Add Eggs and Vanilla:
Beat in 2 large eggs, one at a time, scraping down the bowl after each addition. Mix in 2 tsp vanilla extract. The mixture should look creamy and a bit thick—don’t worry if it looks slightly curdled. - Incorporate Dairy:
Add 1/2 cup (120ml) sour cream or Greek yogurt and 1/4 cup (60ml) milk. Beat on low speed until just combined. The batter will be smooth but thick. If it looks separated, it’ll come together once you add flour. - Combine Wet and Dry:
Add the dry ingredients to the wet in two additions, mixing gently on low or by hand. Stop mixing as soon as the flour disappears—overmixing can make bars dense. - Spread and Bake:
Spoon the batter into the prepared pan and smooth the top with an offset spatula or back of a spoon. Bake for 22-26 minutes, until bars are golden and a toothpick poked in the center comes out clean or with a few moist crumbs. If your oven runs hot, check at 20 minutes. - Cool Completely:
Let the bars cool in the pan for 10 minutes, then use the parchment to lift them onto a wire rack. Cool completely before glazing, or the glaze will melt right off (learned this the hard way!). - Make the Maple Glaze:
In a medium bowl, whisk 1/4 cup (60g) melted butter, 1/3 cup (80ml) maple syrup, and 1/2 tsp maple extract (if using) until smooth. Gradually whisk in 1 1/2 cups (180g) sifted powdered sugar. Add 1-2 tbsp milk or cream, a little at a time, until the glaze is thick but pourable. Add a pinch of salt and taste—adjust if needed. - Glaze and Slice:
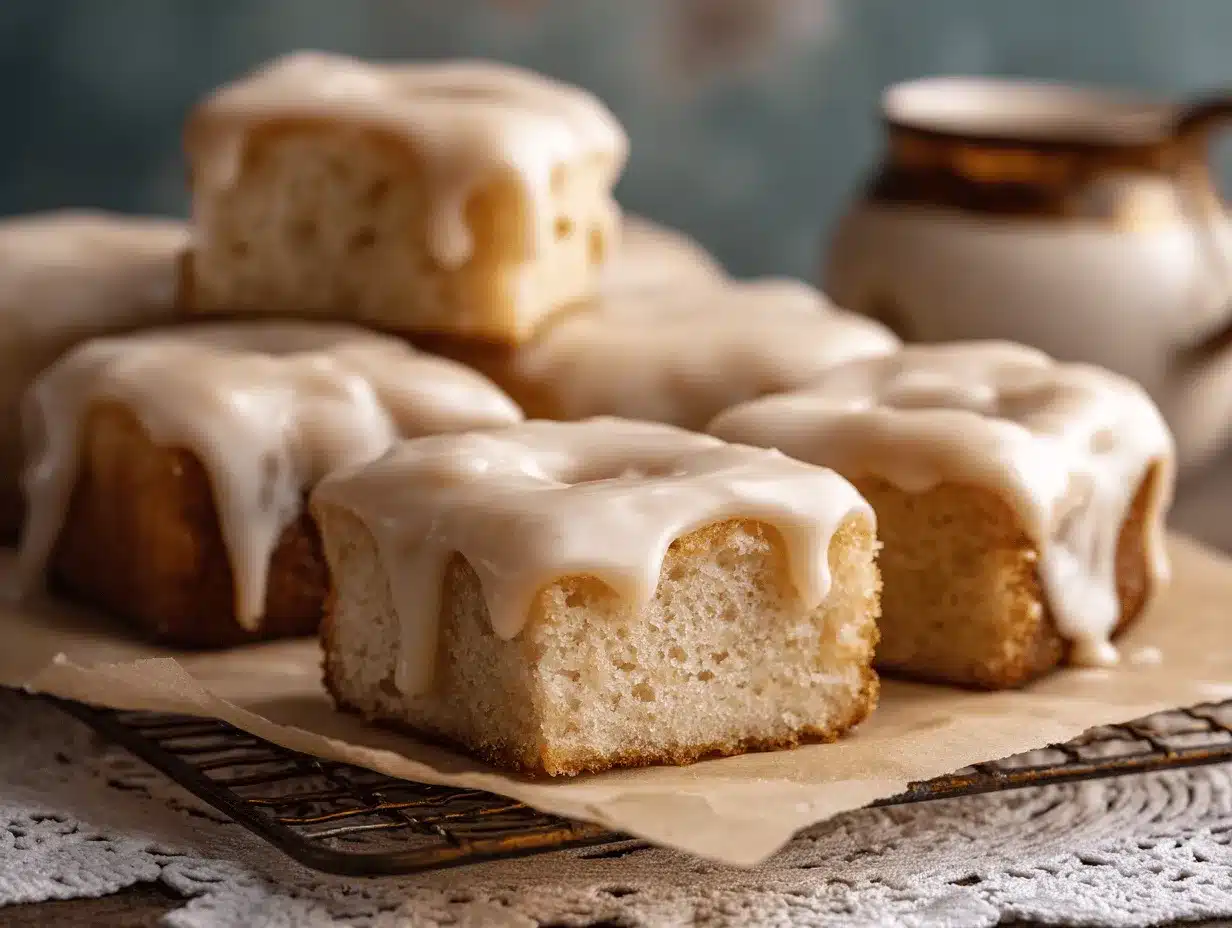
Pour the glaze over cooled bars and spread evenly. Let the glaze set for about 30 minutes (if you can wait). Slice into 12-16 bars. They’ll keep their shape beautifully!
Troubleshooting: If your bars are dry, bake a few minutes less next time—ovens vary. If the glaze is runny, add more powdered sugar. If it’s too thick, add a splash more milk. And don’t skip the parchment—sticky cleanup is not fun!
Cooking Tips & Techniques
Over the years, I’ve learned a few tricks to make these maple donut bars absolute perfection every time (and, let’s face it, I’ve also learned from some epic fails):
- Don’t Overmix: Once the flour is in, mix just until combined. Overmixing = tough, dense bars. The batter should look a little lumpy, and that’s okay.
- Room Temperature Ingredients: Cold eggs or dairy can cause the batter to curdle or bake unevenly. Set them out 30 minutes before you start (or pop eggs in warm water for 5 minutes).
- Glaze Consistency: The glaze should be thick enough to set but thin enough to pour. If you drizzle some off a spoon and it slowly disappears back into the bowl, you’re golden.
- Let Bars Cool Fully: I know it’s tempting, but glazing warm bars leads to a runny mess. Patience pays off with a beautiful, crackly glaze.
- Slicing Cleanly: For neat edges, use a sharp knife and wipe it clean between cuts. If the bars are sticky, chill in the fridge for 15 minutes before slicing.
- Test for Doneness: Ovens can be unpredictable. Start checking at the earlier time; look for golden edges and a toothpick with just a few crumbs.
- Batch Glazing: If you want extra-thick glaze, double the glaze recipe. I’ve done this for big bake sales, and it’s always a hit.
I’ve burned my fair share of bars (distracted by kids, you know how it goes), so now I always set two timers. Don’t be afraid to get a little messy—it’s part of the fun. And if your glaze isn’t perfect, just call them “rustic.” They’ll taste amazing either way.
Variations & Adaptations
One of the joys of this maple donut bars recipe is how easy it is to customize. Here are a few of my favorite twists and swaps:
- Gluten-Free: Use a 1:1 gluten-free all-purpose baking blend. I’ve made these for my gluten-free friends with King Arthur’s blend—no one could tell the difference.
- Vegan: Swap in your favorite plant-based butter and use non-dairy yogurt and milk. Use a flax egg (1 tbsp flaxseed meal + 2.5 tbsp water, set for 5 min) for each egg. The bars are just as soft and flavorful.
- Flavor Boosts: Add a pinch of cinnamon or nutmeg to the batter for a fall-inspired twist. Or sprinkle chopped toasted pecans on top of the glaze for crunch.
- Chocolate Maple Bars: Stir in 1/2 cup (90g) mini chocolate chips to the batter before baking, or drizzle melted chocolate over the glaze (my kids’ favorite).
- Allergen Swaps: For nut allergies, make sure your plant-based products are nut-free. For egg allergies, use an egg replacer or the flax egg method above.
- Small Batch: Halve the recipe and bake in a loaf pan for about 18-20 minutes. Perfect for a cozy night in!
Personally, I love the classic version, but when autumn rolls around, I can’t resist adding a sprinkle of cinnamon and chopped pecans. Don’t be afraid to make these your own—there are no rules, just good dessert.
Serving & Storage Suggestions
These maple donut bars are best enjoyed the day they’re made, but they hold up beautifully for several days. Here’s how I like to serve and store them:
- Serving: Serve at room temperature for the perfect texture and flavor. The glaze sets up nicely, so no sticky fingers! For an extra treat, warm a bar for 10 seconds in the microwave and pair with coffee or cold milk—so good.
- Presentation: Arrange bars on a pretty platter and sprinkle with a little extra powdered sugar or chopped pecans if you want to impress guests. For brunch, stack them on a cake stand with a few maple leaves for a cute Pinterest-worthy touch.
- Storage: Store bars in an airtight container at room temperature for up to 3 days. If your kitchen is warm, pop them in the fridge—they’ll last up to a week. The glaze keeps them moist, but they’ll firm up a little when chilled.
- Freezing: Freeze unglazed bars tightly wrapped for up to 2 months. Thaw at room temp, then glaze before serving. Glazed bars can also be frozen, but the glaze may get a tad sticky—still delicious, though!
- Flavor Note: The maple flavor deepens after a day or two, so leftovers (if you have any) are even better. I’ve hidden a few bars in the back of the fridge for a late-night treat—highly recommend.
Nutritional Information & Benefits
Each maple donut bar (based on 16 bars per batch) is estimated to have about 180 calories, 4g fat, 30g carbs, and 2g protein. Here’s why you can feel good about this treat (in moderation, of course):
- Maple Syrup: Unlike artificial syrups, pure maple syrup brings minerals and antioxidants. It’s also lower on the glycemic index compared to regular sugar.
- No Frying: Baked, not fried, means less oil and less mess—easier on your waistline and your kitchen.
- Customizable: Easily adapted for gluten-free, dairy-free, or nut-free diets. Just follow the swaps above!
- Potential Allergens: Contains eggs, wheat, dairy (unless swapped). Always check your extract and syrup for allergens if you have sensitivities.
For me, these maple donut bars are a “sometimes” treat, but they’re made with real ingredients, and I know exactly what’s going into them. That’s peace of mind with every bite.
Conclusion
If you’re craving something sweet, cozy, and easy, this maple donut bars recipe is about to become your new favorite. They’re quick to make, impossible to resist, and perfect for sharing—or hoarding, no judgment. I love the way the kitchen smells while they bake, and honestly, nothing beats that first bite of soft bar and crackly maple glaze.
Don’t be afraid to make these your own—tweak the glaze, add nuts, go gluten-free, whatever fits your vibe. If you give this recipe a try, let me know in the comments how it turned out or what fun twists you added! Sharing your creations totally makes my day, and I love seeing all the creative spins you come up with.
So go ahead—preheat that oven, grab your whisk, and treat yourself to some homemade bakery magic. You’ve earned it!
FAQs
Can I make maple donut bars ahead of time?
Absolutely! Bake and glaze them a day ahead, then store in an airtight container. The maple flavor actually gets even better overnight.
What can I use instead of maple extract?
If you don’t have maple extract, just use a little extra real maple syrup. The bars will still have plenty of maple flavor, I promise.
Can I freeze maple donut bars?
Yes! Freeze unglazed bars, then thaw and glaze before serving for best texture. Glazed bars can be frozen, but the glaze may get a little sticky (still tasty, though).
How do I know when the bars are done baking?
Check for golden edges and a toothpick that comes out with just a few moist crumbs. Don’t wait for it to come out completely clean, or the bars might get dry.
Is it okay to double the recipe?
Definitely! Just bake in a 9×13-inch pan and increase the baking time to about 28-32 minutes. Keep an eye on the edges so they don’t overbrown.
Pin This Recipe!
Maple Donut Bars

These easy maple donut bars are thick, pillowy, and topped with a silky maple glaze—delivering classic donut shop flavor without frying or special pans. Perfect for brunch, potlucks, or a cozy homemade treat.
- Prep Time: 15 minutes
- Cook Time: 25 minutes
- Total Time: 40 minutes
- Yield: 12-16 bars 1x
- Category: Dessert
- Cuisine: American
Ingredients
- 1 3/4 cups (220g) all-purpose flour (unbleached preferred)
- 1 tsp baking powder
- 1/2 tsp baking soda
- 1/2 tsp salt
- 1/2 cup (115g) unsalted butter, softened
- 3/4 cup (150g) granulated sugar
- 2 large eggs, room temperature
- 1/2 cup (120ml) sour cream or Greek yogurt
- 1/4 cup (60ml) whole milk
- 2 tsp pure vanilla extract
- For the Maple Glaze:
- 1/4 cup (60g) unsalted butter, melted
- 1/3 cup (80ml) pure maple syrup
- 1 1/2 cups (180g) powdered sugar, sifted
- 1/2 tsp maple extract (optional)
- 1–2 tbsp whole milk or cream
- Pinch of salt
Instructions
- Preheat oven to 350°F (175°C). Line a 9×9-inch baking pan with parchment paper, leaving overhang for easy removal. Lightly grease the paper and sides.
- In a medium bowl, whisk together flour, baking powder, baking soda, and salt. Set aside.
- In a large bowl, beat softened butter and granulated sugar with an electric mixer on medium speed for about 2 minutes, until light and fluffy.
- Beat in eggs, one at a time, scraping down the bowl after each addition. Mix in vanilla extract.
- Add sour cream or Greek yogurt and milk. Beat on low speed until just combined.
- Add the dry ingredients to the wet in two additions, mixing gently on low or by hand. Stop mixing as soon as the flour disappears.
- Spoon the batter into the prepared pan and smooth the top. Bake for 22-26 minutes, until bars are golden and a toothpick inserted in the center comes out clean or with a few moist crumbs.
- Let the bars cool in the pan for 10 minutes, then use the parchment to lift them onto a wire rack. Cool completely before glazing.
- For the glaze: In a medium bowl, whisk melted butter, maple syrup, and maple extract (if using) until smooth. Gradually whisk in powdered sugar. Add milk or cream, a little at a time, until the glaze is thick but pourable. Add a pinch of salt and adjust to taste.
- Pour the glaze over cooled bars and spread evenly. Let the glaze set for about 30 minutes. Slice into 12-16 bars and serve.
Notes
For best results, use room temperature eggs and dairy. Don’t overmix the batter after adding flour to keep bars tender. Let bars cool completely before glazing for a crackly finish. For gluten-free, use a 1:1 gluten-free flour blend. Add cinnamon or pecans for a fall twist. Store in an airtight container at room temperature for up to 3 days or refrigerate for up to a week. Freeze unglazed bars for up to 2 months.
Nutrition
- Serving Size: 1 bar (1/16 of recipe)
- Calories: 180
- Sugar: 18
- Sodium: 120
- Fat: 4
- Saturated Fat: 2
- Carbohydrates: 30
- Protein: 2
Keywords: maple donut bars, baked donuts, maple glaze, easy dessert, brunch, potluck, homemade donut bars, no fry donuts, American dessert, bakery style bars


