Introduction
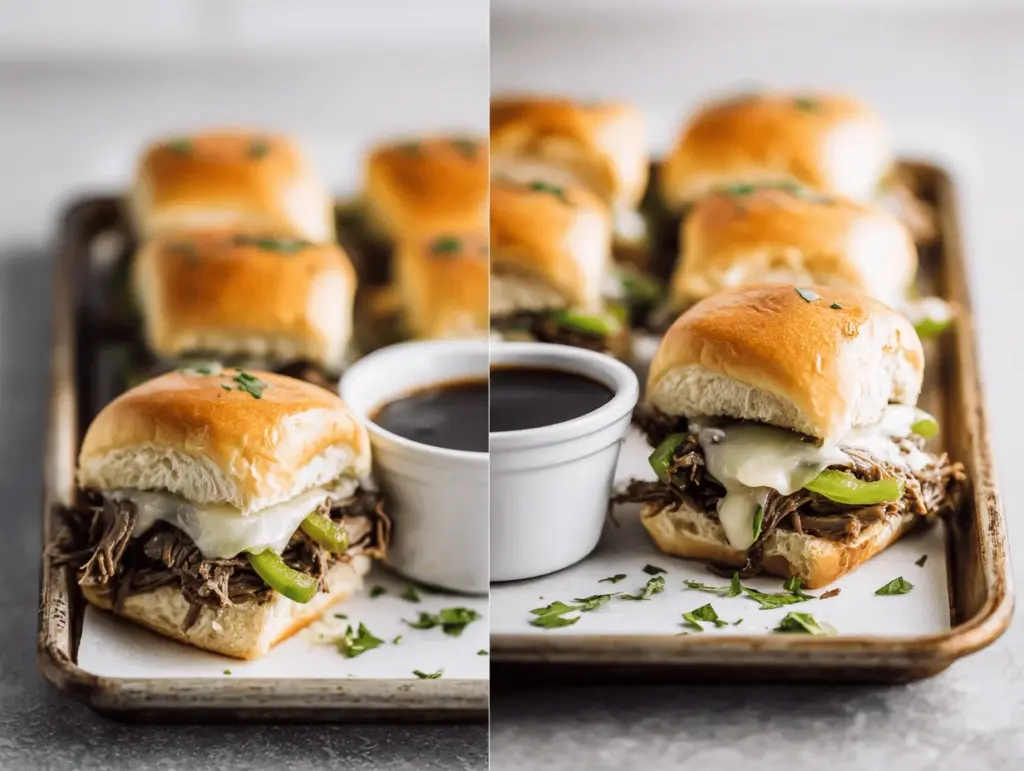
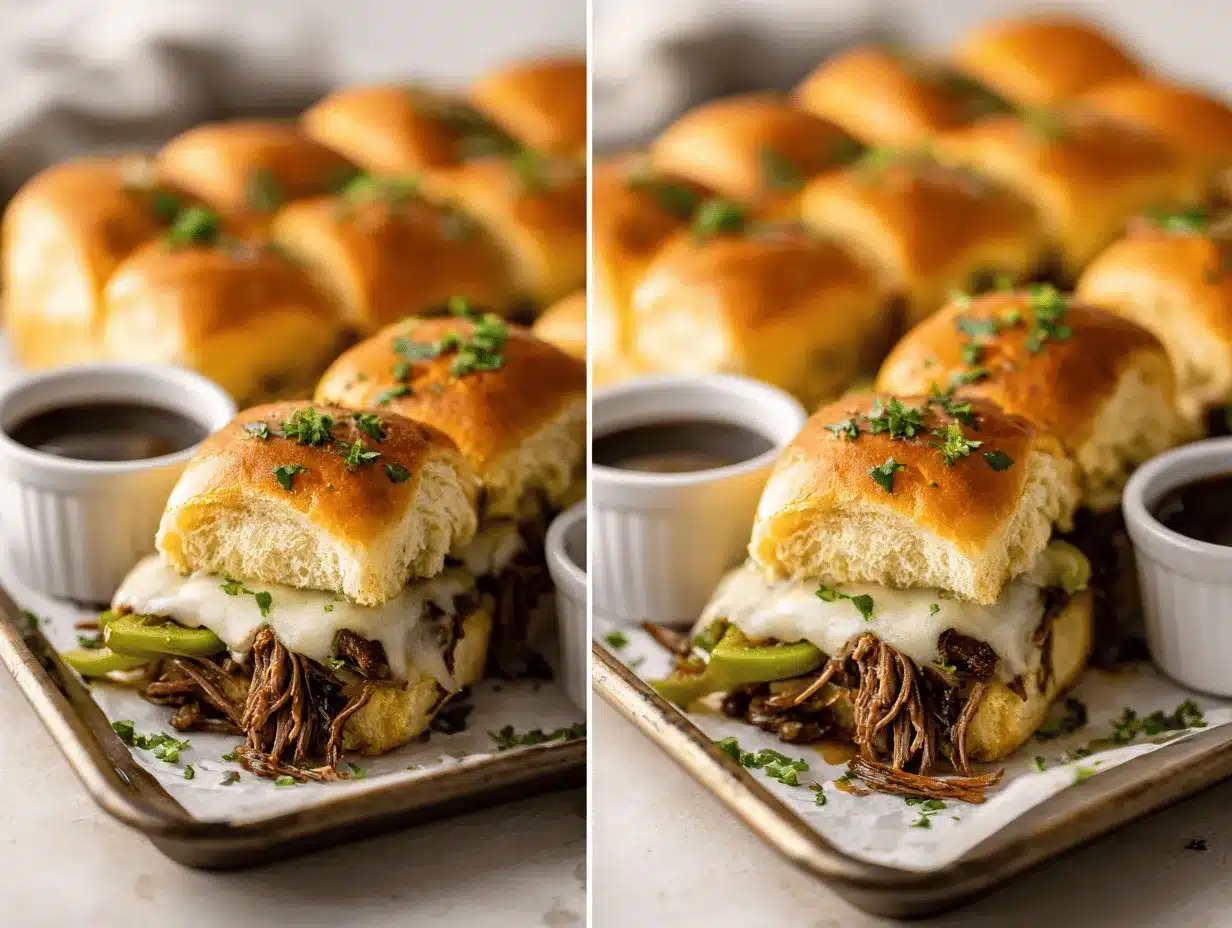
The aroma of sizzling beef and sweet peppers, melting cheese oozing over toasty slider buns—just thinking about these Crockpot Philly Cheesesteak Sliders makes my mouth water! I remember the first time I made these on a chilly Sunday afternoon. Honestly, I wasn’t even planning on making dinner special, but a craving for something hearty and cheesy hit me. These sliders ended up stealing the show. They’re everything you love about a classic Philly cheesesteak, but in mini, dip-worthy form—perfect for game day, a casual weeknight, or when you need a crowd-pleaser without breaking a sweat.
Philly cheesesteak is such an iconic sandwich, but the full-size version can feel a bit heavy (not to mention, messy). That’s why I absolutely adore transforming it into these easy beef dip sliders. With the crockpot doing most of the work, you get all the flavor—thinly sliced beef, sautéed onions and peppers, gooey provolone—packed into perfect hand-held bites. And let’s face it, there’s just something extra fun about sliders! (My family agrees; there’s never a crumb left.)
The best part? These Crockpot Philly Cheesesteak Sliders are ridiculously simple to throw together. Seriously, if you can slice an onion and layer a bun, you’re golden. I’ve tested this recipe more times than I can count—tweaking seasonings, trying different cheese combos, even making it for a friend’s birthday bash. It always delivers, and it’s become a go-to for those “I need something amazing but easy” days. Whether you’re hosting a party, feeding a hungry bunch, or just want a little comfort food magic, this recipe will not disappoint.
Why You’ll Love This Recipe
You know those recipes that become instant favorites after just one bite? That’s exactly what happened with these Crockpot Philly Cheesesteak Sliders in my house. There are so many reasons to love them, and here’s why they’ve earned a permanent spot in my meal rotation:
- Quick & Easy: Minimal prep, maximum flavor. The crockpot does most of the heavy lifting, leaving you time to relax or prep other dishes. You’ll have everything hot and ready in about 30 minutes after the beef’s done simmering.
- Simple Ingredients: No need to hunt down fancy stuff. Most of these ingredients are probably already in your kitchen—think beef, onions, peppers, cheese, and slider buns.
- Perfect for Parties & Game Day: These sliders are made for sharing! They’re portable, dippable, and always a hit at gatherings (trust me, they disappear fast at potlucks or Super Bowl parties).
- Crowd-Pleaser: Kids, picky eaters, and grown-ups all love them. My nephew once ate four in a row (true story!).
- Unbelievably Delicious: The combo of juicy, seasoned beef, caramelized veggies, and melty provolone is pure comfort food bliss. Every bite is cheesy, savory, and just a little bit indulgent.
What really sets this recipe apart is how the beef slow-cooks in the crockpot, soaking up all the flavor from the onions, peppers, and a savory beef broth. I like to finish them under the broiler for a minute, so the cheese bubbles and the buns get toasty—totally next level! And if you’re a dunker, that beefy cooking liquid is the perfect dip.
Honestly, these sliders are more than just tasty—they’re a little celebration in every bite. Whether you need a no-fuss dinner, want to impress your friends, or just want to recreate your favorite sandwich at home, these sliders make it a breeze. That’s why I keep coming back to this recipe, and I bet you will too.
What Ingredients You Will Need
This recipe uses simple, wholesome ingredients to deliver bold flavor and that signature Philly cheesesteak experience, all without a ton of fuss. Here’s what you’ll need for your irresistible Crockpot Philly Cheesesteak Sliders:
- For the Beef & Veggies:
- 1.5 lbs (680g) thinly sliced beef (ribeye or sirloin work best—look for “shaved steak” or ask your butcher to slice it thin)
- 1 large sweet onion, thinly sliced (adds sweetness and depth)
- 1 green bell pepper, thinly sliced (classic Philly flavor)
- 1 red bell pepper, thinly sliced (for a pop of color and extra sweetness)
- 2 cloves garlic, minced
- 1 cup (240ml) low-sodium beef broth (keeps everything juicy and makes a tasty dipping sauce)
- 1 tablespoon Worcestershire sauce (boosts the umami)
- 1 teaspoon kosher salt (or to taste)
- 1/2 teaspoon black pepper
- 1/2 teaspoon dried oregano (adds that Philly steakhouse vibe)
- For the Sliders:
- 12 slider buns or mini sandwich rolls (soft, slightly sweet—Hawaiian rolls are a favorite in my house!)
- 8 slices provolone cheese, halved (or enough to cover all your sliders—mild and melty, just like the real deal)
- 2 tablespoons unsalted butter, melted (for brushing the tops—totally optional, but adds a golden finish)
- Optional Extras:
- Pickled peppers or jalapeños (for some heat)
- Sautéed mushrooms (for an extra savory twist)
- Cheese sauce (if you want that classic “whiz” experience!)
Ingredient Tips: If you can’t find ribeye, sirloin works just as well (and is more budget-friendly). For gluten-free, grab GF slider buns—simple swap. And don’t stress about the cheese; mozzarella or even Swiss can work if provolone isn’t your thing. I’ve tried them all!
Pro tip: If you want to prep ahead, slice your onions and peppers the night before. Everything will be ready to toss into the crockpot come morning.
Equipment Needed
You’ll be happy to know you don’t need any fancy gadgets for these Crockpot Philly Cheesesteak Sliders—just the basics. Here’s what I use:
- Crockpot or Slow Cooker: A 4- to 6-quart model works great for this recipe. If you only have a larger one, that’s fine—just keep an eye on the liquid.
- Sharp Knife & Cutting Board: For slicing the beef and veggies thin. A good, sharp knife really makes all the difference—trust me, I’ve tried with a dull one and it’s a struggle!
- Large Spoon or Tongs: For mixing and serving the beef mixture without making a mess. Tongs make it easier to pile the filling onto the buns.
- Baking Sheet: For finishing the sliders under the broiler, if you want that melted cheese and toasted bun magic.
- Pastry Brush (Optional): For brushing melted butter on the slider tops (a simple trick that takes them over the top).
If you don’t have a crockpot, you can use a Dutch oven or large pot on the stovetop—just simmer gently and watch the liquid. And if you’re on a budget, check thrift stores for used slow cookers—they’re a goldmine!
I always rinse my crockpot insert right after serving—makes cleanup so much easier. Take care of your tools, and they’ll take care of you!
Preparation Method
-
Prep the Beef and Veggies (10 Minutes):
Slice your beef as thin as possible—think deli-thin. If it’s partially frozen, it’ll be even easier. Slice onions and bell peppers into thin strips; mince the garlic. (Your cutting board will smell amazing already!) -
Layer Ingredients in Crockpot (5 Minutes):
Place the sliced onions and both bell peppers at the bottom of your crockpot. Top with the thinly sliced beef, then sprinkle the garlic, salt, pepper, and oregano evenly over everything. -
Add the Liquids (2 Minutes):
Pour the beef broth and Worcestershire sauce over the top. Don’t stir—it’s better to let the veggies create a cushion for the beef (keeps it tender and juicy). -
Cook on Low or High (4-8 Hours):
Set your crockpot on low for 6-8 hours, or high for 3-4 hours. The beef should be super tender and the veggies soft. I always check after 3 hours; every crockpot is a little different. If the beef starts to dry out, add a splash of broth. -
Shred and Mix (5 Minutes):
When it’s done, use two forks to gently shred the beef right in the crockpot. Stir everything together, so all those juices get soaked up. Taste and adjust salt and pepper if needed. -
Assemble the Sliders (5 Minutes):
Line your slider buns on a baking sheet. Using tongs or a slotted spoon, pile the beef and veggie mixture onto the bottom half of each bun. Top with half a slice (or more!) of provolone cheese. -
Toast and Melt (3-4 Minutes):
Place the baking sheet under your broiler for 2-3 minutes, just until the cheese is melted and bubbly. Watch closely—buns go from golden to burnt in seconds! Brush tops with melted butter if you want that extra shine. -
Serve with the Beef Dip (1 Minute):
Pour the leftover cooking liquid into a small bowl for dipping. Nothing beats a cheesy slider dunked in that rich beefy broth!
Prep Notes: If your beef is too thick, it won’t get as tender—don’t be afraid to ask your butcher for help. If your crockpot runs hot, check early to keep the beef from overcooking.
Sensory cues: The beef should be fork-tender and juicy, with the onions and peppers meltingly soft. When you open the lid, you’ll get a savory, slightly peppery aroma that’s totally irresistible.
Personal tip: I always toast the buns a little before loading them up. It keeps them from getting soggy and adds a nice crunch!
Cooking Tips & Techniques
Let’s be real—Philly cheesesteak can be a little intimidating if you haven’t made it before. But with these tips, you’ll get perfect Crockpot Philly Cheesesteak Sliders every time:
- Slice the Beef Thin: Thinner beef cooks fast and gets melt-in-your-mouth tender. I pop mine in the freezer for 30 minutes before slicing—it makes a world of difference.
- Layer Veggies First: Putting onions and peppers at the bottom keeps the beef out of direct heat and adds moisture—no dry sliders here!
- Don’t Overcrowd the Crockpot: If you double the recipe, use a bigger slow cooker. Too much meat packed in means uneven cooking.
- Cheese Goes on Last: Melting cheese under the broiler gives you that classic Philly look and flavor. Don’t skip this step—it’s worth the extra minute.
- Watch the Broiler: I’ve burned my fair share of buns—don’t walk away during this step! Keep a close eye on your sliders.
Common mistakes? Overcooking the beef is the big one. If it’s looking dry, add more broth or cook on low next time. And don’t forget to taste and season before serving—sometimes the broth needs a little extra salt at the end.
For multitasking, prep your veggies and cheese while the beef cooks. That way, assembly is a snap when it’s time to eat.
After making these dozens of times, I’ve learned that patience pays off—let the beef go low and slow if you have the time. The result is always juicier!
Variations & Adaptations
There’s no one right way to enjoy Crockpot Philly Cheesesteak Sliders. Here are some fun twists and tweaks I’ve tried (and loved!):
- Low-Carb Option: Swap the slider buns for mini bell pepper halves or lettuce wraps. You still get all the flavor, but way fewer carbs. Great for keto or gluten-free folks.
- Spicy Version: Add sliced jalapeños to the crockpot or top each slider with pickled hot peppers. My husband loves a dash of hot sauce, too.
- Mushroom Lover’s Twist: Stir in 1 cup of sliced mushrooms with the onions and peppers. It adds an earthy, umami note that’s absolutely delicious.
- Cheese Whiz Classic: If you’re a purist (or just love that creamy texture), replace the provolone with a dollop of cheese sauce on each slider before broiling. It’s rich and super nostalgic.
- Dairy-Free: Use your favorite plant-based cheese, and double-check your buns for dairy. The beef and peppers are naturally dairy-free, so it’s an easy swap.
When I made these for a gluten-free friend, I used GF rolls and nobody even noticed the difference! Don’t be afraid to get creative—these sliders play well with all kinds of flavors.
Serving & Storage Suggestions
These Crockpot Philly Cheesesteak Sliders are best served hot and melty, straight from the oven. I like to arrange them on a big platter with a bowl of the beefy cooking liquid for dipping—it turns snack time into an event!
- Serving Ideas: Serve with a side of crispy fries, potato chips, or a simple green salad. For parties, pair with pickles, coleslaw, and your favorite beer or sparkling water.
- Storage: Leftover sliders keep well in the fridge, wrapped tightly, for up to 3 days. For best results, store the beef mixture separately from the buns to prevent sogginess.
- Freezing: The beef and veggie mixture freezes beautifully for up to 2 months. Thaw in the fridge overnight and reheat before assembling new sliders.
- Reheating: Warm the beef in the microwave or on the stovetop, then assemble fresh sliders and broil just before serving. The cheese melts perfectly every time.
Fun fact: The flavors get even better the next day! If you have leftovers (rare at my house), they make an amazing lunch.
Nutritional Information & Benefits
Each Crockpot Philly Cheesesteak Slider (with bun and cheese) has about 250 calories, 15g protein, 20g carbs, and 10g fat. Of course, that’ll vary depending on your buns and cheese.
Thanks to the lean beef and colorful peppers, you get a nice hit of protein plus vitamin C and B vitamins. Using low-sodium broth keeps things lighter, and you can easily make these gluten-free or low-carb with simple swaps.
Allergy note: Contains gluten (unless you use GF buns) and dairy (from the cheese). Adjust as needed for your family’s needs. Personally, I love how you can tweak this recipe for nearly any diet—it’s real comfort food, made flexible!
Conclusion
If you’re looking for a recipe that’s simple, satisfying, and guaranteed to bring smiles, these Crockpot Philly Cheesesteak Sliders are it. You get all the classic flavors—juicy beef, sweet onions and peppers, gooey cheese—in a totally crave-worthy, party-sized bite.
Don’t be afraid to experiment with your own twists. Whether you switch up the cheese, go gluten-free, or pile on the mushrooms, this recipe is all about making it your own. It’s become a staple in my house for a reason, and I can’t wait for you to try it, too.
If you make these sliders, let me know how they turn out! Comment below with your favorite variations, share this recipe with your friends, or tag me with your slider creations. Happy cooking, and enjoy every bite!
FAQs About Crockpot Philly Cheesesteak Sliders
Can I use a different cut of beef for this recipe?
Absolutely! While ribeye is classic (and super tender), sirloin or even flank steak work well too. Just slice as thin as possible for best results.
Can I make these sliders ahead of time?
Yes! Cook the beef and veggies in advance, then assemble and broil the sliders right before serving. Store the beef mixture separately in the fridge for up to 3 days.
Can I make this recipe without a crockpot?
You can! Use a Dutch oven or large pot on the stove. Simmer the beef, onions, and peppers on low heat until tender, about 1-2 hours.
How do I keep the slider buns from getting soggy?
Toast the buns briefly before assembling, and use a slotted spoon to pile on the beef mixture—this helps keep things nice and crisp.
What cheese works best for Philly cheesesteak sliders?
Provolone is classic, but mozzarella or even Swiss are great alternatives. For a fun twist, try cheese sauce for a creamy, nostalgic vibe.
Pin This Recipe!

Crockpot Philly Cheesesteak Sliders

These Crockpot Philly Cheesesteak Sliders pack all the classic flavors of a Philly cheesesteak—juicy beef, sweet peppers and onions, and melty provolone—into easy, crowd-pleasing mini sandwiches. Perfect for game day, parties, or a comforting weeknight meal with minimal effort.
- Prep Time: 15 minutes
- Cook Time: 3-4 hours (high) or 6-8 hours (low)
- Total Time: 3 hours 30 minutes (using high setting)
- Yield: 12 sliders 1x
- Category: Main Course
- Cuisine: American
Ingredients
- 1.5 lbs thinly sliced beef (ribeye or sirloin)
- 1 large sweet onion, thinly sliced
- 1 green bell pepper, thinly sliced
- 1 red bell pepper, thinly sliced
- 2 cloves garlic, minced
- 1 cup low-sodium beef broth
- 1 tablespoon Worcestershire sauce
- 1 teaspoon kosher salt (or to taste)
- 1/2 teaspoon black pepper
- 1/2 teaspoon dried oregano
- 12 slider buns or mini sandwich rolls
- 8 slices provolone cheese, halved
- 2 tablespoons unsalted butter, melted (optional, for brushing buns)
- Pickled peppers or jalapeños (optional)
- Sautéed mushrooms (optional)
- Cheese sauce (optional)
Instructions
- Slice the beef as thin as possible (partially freezing helps). Slice onions and bell peppers into thin strips and mince the garlic.
- Place sliced onions and both bell peppers at the bottom of the crockpot. Top with thinly sliced beef, then sprinkle garlic, salt, pepper, and oregano evenly over everything.
- Pour beef broth and Worcestershire sauce over the top. Do not stir.
- Cook on low for 6-8 hours or high for 3-4 hours, until beef is tender and veggies are soft. Check after 3 hours as crockpots vary.
- Use two forks to gently shred the beef in the crockpot. Stir everything together and adjust seasoning if needed.
- Line slider buns on a baking sheet. Using tongs or a slotted spoon, pile beef and veggie mixture onto the bottom half of each bun. Top with half a slice of provolone cheese.
- Place baking sheet under the broiler for 2-3 minutes, until cheese is melted and bubbly. Watch closely to avoid burning. Brush tops with melted butter if desired.
- Serve hot with leftover cooking liquid in a small bowl for dipping.
Notes
For best results, slice beef as thin as possible. Toast buns before assembling to prevent sogginess. Use a slotted spoon to serve beef mixture. For gluten-free, use GF buns; for dairy-free, use plant-based cheese. The beef and veggie mixture can be made ahead and freezes well. Watch the broiler closely to avoid burning the buns.
Nutrition
- Serving Size: 1 slider
- Calories: 250
- Sugar: 4
- Sodium: 450
- Fat: 10
- Saturated Fat: 5
- Carbohydrates: 20
- Fiber: 2
- Protein: 15
Keywords: Philly cheesesteak, sliders, crockpot, slow cooker, beef dip, party food, game day, easy dinner, comfort food, mini sandwiches


