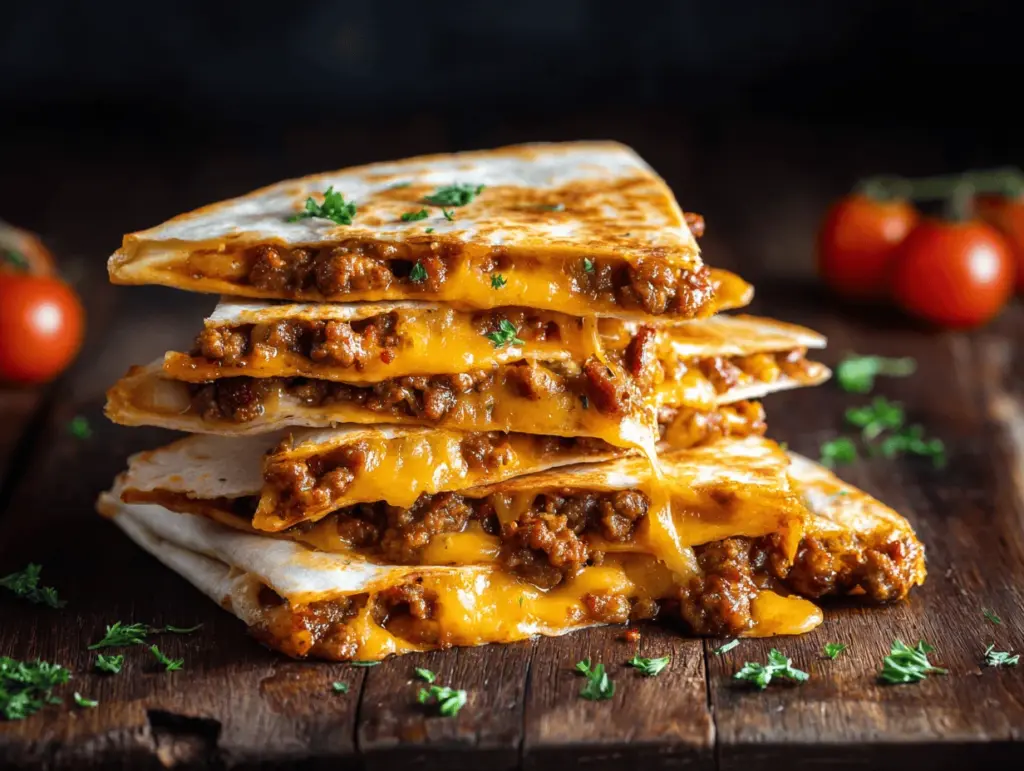
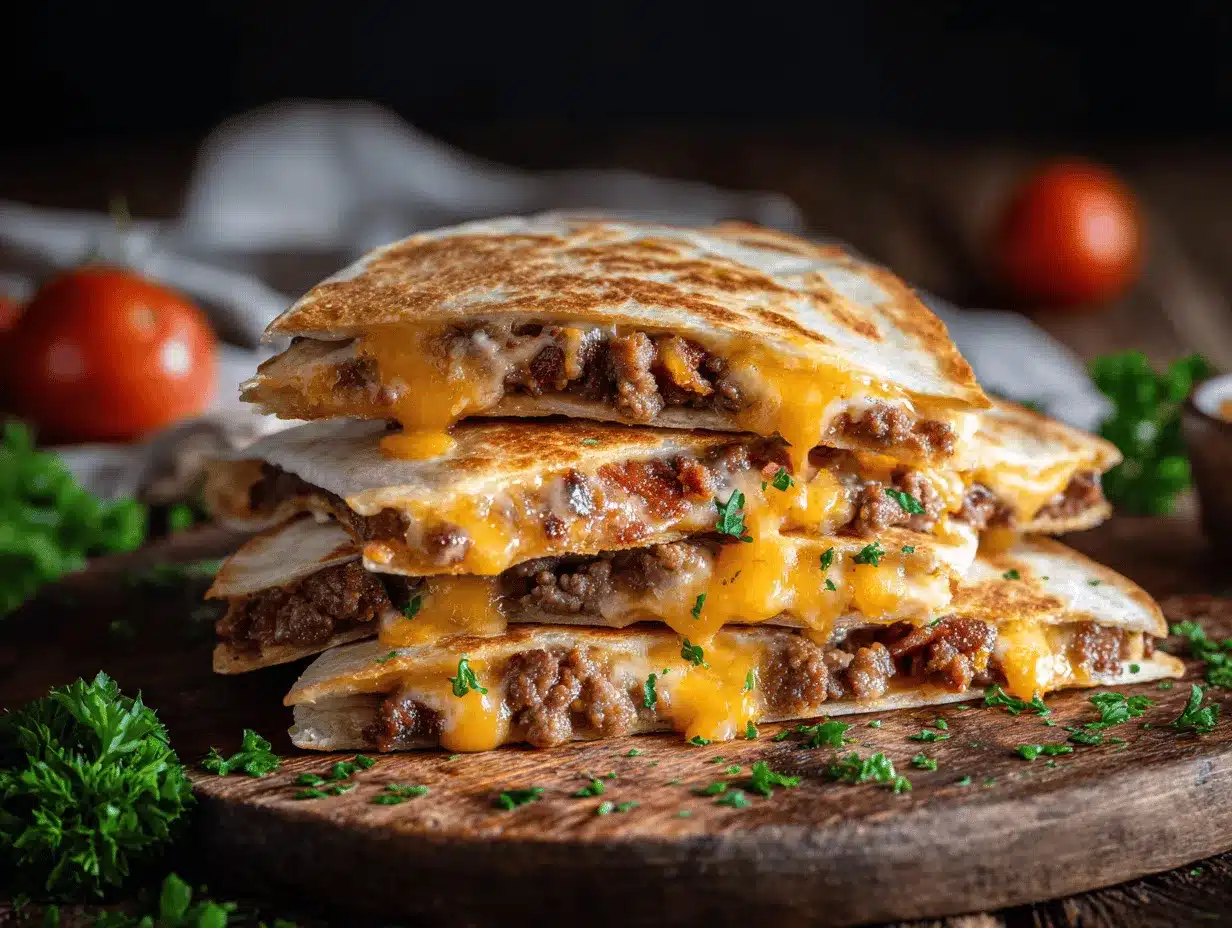
The first bite of a cheesy bacon smashburger quesadilla is pure magic—crispy tortilla, sizzling bacon, oozy melted cheese, and juicy beef all in one handheld package. You know that feeling when you can’t decide between a burger and a quesadilla? Well, why not have both? That’s exactly what I thought the first time I whipped these up for our family game night. Let’s just say—nobody was complaining.
Honestly, this cheesy bacon smashburger quesadillas recipe was born out of necessity (and a bit of laziness). I had leftover burger fixings, a stack of tortillas, and a hungry crowd. Fast forward a few pan flips, and these glorious, golden quesadillas hit the table. The kitchen smelled like a burger joint collided with a taco stand, and everyone was hooked. It’s become my go-to party trick for backyard BBQs, weeknight dinners, and even late-night snacks after movie marathons. The best part? You don’t need any fancy skills—just a skillet, some good cheese, and a love for bold, savory flavors. I’ve tested this recipe more times than I can count, so trust me—you’re about to make something truly special.
Cheesy bacon smashburger quesadillas aren’t just food—they’re an experience. Crispy, gooey, smoky, and utterly irresistible. Perfect for anyone who loves comfort food, wants to impress a crowd, or just needs to satisfy a serious burger craving. Ready to become everyone’s favorite cook? Let’s get started!
Why You’ll Love This Cheesy Bacon Smashburger Quesadillas Recipe
I don’t throw around the word “irresistible” lightly, but these cheesy bacon smashburger quesadillas honestly earn it. After making them for friends, neighbors, and a couple of picky eaters, I can confidently say there’s a lot to love about this recipe. Here’s why:
- Quick & Easy: You can have a big batch ready in under 30 minutes—no grilling, no deep-frying. Perfect for busy weeknights or spontaneous gatherings.
- Simple Ingredients: No need to hunt down specialty items. You probably have everything in your fridge or pantry right now.
- Perfect for Any Occasion: These quesadillas are a hit at parties, potlucks, family dinners, or even lazy weekends. They’re also fantastic as a late-night snack (trust me, I’ve tested this theory).
- Crowd-Pleaser: Kids devour them, adults ask for seconds, and everyone wants the recipe. Even the “I don’t like bacon” folks have changed their minds.
- Unbelievably Delicious: The combo of crispy tortilla, smoky bacon, juicy burger meat, and gooey cheese is just next-level. That melty cheese pull? It’s the stuff of dreams.
What sets my version apart? I use a smashburger technique—pressing seasoned beef right onto a hot skillet for maximum caramelization and flavor. Plus, the bacon isn’t just a topping—it’s layered throughout, so every bite counts. I use a mix of cheeses for the ultimate melt, and a touch of burger sauce for that classic drive-thru flavor. This isn’t just a burger in a tortilla; it’s the best parts of both, smashed together for the ultimate comfort food mash-up.
When you serve these cheesy bacon smashburger quesadillas, you’re not just feeding people—you’re giving them a reason to gather, laugh, and maybe fight over the last piece. That’s the real magic, if you ask me.
What Ingredients You Will Need
This cheesy bacon smashburger quesadillas recipe keeps things simple, but every ingredient pulls its weight. You’ll get bold, satisfying flavors without a ton of fuss. Here’s what you’ll need:
- For the Quesadillas:
- Flour tortillas (8-inch or 10-inch size, soft taco style works best)
- Ground beef (80/20 or 85/15 blend—juicy but not greasy)
- Thick-cut bacon (smoky flavor, holds up well after cooking)
- Cheddar cheese, shredded (for sharp, classic flavor)
- Monterey Jack cheese, shredded (for melty, creamy texture)
- Yellow onion, diced (optional, adds sweetness and crunch)
- Dill pickles, sliced (for that burger shop tang—optional but highly recommended)
- For the Smash Sauce:
- Mayonnaise (creamy base—regular or light both work)
- Ketchup (classic sweetness)
- Yellow mustard (a little zip)
- Pickle juice (adds tang and makes the sauce pop)
- Smoked paprika (optional, a hint of smokiness)
- Black pepper (freshly ground for best flavor)
- For Cooking:
- Butter (for golden, crispy tortillas—can use olive oil if preferred)
Ingredient Tips:
- I swear by Tillamook cheddar for meltability, but any good block cheese will work—avoid pre-shredded if you can.
- Look for thick-cut bacon; it doesn’t disappear inside the quesadilla like thinner slices do.
- If you want to lighten it up, swap ground beef for ground turkey or use turkey bacon.
- Gluten-free? Use your favorite GF tortillas.
- Dairy-free cheese alternatives melt well in this recipe—Violife and Daiya are my go-tos when cooking for dairy-free friends.
Honestly, don’t overthink the ingredients. The magic is in how everything comes together!
Equipment Needed
- Large nonstick skillet or griddle: For smashing and sizzling those beef patties and crisping up the quesadillas. (A well-seasoned cast iron pan is my favorite—nothing beats that crust!)
- Spatula (preferably metal): For smashing the beef and flipping the quesadillas. If you’re using a nonstick pan, a silicone spatula works too.
- Cutting board and sharp knife: For prepping onions, bacon, and cheese.
- Cheese grater: Freshly grated cheese melts way better than the bagged stuff. Trust me, it’s worth the extra minute.
- Mixing bowl and spoon: For your smash sauce.
- Paper towels: For draining bacon and dabbing away excess grease.
- Optional: Grill press or another heavy pan: If you want to really “smash” the beef, a grill press works wonders. (I’ve even used a smaller skillet in a pinch!)
If you don’t have a griddle, just use two skillets at once to speed things up. For big crowds, keep cooked quesadillas warm in a 200°F (95°C) oven. And if you’re tight on space or budget, a single sturdy skillet can handle the whole job. I’ve made these at tailgates with just a camping griddle and they still disappeared in minutes!
How to Make Cheesy Bacon Smashburger Quesadillas
- Prep the ingredients (10 minutes):
- Shred 1 cup (100g) cheddar cheese and 1 cup (100g) Monterey Jack cheese.
- Dice 1 small yellow onion (about ½ cup, 75g) and slice 8-10 dill pickle chips.
- Stir together ¼ cup (60g) mayonnaise, 1 tablespoon (15g) ketchup, 1 teaspoon (5g) yellow mustard, 2 teaspoons (10ml) pickle juice, a pinch of smoked paprika, and black pepper in a bowl for the smash sauce. Set aside.
- Cook the bacon (7-8 minutes):
- Heat your skillet over medium heat. Add 6 slices (about 150g) thick-cut bacon. Cook, turning occasionally, until crispy and browned. Remove to a paper towel-lined plate and chop into bite-sized pieces once cool.
- Tip: Pour off excess bacon grease, but leave a little in the pan for max flavor.
- Form and smash the beef (5 minutes):
- Divide 1 pound (450g) ground beef into 6-8 golf ball-sized portions. Season lightly with salt and pepper.
- Increase heat to medium-high. Add beef balls to the skillet and immediately press down with a spatula or grill press to flatten—about ¼-inch (6mm) thick.
- Cook for 1-2 minutes per side, until browned and cooked through. Remove to a plate.
- Note: Don’t overcrowd the pan! Work in batches if needed.
- Assemble the quesadillas (5 minutes):
- Wipe out the skillet and reduce heat to medium-low.
- Lay out 4 tortillas. On half of each tortilla, scatter a layer of cheddar and Monterey Jack cheese, some chopped bacon, diced onion, and pickles. Top with a smashed beef patty (break it up if needed), drizzle with smash sauce, then sprinkle more cheese on top. Fold tortillas over to form half-moons.
- Prep tip: Don’t overfill—too much and the fillings will ooze out during cooking.
- Cook the quesadillas (8-10 minutes):
- Add a bit of butter to the skillet. Place 1-2 quesadillas in the pan.
- Cook for 2-3 minutes per side, pressing gently, until golden and crispy. The cheese should be melted and the edges crunchy.
- Transfer to a cutting board and repeat with remaining quesadillas, adding more butter as needed.
- Sensory cue: Listen for a gentle sizzle and look for deep golden spots on the tortilla.
- Slice and serve (2 minutes):
- Let quesadillas rest for a minute, then cut each into wedges. Serve hot, with extra smash sauce on the side for dunking.
- Warning: Cheese will be hot! Give them a minute before serving to little ones.
Troubleshooting: If your quesadilla splits or fillings spill, just tuck everything back in with a spatula and keep going! Slightly torn tortillas still taste amazing.
Cooking Tips & Techniques
- Smashburger Method: Pressing the beef flat against a hot skillet caramelizes the meat and boosts flavor. Don’t skip this step—it’s what gives that classic burger vibe.
- Cheese Choice: Mixing two cheeses gives you both flavor and melt. Pre-shredded cheese can work, but it doesn’t melt as smoothly due to anti-caking agents.
- Don’t Overstuff: Trust me, I’ve learned the hard way—too much filling makes them impossible to flip. Start with less, then add more if you feel confident.
- Heat Control: Cook the quesadillas over medium to medium-low heat. Too hot, and you’ll burn the outside before the cheese melts. Too low, and they’ll be soggy rather than crisp.
- Bacon Grease Bonus: Cooking the quesadillas in a touch of reserved bacon grease adds flavor and helps crisp up the tortillas. Just don’t overdo it or they’ll be greasy.
- Batch Cooking: For a crowd, keep finished quesadillas on a sheet pan in a 200°F (95°C) oven so they stay hot and crisp.
- Make-Ahead: You can prep all the fillings and sauce in advance. Assemble and cook the quesadillas right before serving for the best texture.
- Quesadilla Flipping Hack: Use a wide spatula or even two spatulas at once if you’re nervous. (My first few tries were messy, but practice makes perfect!)
Oh, and if you drop a wedge on the floor? Five-second rule—nobody’s judging!
Variations & Adaptations
- Low-Carb/Keto: Use low-carb tortillas and swap ground beef for ground turkey or chicken. Skip the onions or use a smaller amount to keep carbs super low.
- Vegetarian Option: Replace the ground beef and bacon with plant-based crumbles and veggie bacon. Add sautéed mushrooms for extra umami.
- Spicy Kick: Add sliced jalapeños, pepper jack cheese, or a dash of hot sauce to the filling. I sometimes sprinkle on crushed red pepper flakes for a little surprise heat.
- Breakfast Style: Add scrambled eggs and hash browns for a breakfast-for-dinner twist. (Trust me, it’s a hit at brunch.)
- Allergen Swap: For dairy-free, use vegan cheese and mayo. Gluten-free tortillas work great if you’re avoiding wheat.
One weekend, I swapped in leftover pulled pork instead of ground beef and wow—BBQ smashburger quesadillas were born. Don’t be afraid to get creative or use up what’s in the fridge. The basic formula is super forgiving!
Serving & Storage Suggestions
Serving: Cheesy bacon smashburger quesadillas are best hot and crispy, straight from the skillet. Slice them into triangles and stack them high on a big platter—nobody can resist grabbing one (or two). I love serving them with extra smash sauce, sliced pickles, and maybe a side of kettle-cooked chips or a fresh green salad for balance. They’re also amazing with a cold soda or classic milkshake if you’re feeling retro.
Storage: Leftover quesadillas keep well in the fridge for up to 3 days. Stack between layers of parchment or wax paper in an airtight container. To reheat and keep them crisp, pop them in a skillet over low heat for a few minutes per side, or use a toaster oven. Microwave works in a pinch, but you’ll lose some crunch.
Freezing: You can freeze assembled (uncooked) quesadillas, wrapped tightly in plastic wrap and foil for up to 2 months. Cook from frozen (add a few extra minutes) or thaw before crisping up.
The flavors actually deepen overnight, so leftovers are a treat—if you have any!
Nutritional Information & Benefits
Each cheesy bacon smashburger quesadilla wedge (1/8 of the recipe) packs around 320 calories, 18g protein, 19g fat, and 19g carbs (estimates will vary based on brands). Thanks to the beef and cheese, you get a solid dose of protein and calcium. Using leaner beef or turkey can lower the fat if you like.
Health highlights: Real cheese offers protein and calcium, and swapping in whole wheat tortillas bumps up the fiber. You can easily adjust the recipe for gluten-free or dairy-free needs. Just be aware of potential allergens (wheat, dairy, and eggs in some tortillas or sauces).
Honestly, I love that this recipe feels indulgent but can be tweaked to fit most diets—so everyone can indulge together, guilt-free.
Conclusion
Cheesy bacon smashburger quesadillas are the kind of recipe that makes people smile, plain and simple. They’re easy, fun, and ridiculously tasty—perfect for feeding a crowd, making a weeknight dinner feel special, or just treating yourself to something epic. I love how customizable they are, and how they always disappear faster than I expect.
If you try this recipe, don’t be afraid to put your own spin on it. Add your favorite fixings, try a new sauce, or stuff them with whatever leftovers are in the fridge. That’s what makes cooking fun. If these cheesy bacon smashburger quesadillas make your table a little happier, I’d love to hear about it—leave a comment, share a photo, or let me know your favorite variation!
Now go ahead—grab a skillet and get smashing. You’re about to become everyone’s favorite chef!
Frequently Asked Questions
Can I make these quesadillas ahead of time for a party?
Absolutely! Prep and assemble the quesadillas, then cook them right before serving. Keep them warm in a low oven so they’re crispy when guests arrive.
What’s the best cheese for melty quesadillas?
A mix of cheddar and Monterey Jack gives you both flavor and super meltiness. Feel free to use pepper jack or mozzarella if you want to change things up.
Can I freeze leftover quesadillas?
Yes! Wrap them tightly in plastic wrap and foil, then freeze for up to two months. Reheat in a skillet or oven for best results—microwaving will make them a bit softer.
How do I make these gluten-free?
Just swap in your favorite gluten-free tortillas and double-check that your other ingredients are safe. The recipe works great with most GF wraps.
What extras can I serve with cheesy bacon smashburger quesadillas?
They’re awesome with fries, chips, pickles, or a crisp salad. I love serving extra smash sauce, ketchup, or even a little BBQ sauce for dipping.
Pin This Recipe!
Cheesy Bacon Smashburger Quesadillas

These cheesy bacon smashburger quesadillas combine crispy tortillas, juicy beef, smoky bacon, and melty cheese for the ultimate comfort food mash-up. Perfect for feeding a crowd, weeknight dinners, or parties—no fancy skills required!
- Prep Time: 10 minutes
- Cook Time: 18 minutes
- Total Time: 28 minutes
- Yield: 4 quesadillas (serves 4-8 as a main or appetizer) 1x
- Category: Main Course
- Cuisine: American
Ingredients
- 4 (8- or 10-inch) flour tortillas (soft taco style)
- 1 pound ground beef (80/20 or 85/15 blend)
- 6 slices thick-cut bacon
- 1 cup shredded cheddar cheese
- 1 cup shredded Monterey Jack cheese
- 1 small yellow onion, diced (about 1/2 cup)
- 8–10 dill pickle chips, sliced (optional)
- Butter (for cooking, or olive oil as substitute)
- Salt and black pepper, to taste
- For the Smash Sauce:
- 1/4 cup mayonnaise
- 1 tablespoon ketchup
- 1 teaspoon yellow mustard
- 2 teaspoons pickle juice
- Pinch smoked paprika (optional)
- Black pepper, to taste
Instructions
- Shred cheddar and Monterey Jack cheese. Dice onion and slice pickles. Mix mayonnaise, ketchup, mustard, pickle juice, smoked paprika, and black pepper for the smash sauce; set aside.
- Heat a large skillet over medium heat. Cook bacon until crispy (7-8 minutes), then transfer to a paper towel-lined plate and chop into bite-sized pieces. Pour off excess bacon grease, leaving a little in the pan.
- Divide ground beef into 6-8 golf ball-sized portions. Season with salt and pepper. Increase heat to medium-high, add beef balls to skillet, and smash flat (about 1/4-inch thick). Cook 1-2 minutes per side until browned and cooked through. Remove to a plate.
- Wipe out skillet and reduce heat to medium-low. Lay out tortillas. On half of each, layer cheddar and Monterey Jack cheese, bacon, onion, pickles, a smashed beef patty (break up if needed), a drizzle of smash sauce, and more cheese. Fold tortillas over to form half-moons.
- Add butter to skillet. Cook 1-2 quesadillas at a time for 2-3 minutes per side, pressing gently, until golden and crispy with melted cheese. Repeat with remaining quesadillas, adding more butter as needed.
- Let quesadillas rest for a minute, then cut into wedges. Serve hot with extra smash sauce for dipping.
Notes
For best results, use freshly grated cheese and thick-cut bacon. Don’t overstuff the quesadillas to prevent filling from spilling out. Keep cooked quesadillas warm in a 200°F oven if making for a crowd. Gluten-free and dairy-free adaptations work well. Leftovers reheat best in a skillet or toaster oven.
Nutrition
- Serving Size: 1 wedge (1/8 of recipe)
- Calories: 320
- Sugar: 2
- Sodium: 650
- Fat: 19
- Saturated Fat: 9
- Carbohydrates: 19
- Fiber: 1
- Protein: 18
Keywords: smashburger quesadillas, cheesy bacon quesadillas, party food, skillet recipes, comfort food, beef quesadilla, bacon, easy dinner, crowd-pleaser, game night


