The first time I slid a pan of these peanut butter s’mores cookie bars into the oven, the whole kitchen smelled like a cozy campfire—only better, honestly. There’s something about the way peanut butter hugs gooey marshmallows and melty chocolate that just screams fall comfort. You know those chilly evenings when you want a treat that’s both nostalgic and a bit indulgent? That’s exactly when this recipe shines. I actually developed this one during a rainy weekend, craving s’mores but not wanting to deal with the firepit. The result? A bar cookie that’s crispy on the top, chewy in the middle, and absolutely packed with classic s’mores flavor—with a peanut butter twist that takes it over the top.
I’ve baked these peanut butter s’mores cookie bars more times than I can count—for bake sales, family movie nights, and, let’s be honest, sometimes just because it’s Tuesday. They’re a hit with kids and adults alike (my picky niece asks for them every time she visits). They’re also pretty forgiving: you don’t need fancy tools or ingredients, and you can swap things in and out, depending on what’s hanging around in your pantry. What makes these bars really special is the way the soft peanut butter cookie base wraps around pools of melted chocolate and marshmallow. Every bite is gooey, sweet, and just a little salty.
If you’re hunting for a fall dessert that’s easy, crowd-pleasing, and impossible to resist, these peanut butter s’mores cookie bars are it. Whether you’re baking for a holiday gathering or just want to treat yourself, you’ll love how quick and simple this recipe is. And if you’re a peanut butter lover, get ready—this one’s about to become your new obsession.
Why You’ll Love This Recipe
I’ve been baking for years, and let me tell you—these peanut butter s’mores cookie bars are in a league of their own. After testing dozens of s’mores-inspired recipes, this is the one I come back to every time. Here’s why you’ll love it as much as I do:
- Quick & Easy: You can have these bars ready in under an hour, start to finish. Perfect for last-minute cravings or when you need a dessert fast.
- Simple Ingredients: No need to hunt down specialty items. Most of these are probably already in your pantry, which makes this recipe a reliable go-to.
- Perfect for Any Occasion: These make a killer addition to fall bake sales, potlucks, or even holiday dessert tables. I’ve packed them in lunchboxes and served them at family gatherings—they always disappear!
- Crowd-Pleaser: Both kids and adults go wild for these bars. I’ve seen grown-ups sneak extra pieces when they think no one’s looking (myself included).
- Unbelievably Gooey and Delicious: The combo of peanut butter, chocolate, and marshmallow creates a soft, chewy texture with just the right amount of ooze and crunch.
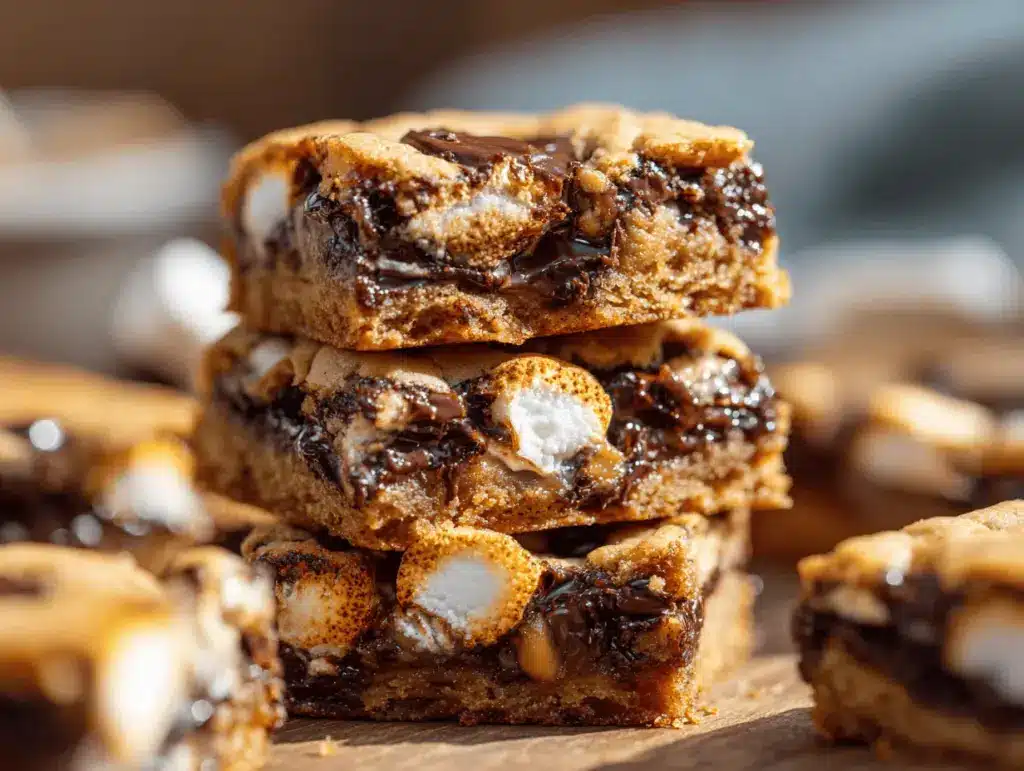
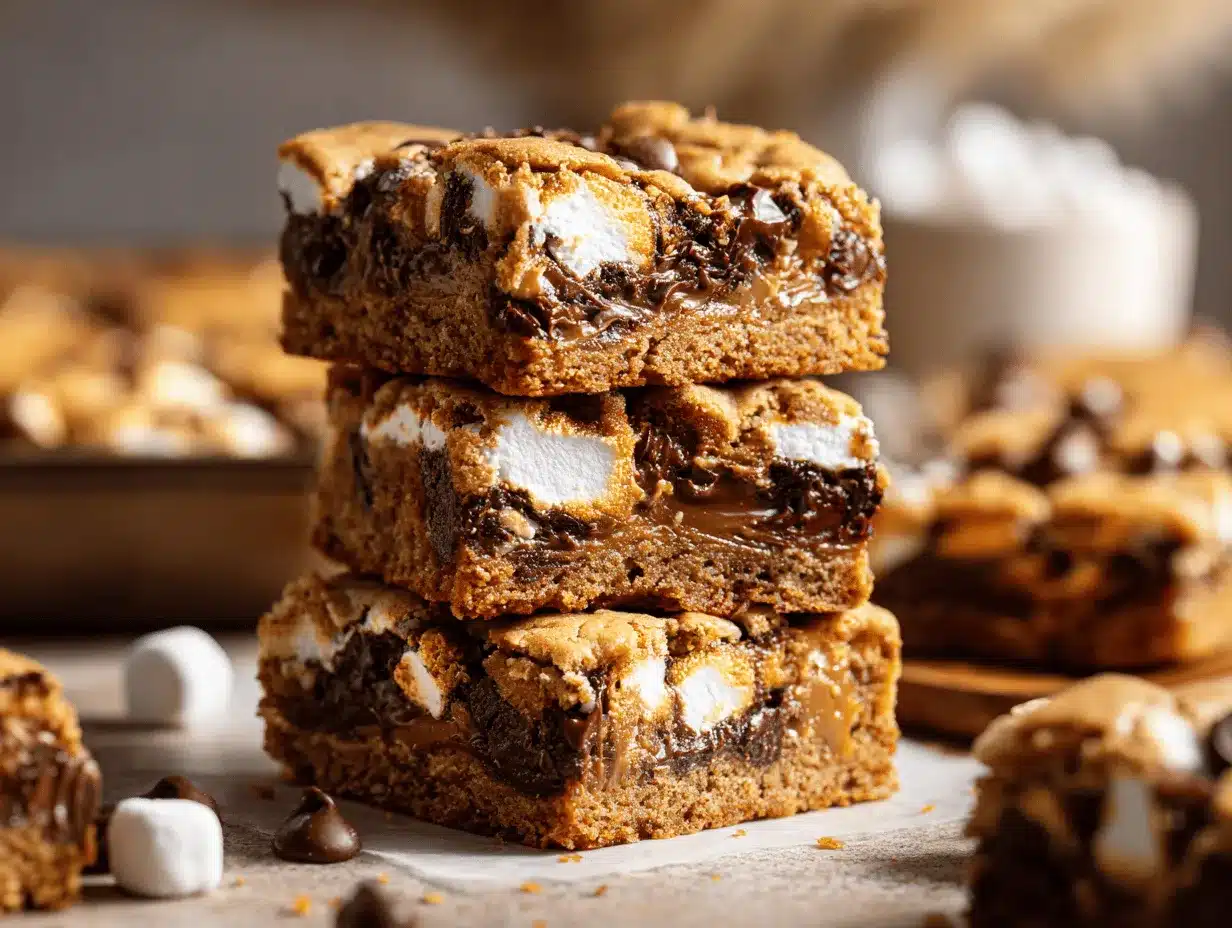
What really makes these peanut butter s’mores cookie bars different is the peanut butter cookie base. Instead of just pressing graham crackers into a pan, you get a soft, rich cookie layer that cradles all that gooey goodness. I also use a special layering technique—half the dough on the bottom, fillings in the middle, then dollops of dough on top. It gives the bars a rustic look and lets those marshmallows bubble up and caramelize around the edges. That’s the magic right there.
These bars are more than just a dessert—they’re a little taste of nostalgia, made even better with peanut butter’s creamy richness. Whether you’re making memories with your kids or indulging your own sweet tooth, this recipe is pure fall comfort, no campfire required.
What Ingredients You Will Need
This recipe uses simple, everyday ingredients to build layers of flavor and texture. It’s one of those bakes where each part plays a role, from the sturdy cookie base to the gooey marshmallow swirls. Here’s what you’ll need for peanut butter s’mores cookie bars:
- For the Cookie Base:
- 1/2 cup (113g) unsalted butter, softened (adds richness and helps with that soft, chewy texture)
- 1/2 cup (120g) creamy peanut butter (I use Jif or Skippy for best results—you can use natural PB, but the bars may be a bit crumbly)
- 3/4 cup (150g) light brown sugar, packed (adds moisture and a caramel note)
- 1/4 cup (50g) granulated sugar
- 1 large egg, room temperature
- 1 teaspoon pure vanilla extract
- 1 cup (125g) all-purpose flour (I’ve tried King Arthur and Gold Medal—both work great)
- 1/2 teaspoon baking soda
- 1/4 teaspoon salt
- For the S’mores Filling:
- 3/4 cup (about 65g) graham cracker crumbs (about 5 full sheets, crushed finely)
- 1 cup (175g) semi-sweet chocolate chips or chopped chocolate (use milk chocolate for a classic s’mores vibe, or dark for a richer flavor)
- 1 1/2 cups (75g) mini marshmallows (regular marshmallows cut into pieces work if that’s what you have)
Ingredient Notes & Substitutions:
- If you need a gluten-free version, swap the all-purpose flour for a gluten-free blend and ensure your graham crackers are gluten-free.
- Dairy-free? Use a plant-based butter and dairy-free chocolate chips. The texture changes a bit but it’s still delish.
- You can use crunchy peanut butter for added texture, but I prefer creamy for that classic, soft bite.
- No graham crackers? Try digestive biscuits or even vanilla wafers as a substitute.
- Feeling fancy? Add a handful of chopped toasted nuts or a sprinkle of sea salt on top for extra crunch.
Honestly, this is a great recipe to play around with—just keep that peanut butter, chocolate, and marshmallow combo front and center!
Equipment Needed
You don’t need much to whip up peanut butter s’mores cookie bars—just the basics. Here’s what I use every time:
- 9×9-inch (23x23cm) baking pan (metal or glass both work—just watch the bake time, as glass can take a little longer)
- Parchment paper (my secret weapon for easy removal and clean-up—foil works in a pinch, but parchment is best)
- Medium mixing bowls (one for wet, one for dry)
- Electric hand mixer or stand mixer (makes creaming the butter and sugar a breeze, but you can use a sturdy whisk and elbow grease if you’re feeling old-school)
- Measuring cups and spoons (I like using a digital scale for accuracy, but cups work fine)
- Spatula or wooden spoon
- Small offset spatula (helpful for spreading the thick dough, but you can use the back of a spoon)
- Cooling rack (not essential, but it helps prevent soggy bottoms)
If you don’t have a square pan, an 8×8-inch will work—the bars will just be a touch thicker, so add a few minutes to the bake time. For easy clean-up, I always line my pan with parchment and leave a bit overhanging the sides. Budget tip: Dollar store pans work just fine for this recipe, especially if you’re bringing these to a party and don’t want to worry about getting your pan back.
And here’s a little maintenance tip—if you use a nonstick pan, avoid metal utensils so the coating doesn’t get scratched. Learned that the hard way!
How to Make Peanut Butter S’mores Cookie Bars
- Prep Your Pan and Oven (5 minutes):
Preheat your oven to 350°F (175°C). Line a 9×9-inch baking pan with parchment paper, letting the sides hang over for easy lifting. Lightly spray with nonstick spray. This makes the bars come out like a dream—no scraping or sticking! - Mix the Wet Ingredients (5 minutes):
In a medium bowl, beat together 1/2 cup softened butter and 1/2 cup creamy peanut butter until smooth and creamy. Add 3/4 cup packed brown sugar and 1/4 cup granulated sugar. Beat until light and fluffy, about 2-3 minutes. Mix in 1 large egg and 1 teaspoon vanilla extract, scraping the bowl as needed. The mixture should look pale and creamy—if it looks curdled, keep mixing! (Don’t worry, it’ll come together.) - Combine the Dry Ingredients (2 minutes):
In another bowl, whisk together 1 cup flour, 1/2 teaspoon baking soda, and 1/4 teaspoon salt. Stir in the graham cracker crumbs. (I crush mine in a zip-top bag using a rolling pin—it’s oddly satisfying!) - Make the Dough (2 minutes):
Gradually add the dry ingredients to the wet, mixing until just combined. The dough will be thick—don’t overmix or the bars will be tough. If it looks crumbly, press it together with your spatula. - Assemble the Bars (5 minutes):
Press about two-thirds of the dough evenly into the bottom of your prepared pan. Sprinkle the chocolate chips evenly over the dough, then scatter the mini marshmallows on top. Drop spoonfuls of the remaining dough over the marshmallows. Don’t worry if it doesn’t cover everything—the marshmallows will puff up and peek through while baking, which is exactly what you want. - Bake (22–28 minutes):
Bake for 22-28 minutes, or until the top is golden brown and the edges are set. The center may still look a little jiggly—that’s perfect! The bars will firm up as they cool. If you like extra-gooey marshmallows, pull them at 22 minutes. For a crispier top, go to 28 minutes. Watch closely the last few minutes, as marshmallows can brown quickly. - Cool Completely (at least 1 hour):
Let the bars cool in the pan for at least an hour before lifting them out by the parchment. If you try to cut them too soon, you’ll end up with a (delicious) mess. For ultra-clean slices, chill them in the fridge for 30 minutes before cutting. (Trust me, patience pays off here!) - Slice and Serve:
Use a sharp knife to cut into 16 squares. If the marshmallow sticks, wipe the blade between cuts and run it under hot water.
Troubleshooting Tips: If your bars seem too underbaked, pop them back in for 2-3 minutes. If they’re too dry, next time, measure your flour using the “spoon and level” method or use a digital scale. And if your marshmallows ooze out the sides, that’s part of the fun—those caramelized edges are irresistible!
My top tip? Don’t skip the parchment paper—it makes life so much easier. And if you’re in a rush, you can speed up the cooling by chilling the pan in the fridge.
Cooking Tips & Techniques
Even after making peanut butter s’mores cookie bars dozens of times, I still pick up new tricks. Here’s what I’ve learned (sometimes the hard way):
- Room Temperature Butter: Soft butter blends more easily and creates a smoother, fluffier dough. Cold butter just won’t cut it—literally.
- Don’t Overmix: Once you add the dry ingredients, mix until just combined. Overmixing leads to tough bars instead of soft, chewy perfection.
- Watch the Marshmallows: They can go from golden to burnt quickly. If the tops are browning too fast, tent the pan with foil for the last 5 minutes.
- Cut When Cool: These bars are super gooey when warm (which is amazing, but messy). If you want neat squares for a party, let them cool completely or chill before slicing.
- Use High-Quality Chocolate: It makes a big difference. I’ve tried store brands, but Ghirardelli or Trader Joe’s chocolate chips melt beautifully and taste richer.
- Layering is Key: Leaving some marshmallows exposed lets them get toasty and caramelized. Don’t worry if it looks uneven going into the oven.
I’ll admit, I once tried to bake these in a glass pan without parchment paper—big mistake. They stuck, and I had to scrape them out (still tasted great, but not Pinterest-pretty). Also, don’t be tempted to use a smaller pan unless you want super-thick bars—then you’ll need to extend the bake time and keep a close eye on the center.
For multitasking, get the dough ready while your oven preheats and crush the graham crackers while the butter softens. You can even mix the dough a day ahead and keep it in the fridge—just let it sit at room temp for 20 minutes before assembling so it spreads easily.
Variations & Adaptations
The beauty of peanut butter s’mores cookie bars is how customizable they are. Here are some of my favorite twists:
- Gluten-Free: Swap the flour and graham crackers for gluten-free versions. The texture stays chewy and delicious—just check your marshmallows and chocolate for hidden gluten.
- Nut-Free: Use sunflower seed butter or Wowbutter instead of peanut butter. I’ve made these for my nephew’s school, and they disappeared just as fast.
- Flavored Chips: Try butterscotch, white chocolate, or even peanut butter chips for a different flavor profile. My kids love half chocolate, half butterscotch!
- Seasonal Add-Ins: For fall, add a pinch of cinnamon or pumpkin spice to the dough, or toss in some chopped dried cranberries for a tangy kick.
- Vegan Option: Use plant-based butter, egg replacer, and vegan marshmallows. The dough may be a bit softer, but the flavor is still spot-on.
- Different Pan Sizes: Bake in an 8×8-inch pan for thicker bars (just add 5-8 minutes to the bake time), or in a 9×13-inch pan for thinner, party-size bars (reduce bake time).
Personally, I love swapping in dark chocolate chips and adding a sprinkle of flaky sea salt on top for a grown-up twist. The sweet-salty combo is just addictive. If you’re feeling extra creative, swirl a spoonful of raspberry or strawberry jam into the dough before baking—kind of like a PB&J s’mores bar!
Serving & Storage Suggestions
Peanut butter s’mores cookie bars are at their best served just slightly warm—the chocolate is still a little melty, and the marshmallows are gooey. If you want to go all out, top with a scoop of vanilla ice cream or a drizzle of chocolate sauce.
For gatherings, cut the bars into small squares and arrange on a rustic wooden board or pretty plate. They pair perfectly with hot cocoa, coffee, or even a glass of cold milk (classic, right?). If you’re serving these at a fall party, a spiced chai latte is a dreamy match.
Storage: Keep bars in an airtight container at room temperature for up to 3 days. They’ll stay soft and chewy—just make sure they’re cool before storing, or the marshmallow can get a bit sticky. For longer storage, freeze the bars (layered between wax paper) for up to 2 months. Thaw at room temp, or pop them in the microwave for 10-15 seconds to bring back that gooey magic.
If you like your bars extra soft, store them with a slice of bread in the container—the bread keeps them from drying out. And honestly, the flavors deepen after a day or two, so leftovers (if you have any!) are even better.
Nutritional Information & Benefits
Each peanut butter s’mores cookie bar (based on 16 bars per batch) is approximately:
- Calories: 220
- Fat: 11g
- Carbohydrates: 28g
- Protein: 3g
- Sugar: 17g
Peanut butter adds a bit of protein and healthy fats, while marshmallows and chocolate bring the joy. If you’re watching your sugar, you can swap in a lower-sugar chocolate or reduce the marshmallows a bit. These bars are naturally vegetarian, and can easily be made gluten-free or dairy-free with a couple swaps. Allergens to watch for: peanuts, wheat, dairy, and eggs (depending on your substitutions).
From a wellness perspective, I love that you can get all the s’mores flavor with a little more substance (and way less mess) than the classic campfire treat. Everything in moderation, right?
Conclusion
There’s just something special about peanut butter s’mores cookie bars—every time I bake them, they bring back memories of campfires and childhood treats, but with a cozy, grown-up twist. They’re quick to make, easy to customize, and so gooey and delicious you’ll be craving them all season long.
If you’re looking for a fall dessert that’s impossible to resist and simple enough for any baker, give these bars a try. Don’t be afraid to mix things up with your favorite add-ins or toppings. I’ve made a hundred versions, and each one has its own charm.
Let me know how your peanut butter s’mores cookie bars turn out—drop a comment below if you try them, share your favorite twist, or tag me on social media. Happy baking, and may your fall be filled with gooey, chocolatey smiles!
FAQs About Peanut Butter S’mores Cookie Bars
Can I use crunchy peanut butter instead of creamy?
Absolutely! Crunchy peanut butter adds a bit of extra texture and nutty crunch to the bars. Just make sure to mix well so everything holds together.
How do I keep the marshmallows from burning on top?
If you notice the marshmallows browning too quickly, loosely cover the pan with foil for the last 5 minutes of baking. This keeps them gooey and golden, not burnt.
Can I double the recipe for a crowd?
Yes! Double all the ingredients and bake in a 9×13-inch pan. You may need to add 5-8 minutes to the baking time—just check that the top is golden and the edges are set.
What’s the best way to store leftovers?
Store cooled bars in an airtight container at room temperature for up to 3 days. For longer storage, freeze with parchment between layers and thaw as needed.
Can I make these bars without graham crackers?
You can! Substitute digestive biscuits, vanilla wafers, or even crushed oatmeal cookies. The flavor will be a little different but still tasty and s’mores-like.
Pin This Recipe!

Peanut Butter S’mores Cookie Bars

These gooey, chewy cookie bars combine the nostalgic flavors of classic s’mores with a rich peanut butter cookie base. Perfect for fall gatherings or anytime you crave a cozy, crowd-pleasing dessert—no campfire required.
- Prep Time: 15 minutes
- Cook Time: 22-28 minutes
- Total Time: 1 hour 45 minutes
- Yield: 16 bars 1x
- Category: Dessert
- Cuisine: American
Ingredients
- 1/2 cup (113g) unsalted butter, softened
- 1/2 cup (120g) creamy peanut butter
- 3/4 cup (150g) light brown sugar, packed
- 1/4 cup (50g) granulated sugar
- 1 large egg, room temperature
- 1 teaspoon pure vanilla extract
- 1 cup (125g) all-purpose flour
- 1/2 teaspoon baking soda
- 1/4 teaspoon salt
- 3/4 cup (about 65g) graham cracker crumbs (about 5 full sheets, crushed finely)
- 1 cup (175g) semi-sweet chocolate chips or chopped chocolate
- 1 1/2 cups (75g) mini marshmallows
Instructions
- Preheat your oven to 350°F (175°C). Line a 9×9-inch baking pan with parchment paper, letting the sides hang over for easy lifting. Lightly spray with nonstick spray.
- In a medium bowl, beat together the softened butter and creamy peanut butter until smooth and creamy. Add the brown sugar and granulated sugar. Beat until light and fluffy, about 2-3 minutes. Mix in the egg and vanilla extract, scraping the bowl as needed.
- In another bowl, whisk together the flour, baking soda, and salt. Stir in the graham cracker crumbs.
- Gradually add the dry ingredients to the wet, mixing until just combined. The dough will be thick—do not overmix.
- Press about two-thirds of the dough evenly into the bottom of the prepared pan. Sprinkle the chocolate chips evenly over the dough, then scatter the mini marshmallows on top. Drop spoonfuls of the remaining dough over the marshmallows.
- Bake for 22-28 minutes, or until the top is golden brown and the edges are set. The center may still look a little jiggly—that’s perfect. The bars will firm up as they cool.
- Let the bars cool in the pan for at least an hour before lifting them out by the parchment. For ultra-clean slices, chill them in the fridge for 30 minutes before cutting.
- Use a sharp knife to cut into 16 squares. If the marshmallow sticks, wipe the blade between cuts and run it under hot water.
Notes
For gluten-free bars, use a gluten-free flour blend and gluten-free graham crackers. To prevent marshmallows from burning, tent the pan with foil for the last 5 minutes of baking. Let bars cool completely before slicing for neat squares. Store in an airtight container at room temperature for up to 3 days or freeze for up to 2 months.
Nutrition
- Serving Size: 1 bar (1/16 of pan)
- Calories: 220
- Sugar: 17
- Sodium: 120
- Fat: 11
- Saturated Fat: 4
- Carbohydrates: 28
- Fiber: 1
- Protein: 3
Keywords: peanut butter, s'mores, cookie bars, fall dessert, easy dessert, marshmallow, chocolate, bake sale, kid-friendly, gooey bars


