
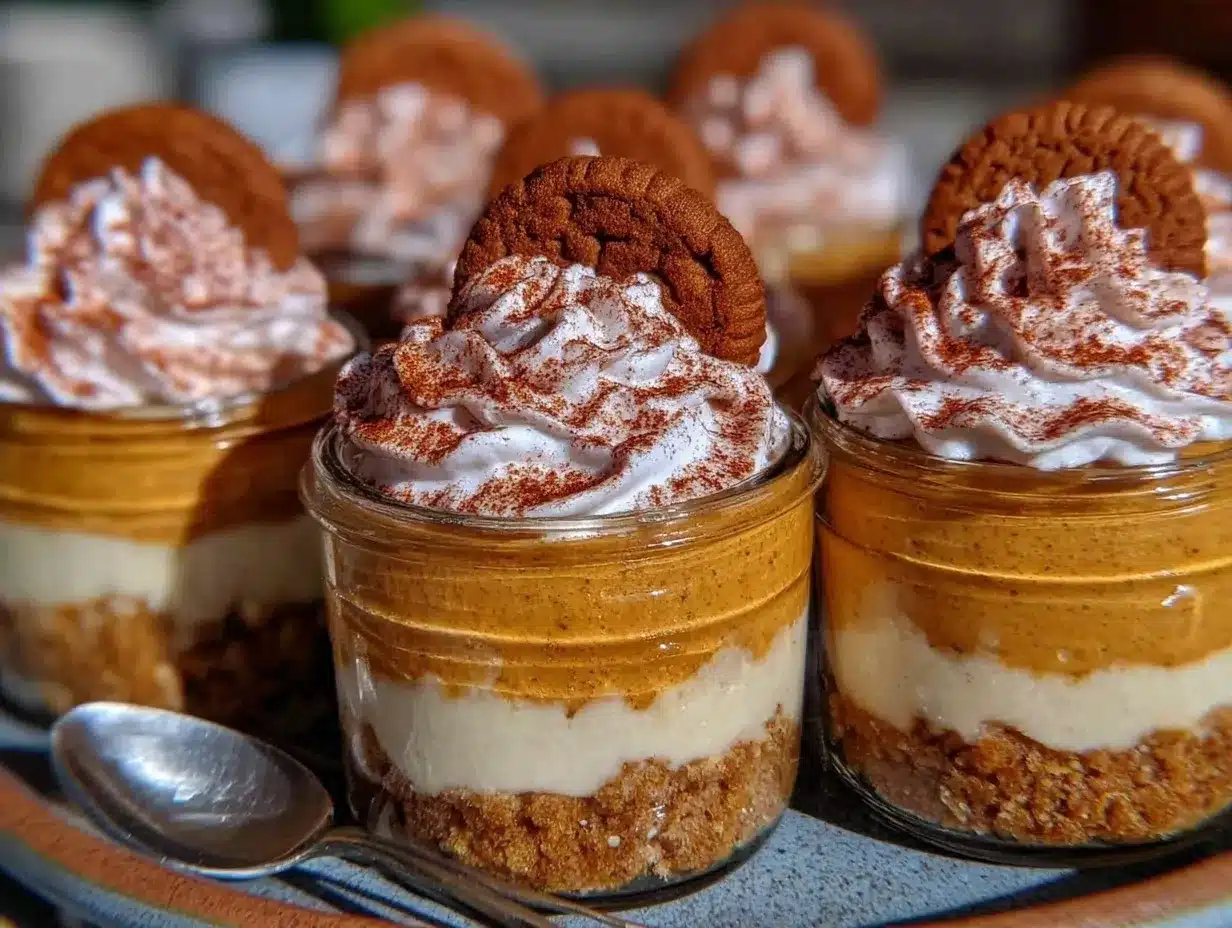
The smell of pumpkin spice and cinnamon swirling through the air instantly transports me to cozy autumn afternoons. Honestly, there’s something about pumpkin pie that just feels like home. But let’s face it — the traditional pie crust can be a bit intimidating and time-consuming. That’s why I’m so excited to share my recipe for creamy no bake pumpkin pies in a jar. This easy fall dessert idea is a total game-changer, especially when you want all the comfort of pumpkin pie without the fuss of baking.
I first stumbled upon this recipe during a chilly weekend when I was craving pumpkin pie but didn’t want to heat up the oven. After tweaking it a few times (and, of course, taste-testing along the way), I landed on the perfect balance of smooth pumpkin filling, spiced just right, layered over a crunchy crust—all served up in adorable little jars. It’s become a favorite around my kitchen, especially when friends drop by unexpectedly or for a quick sweet treat after dinner.
This creamy no bake pumpkin pie in a jar recipe is not only delicious but super convenient. Whether you’re a busy parent, a college student with limited kitchen gear, or just someone who loves fuss-free desserts, this recipe is for you. Plus, it’s a great way to bring that classic fall flavor to your table without the hassle. Trust me, once you try it, you’ll wonder why you ever baked a pumpkin pie the old-fashioned way.
Why You’ll Love This Recipe
- Quick & Easy: Ready in under 30 minutes with zero baking required—perfect for busy evenings or last-minute holiday gatherings.
- Simple Ingredients: Uses everyday pantry staples like canned pumpkin, cream cheese, and graham crackers. No need for a special grocery run.
- Perfect for Fall Occasions: Ideal for Thanksgiving, cozy family dinners, potlucks, or even as a festive treat to enjoy alongside your morning coffee.
- Crowd-Pleaser: Kids and adults alike rave about the creamy texture and just-right spice blend. I’ve served this at several get-togethers, and it’s always a hit.
- Unbelievably Delicious: The silky pumpkin filling with a hint of warm spices layered over a crunchy crust is comfort food at its best, but without the heaviness of a traditional pie.
What sets this recipe apart? It’s the no bake approach combined with a perfectly smooth, lightly sweetened pumpkin filling that’s blended with cream cheese to give it that luscious texture. I like to whip the mixture just right so it’s fluffy but still thick enough to hold its shape in the jar. Plus, serving it in individual jars makes it feel a little fancy, yet it’s totally casual and easy to share. Honestly, it’s the kind of dessert that makes you close your eyes after the first bite and say, “Yep, this is fall.”
What Ingredients You Will Need
This recipe keeps it straightforward with ingredients you probably have on hand. They come together to create a creamy, spiced filling atop a buttery, crunchy crust—no oven required.
- For the Crust:
- 1 ½ cups graham cracker crumbs (about 10-12 full sheets, crushed finely)
- 5 tablespoons unsalted butter, melted (I love using Kerrygold for richness)
- 2 tablespoons granulated sugar (balances the buttery crust)
- For the Pumpkin Filling:
- 1 cup canned pumpkin puree (not pumpkin pie filling; I recommend Libby’s for consistent quality)
- 8 ounces cream cheese, softened (full fat gives the best creamy texture)
- ½ cup powdered sugar (adds sweetness without graininess)
- 1 teaspoon vanilla extract (pure vanilla is king here)
- 1 teaspoon ground cinnamon
- ½ teaspoon ground ginger
- ¼ teaspoon ground nutmeg
- ⅛ teaspoon ground cloves (optional but adds warmth)
- 1 cup heavy whipping cream (cold, for whipping)
If you want to keep it dairy-free, swap cream cheese for a vegan cream cheese and use coconut cream instead of heavy whipping cream. Also, you can swap the graham cracker crumbs for crushed digestive biscuits if you’re outside the US or want a slightly different flavor. For a gluten-free option, gluten-free graham crackers work beautifully. The spices are flexible, too—feel free to adjust based on your favorite pumpkin pie spice blend or what you have on hand.
Equipment Needed
- Mixing bowls (one large for crust, one medium for filling, plus a chilled bowl for whipping cream)
- Hand mixer or stand mixer (essential for whipping the cream and blending the cream cheese smoothly)
- Measuring cups and spoons (accuracy matters for spices and sugar)
- Spoon or spatula (for folding whipped cream gently)
- Small jars or dessert glasses (4-6, about 8 oz / 240 ml each, perfect for individual servings)
- Food processor or zip-top bag and rolling pin (for crushing graham crackers; I’ve used both with good results)
If you don’t have a mixer, you can whip the cream by hand, but it takes some patience—and a strong arm! I recommend chilling your bowl and beaters in the fridge beforehand; it makes a noticeable difference in how quickly the cream whips up. For a budget-friendly alternative to jars, small plastic cups or even ramekins work just fine.
Detailed Preparation Method
- Prepare the crust: Start by crushing graham crackers into fine crumbs. You can pulse them in a food processor or place them in a zip-top bag and crush with a rolling pin. Measure out 1 ½ cups of crumbs.
Combine crumbs, melted butter, and sugar in a bowl. Stir until all the crumbs are evenly coated and look like wet sand. This usually takes about 2-3 minutes. Press the mixture firmly into the bottom of each jar (about 2 tablespoons per jar). This forms a sturdy base. Set jars aside. - Make the pumpkin filling: In a medium bowl, beat the softened cream cheese until smooth and creamy. This can take about 2-3 minutes with a hand mixer.
Add canned pumpkin, powdered sugar, vanilla extract, cinnamon, ginger, nutmeg, and cloves. Beat together until fully combined and smooth. The mixture should be thick but spreadable. - Whip the cream: Using a chilled bowl and beaters, whip the heavy cream until stiff peaks form. This usually takes 3-5 minutes. Be careful not to overbeat; you want it fluffy but not grainy.
Gently fold the whipped cream into the pumpkin mixture using a spatula. Fold carefully to keep the airy texture intact. This step creates the creamy, mousse-like consistency that makes this recipe special. - Assemble the jars: Spoon the pumpkin filling over the graham cracker crust in each jar. Fill almost to the top—about ¾ full. Smooth the tops with the back of a spoon or a small offset spatula.
Cover each jar with a lid or plastic wrap and refrigerate for at least 2 hours, ideally 4, to let the flavors meld and the filling set nicely. - Serve and garnish: Before serving, you can add a dollop of whipped cream or a sprinkle of cinnamon on top for extra flair. If you’re feeling fancy, a few chopped pecans or a drizzle of caramel sauce make a lovely finishing touch.
If the crust feels a bit loose, chilling helps it firm up. And if your pumpkin filling feels too thick, a splash of milk can loosen it up without losing creaminess. Just remember, patience is key with no bake desserts—the chilling time really brings everything together.
Cooking Tips & Techniques
One trick I’ve learned is to soften the cream cheese properly—take it out of the fridge at least 30 minutes ahead or microwave it in short bursts (10 seconds at a time) to avoid lumps. Lumps in cream cheese are the enemy of smooth pumpkin pie filling, trust me!
Also, folding the whipped cream gently is crucial. If you’re too aggressive, the mixture deflates and turns dense rather than light and fluffy. Use a spatula to cut through the center and fold from the edges in a slow, deliberate motion.
Another tip: don’t skip chilling the whipped cream bowl and beaters. Cold tools whip cream much faster and better. I learned this the hard way after many failed batches with curdled or under-whipped cream.
When pressing the crust into the jars, pack it down firmly but don’t crush it to dust. You want that satisfying crunch when you bite in. If you prefer a softer crust, press less firmly, but it might not hold together as well.
Lastly, plan ahead for chilling time. This dessert tastes best after a few hours in the fridge. If you’re in a rush, 1 hour is the bare minimum, but overnight is ideal for the flavors to marry beautifully.
Variations & Adaptations
- Vegan Version: Use dairy-free cream cheese and coconut cream instead of heavy cream. Swap butter for coconut oil in the crust and use gluten-free vegan graham crackers.
- Spice Variations: Play with your favorite pumpkin pie spice blend or add a pinch of cardamom or allspice for a unique twist. For a milder version, reduce cloves or nutmeg.
- Crunchy Toppings: Add toasted pecans, walnuts, or even gingersnap cookie crumbs on top for extra texture and fall flavors.
- Cooking Method Switch: If you prefer, use pre-made graham cracker crusts pressed into ramekins—save time on the crust prep.
- Fruit Add-Ins: Stir in some finely chopped crystallized ginger or dried cranberries into the filling before folding in the whipped cream. It adds a nice zing and chewiness.
One variation I love is layering the pumpkin filling with a dollop of caramel sauce between layers in the jar. It’s a decadent surprise and perfect for holiday entertaining.
Serving & Storage Suggestions
Serve these creamy no bake pumpkin pies chilled straight from the refrigerator. They’re delightful as individual desserts at dinner parties or packed up for potlucks. I like to garnish with a sprinkle of cinnamon or a small mint leaf for a pop of color.
If you want to prep ahead, these jars store beautifully in the fridge for up to 3 days. Just keep them tightly covered to prevent the crust from getting soggy. For longer storage, you can freeze the assembled jars (without whipped cream topping), then thaw overnight in the fridge before serving.
Reheat is not recommended since the filling is meant to be served cold and creamy, but if you want a slightly softer texture, leave the jars out at room temperature for 15-20 minutes before serving.
Over time in the fridge, the flavors meld even more, making the pumpkin spices pop and the texture creamier. I often make these a day ahead to let everything settle—it honestly tastes better the next day!
Nutritional Information & Benefits
Each jar contains approximately:
| Calories | Fat | Carbohydrates | Protein |
|---|---|---|---|
| 320 kcal | 22 g | 28 g | 4 g |
This recipe offers a decent amount of vitamin A thanks to the pumpkin puree, which is rich in beta-carotene—great for immune support and skin health. The cream cheese and heavy cream add calcium and protein, though this dessert is definitely on the indulgent side.
For gluten-free diets, just swap the graham crackers with certified gluten-free versions. Those watching sugar intake can reduce the powdered sugar slightly or try a natural sweetener like maple syrup, though the texture might vary a bit.
Personally, I appreciate that this recipe brings seasonal flavors with wholesome ingredients, making it a satisfying treat that doesn’t feel overly processed or artificial. It’s a little indulgence that still respects real food.
Conclusion
Creamy no bake pumpkin pies in a jar are one of those recipes that make fall feel extra special without any hassle. They’re easy to make, use simple ingredients, and pack that classic pumpkin pie flavor in a convenient, mess-free format. I love how customizable they are, which means you can make them your own with different spices, toppings, or dietary tweaks.
Honestly, this recipe has become my go-to for last-minute dessert needs or when I want to impress friends without turning on the oven. I hope you give it a try and find yourself reaching for these jars all autumn long.
If you make this recipe, please drop a comment below or share how you adapted it. I love hearing your stories and seeing your creations—it’s what makes food blogging so much fun!
Happy baking (or in this case, no baking!) and here’s to a cozy, tasty fall season.
FAQs About Creamy No Bake Pumpkin Pies in a Jar
Can I make this dessert ahead of time?
Yes! These pies actually taste better after chilling for a few hours or overnight. Just keep them covered in the fridge until ready to serve.
What if I don’t have graham crackers?
You can substitute with digestive biscuits, crushed gingersnaps, or even shortbread cookies for a different flavor profile.
How do I soften cream cheese quickly?
Leave it out at room temperature for about 30 minutes, or microwave in short 10-second bursts, checking frequently to avoid melting.
Is there a vegan version of this recipe?
Absolutely! Use vegan cream cheese, coconut cream, and dairy-free butter or coconut oil for the crust. Choose vegan and gluten-free crackers as needed.
Can I double or triple this recipe for a crowd?
Yes, just multiply the ingredients and assemble in more jars or a large trifle dish. Keep everything refrigerated until serving.
Pin This Recipe!
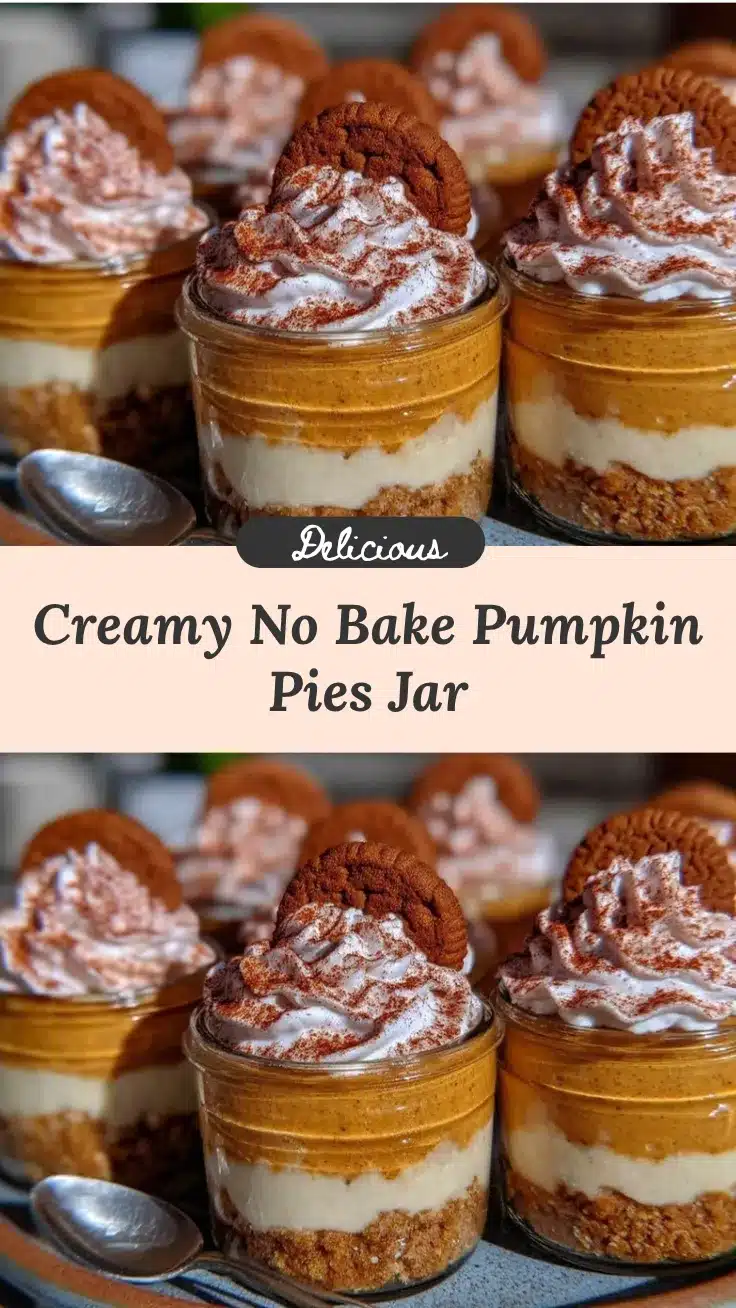
Creamy No Bake Pumpkin Pies in a Jar Easy Fall Dessert Recipe 2024

A quick and easy no bake pumpkin pie dessert served in individual jars, featuring a creamy spiced pumpkin filling over a crunchy graham cracker crust. Perfect for fall occasions and requires no oven.
- Prep Time: 15 minutes
- Cook Time: 0 minutes
- Total Time: 2 hours 15 minutes
- Yield: 4-6 servings 1x
- Category: Dessert
- Cuisine: American
Ingredients
- 1 ½ cups graham cracker crumbs (about 10–12 full sheets, crushed finely)
- 5 tablespoons unsalted butter, melted
- 2 tablespoons granulated sugar
- 1 cup canned pumpkin puree (not pumpkin pie filling)
- 8 ounces cream cheese, softened (full fat)
- ½ cup powdered sugar
- 1 teaspoon vanilla extract
- 1 teaspoon ground cinnamon
- ½ teaspoon ground ginger
- ¼ teaspoon ground nutmeg
- ⅛ teaspoon ground cloves (optional)
- 1 cup heavy whipping cream (cold)
Instructions
- Prepare the crust: Crush graham crackers into fine crumbs using a food processor or a zip-top bag and rolling pin. Measure 1 ½ cups of crumbs.
- Combine graham cracker crumbs, melted butter, and granulated sugar in a bowl. Stir until crumbs are evenly coated and look like wet sand.
- Press the crust mixture firmly into the bottom of each jar (about 2 tablespoons per jar) to form a sturdy base. Set jars aside.
- Make the pumpkin filling: Beat softened cream cheese in a medium bowl until smooth and creamy (2-3 minutes).
- Add canned pumpkin, powdered sugar, vanilla extract, cinnamon, ginger, nutmeg, and cloves to the cream cheese. Beat until fully combined and smooth.
- Whip the heavy cream in a chilled bowl with chilled beaters until stiff peaks form (3-5 minutes).
- Gently fold the whipped cream into the pumpkin mixture using a spatula to keep the airy texture intact.
- Assemble the jars: Spoon the pumpkin filling over the graham cracker crust in each jar, filling about ¾ full. Smooth the tops.
- Cover each jar with a lid or plastic wrap and refrigerate for at least 2 hours, ideally 4 hours, to let flavors meld and filling set.
- Before serving, optionally garnish with a dollop of whipped cream, a sprinkle of cinnamon, chopped pecans, or a drizzle of caramel sauce.
Notes
Soften cream cheese properly before mixing to avoid lumps. Chill bowl and beaters before whipping cream for best results. Fold whipped cream gently to maintain airy texture. Press crust firmly but not too hard to keep crunch. Chill for at least 2 hours; overnight is ideal for best flavor and texture. For dairy-free or vegan versions, substitute cream cheese and heavy cream with vegan alternatives and use coconut oil instead of butter in crust. Gluten-free graham crackers can be used for gluten-free diets.
Nutrition
- Serving Size: One jar (about 8 oz
- Calories: 320
- Fat: 22
- Carbohydrates: 28
- Protein: 4
Keywords: pumpkin pie, no bake dessert, pumpkin spice, fall dessert, easy pumpkin pie, pumpkin pie in a jar, creamy pumpkin pie, no bake pumpkin pie


