The smell of bubbling cheese and toasted breadcrumbs wafting from the oven is honestly one of those smells that just hits home. I first whipped up this creamy baked mac and cheese with crispy topping during a chilly weekend when I craved something warm and satisfying but easy to make. Let’s face it, mac and cheese is comfort food royalty, but this version takes it up a notch with its luscious creaminess and that addictive crunchy layer on top.
After baking this recipe multiple times, I can tell you it never disappoints. The cheese sauce is rich and velvety, yet light enough that you don’t feel weighed down afterward. Plus, the crispy topping adds that perfect textural contrast that keeps you coming back for more. This baked mac and cheese recipe has become my go-to when feeding a crowd or just treating myself to a cozy night in.
Whether you’re a mac and cheese purist or someone who loves a little twist on the classic, this creamy baked mac and cheese with crispy topping is worth adding to your recipe box. It’s great for busy weeknights, potlucks, or whenever you need a little culinary hug. Trust me, once you try this, it might just become a family favorite that everyone asks for again and again.
Why You’ll Love This Creamy Baked Mac and Cheese with Crispy Topping
- Quick & Easy: Ready to bake in under 30 minutes, which is perfect when you’re short on time but craving something hearty.
- Simple Ingredients: You probably have most of these staples in your kitchen already—cheese, pasta, butter, milk. No fancy trips required!
- Perfect for Any Occasion: Whether it’s a family dinner, game day, or a cozy night in, this dish fits right in.
- Crowd-Pleaser: Kids and adults alike go crazy for the creamy sauce combined with the crispy, golden topping.
- Unbelievably Delicious: The silky cheese sauce and crunchy topping combo is pure comfort food magic.
What sets this creamy baked mac and cheese apart? It’s all in the sauce and the topping. I blend sharp cheddar with a hint of creamy mozzarella for that gooey pull, then add a touch of nutmeg to bring depth without overwhelming. The crunchy topping? A buttery mix of panko breadcrumbs and parmesan that crisps up beautifully in the oven. Honestly, it’s like a little party happening in your mouth with every bite.
This isn’t just another mac and cheese recipe—it’s the kind that makes you close your eyes after the first forkful and smile. It’s classic comfort food, but with a perfectly balanced twist that feels both nostalgic and fresh at the same time.
What Ingredients You Will Need
This creamy baked mac and cheese with crispy topping uses straightforward ingredients that deliver rich flavor and satisfying textures without fuss. Most are pantry staples, and the cheese blend is flexible to suit your tastes.
- Elbow macaroni: 3 cups (about 240g) uncooked – classic choice for that perfect bite.
- Unsalted butter: 4 tablespoons (about 56g) – for the roux and topping, use high-quality butter like Kerrygold if you can.
- All-purpose flour: 1/4 cup (30g) – to thicken the cheese sauce.
- Whole milk: 3 cups (720ml), warmed – creates that creamy base; you can swap for 2% milk but whole milk adds richness.
- Sharp cheddar cheese: 3 cups shredded (about 340g) – the star of the sauce, gives bold flavor.
- Mozzarella cheese: 1 cup shredded (about 113g) – adds stretchiness and creaminess.
- Grated Parmesan cheese: 1/2 cup (50g) – mixed into the sauce and topping for an umami punch.
- Garlic powder: 1/2 teaspoon – subtle warmth.
- Onion powder: 1/2 teaspoon – rounds out the flavor.
- Ground nutmeg: a pinch – trust me, it adds a cozy, almost sweet note.
- Salt and freshly ground black pepper: to taste – essential for balancing flavors.
- Panko breadcrumbs: 1 cup (about 50g) – for the crispy topping; regular breadcrumbs work but panko gives better crunch.
- Optional: smoked paprika or cayenne pepper: a pinch – if you like a little kick in your mac and cheese.
For substitutions, if you need gluten-free, use gluten-free pasta and flour alternatives. For a dairy-free version, almond milk and vegan cheese blends can work, but the texture will differ slightly. I’ve found that firm, shredded cheeses melt best for the sauce, so avoid pre-shredded blends with anti-caking agents.
Equipment Needed
- Large pot: to boil the pasta; a roomy one helps prevent sticking.
- Medium saucepan: for making the cheese sauce; non-stick is a bonus.
- Whisk: essential for stirring the roux and sauce smoothly without lumps.
- Baking dish: a 9×13-inch (23x33cm) casserole dish works perfectly for baking and serving.
- Measuring cups and spoons: for accuracy in ingredients.
- Cheese grater: if not using pre-shredded cheese.
- Oven mitts: safety first when handling the hot baking dish.
If you don’t have panko breadcrumbs, you can pulse regular breadcrumbs in a food processor for a similar airy texture. I’ve also used a cast-iron skillet to make this on the stovetop before finishing under the broiler for a quick crisp. For budget-friendly options, most kitchen basics like a saucepan and whisk can be found at reasonable prices without compromising the dish.
Detailed Preparation Method

- Preheat the oven to 350°F (175°C). Prepare your baking dish by lightly greasing it with butter or cooking spray so the mac and cheese won’t stick.
- Cook the pasta: Bring a large pot of salted water to a boil. Add 3 cups (240g) of elbow macaroni and cook for 7-8 minutes until just al dente (it should still have a slight bite). Drain and set aside—don’t overcook, or the pasta will get mushy when baked.
- Make the roux: In a medium saucepan, melt 4 tablespoons (56g) unsalted butter over medium heat. Once melted, sprinkle in 1/4 cup (30g) all-purpose flour. Whisk continuously for about 2 minutes to cook out the raw flour taste; the mixture should turn a light golden color but not brown.
- Add milk gradually: Slowly pour in 3 cups (720ml) warmed whole milk, whisking constantly to avoid lumps. Continue cooking and stirring until the sauce thickens and coats the back of a spoon, about 5-7 minutes.
- Season the sauce: Stir in 1/2 teaspoon garlic powder, 1/2 teaspoon onion powder, a pinch of nutmeg, and salt and pepper to taste. Remember, you can always add more salt later if needed.
- Add cheese: Remove the sauce from heat and stir in 3 cups (340g) shredded sharp cheddar, 1 cup (113g) shredded mozzarella, and 1/2 cup (50g) grated Parmesan. Stir until melted and smooth. If the sauce seems too thick, add a splash of milk until you get the creamy consistency you like.
- Combine pasta and sauce: Add the drained macaroni to the cheese sauce and gently mix until all noodles are coated evenly.
- Prepare the topping: In a small bowl, mix 1 cup (50g) panko breadcrumbs with 2 tablespoons melted butter and 1/4 cup (25g) grated Parmesan. For a little extra flavor, sprinkle in a pinch of smoked paprika or cayenne pepper if you like a subtle heat.
- Assemble and bake: Pour the cheesy pasta mixture into your prepared baking dish and spread evenly. Sprinkle the breadcrumb topping evenly over the surface.
- Bake: Place the dish in the preheated oven and bake for 25-30 minutes until the topping is golden brown and crispy, and the sauce is bubbling around the edges.
- Rest and serve: Let the baked mac and cheese sit for 5 minutes before serving. This helps it set slightly and makes it easier to scoop.
If you notice the topping browns too quickly, loosely cover the dish with foil halfway through baking. The sauce should be creamy, not dry or rubbery—if it looks too thick, stir in a little milk before serving. The key to perfect creamy baked mac and cheese is balancing the cheese sauce richness with the crispy topping texture.
Cooking Tips & Techniques for Perfect Mac and Cheese
One trick I learned after some trial and error is to never skip cooking the roux properly. Whisking the butter and flour until it’s lightly golden prevents that raw flour taste that can ruin the sauce’s smoothness. Also, warming your milk before adding it helps the sauce thicken faster and blend better.
When boiling pasta, salt your water generously—you want it to taste like the sea. Undercooking slightly is better than overcooking, since the pasta will continue cooking in the oven. Drain thoroughly to avoid a watery sauce.
For the topping, panko breadcrumbs are superior because they crisp up without becoming mushy. Mixing them with melted butter ensures they toast evenly and taste buttery. If you don’t have panko, pulse regular breadcrumbs in a food processor to lighten them.
Avoid using pre-shredded cheese with anti-caking agents — it melts less smoothly and can make your sauce grainy. Instead, shred your own, and mix cheeses for best flavor and texture.
Timing-wise, you can prep the sauce and pasta ahead of time, then assemble and bake just before serving. If baking straight from the fridge, add a few extra minutes to the bake time and cover with foil initially to prevent over-browning.
Variations & Adaptations
This creamy baked mac and cheese with crispy topping is super adaptable depending on your mood or dietary needs.
- Gluten-Free: Use gluten-free pasta and substitute all-purpose flour with a gluten-free blend or cornstarch for the roux.
- Spicy Kick: Add diced jalapeños or a teaspoon of hot sauce to the cheese sauce for a spicy twist. I tried this once and it instantly jazzed up the classic flavor.
- Veggie Boost: Stir in cooked broccoli florets, sautéed mushrooms, or roasted red peppers before baking to sneak in some veggies without sacrificing creaminess.
- Dairy-Free: Swap milk for almond or oat milk and use vegan cheese alternatives. Keep in mind the texture will be different, but it’s still comforting.
- Different Cheese Combos: Try smoked gouda or fontina instead of mozzarella for a nuttier flavor. I’ve also used a sharp white cheddar for a sharper bite.
You can also experiment with different toppings—crushed potato chips or crispy fried onions add fun textures. For a richer sauce, a splash of heavy cream can be added to the milk.
Serving & Storage Suggestions
This creamy baked mac and cheese is best served warm, fresh from the oven when the topping is at its crispiest and the sauce is perfectly gooey. Pair it with a fresh green salad or steamed veggies to balance the richness.
Leftovers store well in an airtight container in the refrigerator for up to 3 days. When reheating, cover loosely with foil and warm in a 350°F (175°C) oven for 15-20 minutes to bring back the creamy texture without drying out. Microwaving works too, but you might lose some crispiness on top.
Freezing is possible, though the topping might lose its crunch. To freeze, cool completely, then store in a freezer-safe dish for up to 2 months. Thaw overnight in the fridge before baking again.
Interestingly, the flavors meld beautifully after a day, making the mac and cheese taste even better the next day—if you can resist it that long!
Nutritional Information & Benefits
Estimated per serving (serves 6): approximately 450 calories, 25g fat, 35g carbohydrates, 18g protein.
This creamy baked mac and cheese packs a good protein punch from the cheese and milk, making it more satisfying than boxed versions. Cheddar cheese provides calcium and vitamin A, while the milk adds vitamin D and potassium.
If you’re mindful of carbs, you can swap regular pasta with whole wheat or low-carb alternatives like chickpea pasta to add fiber and protein. Keep in mind, this recipe contains dairy and gluten unless substitutions are made.
From a wellness perspective, this recipe balances indulgence with nutrition better than many takeout options, and it’s a dish I happily include in my weekly meal rotation when I want comfort food that feels homemade and wholesome.
Conclusion
This creamy baked mac and cheese with crispy topping is the kind of recipe you’ll return to when you want comfort food that’s both indulgent and straightforward. I love how easy it is to prepare, yet it feels special enough to serve guests or treat the family.
Feel free to tweak the cheeses, add veggies, or spice it up to make it truly your own. Honestly, there’s no wrong way to enjoy this dish—just make sure you have plenty of napkins ready!
Give this recipe a try, and if you do, I’d love to hear how you customized it or what your favorite cheese combo is. Don’t forget to share it with your friends who need a little comfort food in their lives. Happy cooking and enjoy every gooey, crispy bite!
Frequently Asked Questions
Can I use a different type of pasta for this mac and cheese?
Absolutely! While elbow macaroni is classic, you can use shells, cavatappi, or penne. Just adjust the cooking time so the pasta stays al dente.
How do I make the topping extra crispy?
Using panko breadcrumbs mixed with melted butter is key. Also, spreading the topping evenly and baking uncovered helps it brown nicely. A quick broil at the end can add extra crunch, but watch carefully to avoid burning.
Can I prepare this recipe ahead of time?
Yes! You can mix the pasta and cheese sauce, assemble in the dish, cover, and refrigerate for up to 24 hours before baking. Add a few extra minutes to the bake time if baking cold.
What’s the best way to reheat leftovers?
Reheat in a 350°F (175°C) oven covered with foil for about 15-20 minutes. This keeps the sauce creamy and prevents the topping from burning. Microwaving is quicker but might soften the topping.
Is there a dairy-free version of this recipe?
You can substitute dairy milk with almond or oat milk and use vegan cheese alternatives. The texture will be a bit different, but it still makes a tasty comfort dish.
Pin This Recipe!

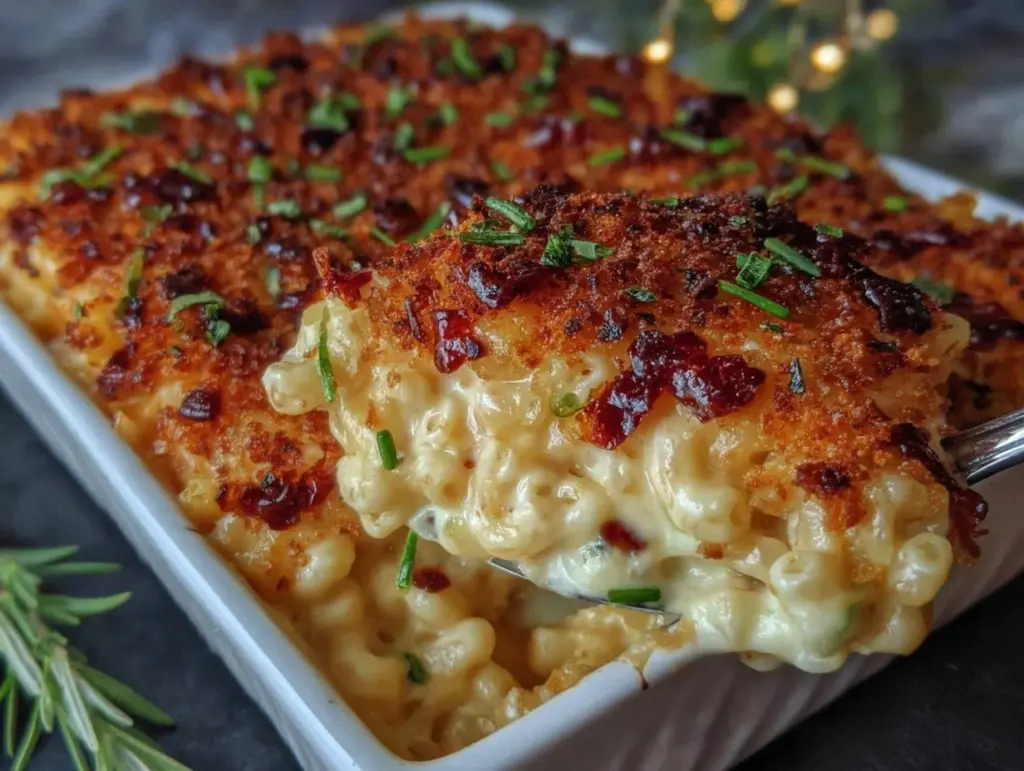
Creamy Baked Mac and Cheese with Crispy Topping

A rich and velvety baked mac and cheese featuring a luscious cheese sauce and a buttery, crispy panko breadcrumb topping. Perfect comfort food for any occasion.
- Prep Time: 15 minutes
- Cook Time: 30 minutes
- Total Time: 45 minutes
- Yield: 6 servings 1x
- Category: Main Course
- Cuisine: American
Ingredients
- 3 cups (about 240g) uncooked elbow macaroni
- 4 tablespoons (about 56g) unsalted butter, divided
- 1/4 cup (30g) all-purpose flour
- 3 cups (720ml) whole milk, warmed
- 3 cups (340g) shredded sharp cheddar cheese
- 1 cup (113g) shredded mozzarella cheese
- 1/2 cup (50g) grated Parmesan cheese, divided
- 1/2 teaspoon garlic powder
- 1/2 teaspoon onion powder
- Pinch of ground nutmeg
- Salt and freshly ground black pepper to taste
- 1 cup (50g) panko breadcrumbs
- Optional: pinch of smoked paprika or cayenne pepper
Instructions
- Preheat the oven to 350°F (175°C). Lightly grease a 9×13-inch baking dish with butter or cooking spray.
- Bring a large pot of salted water to a boil. Add elbow macaroni and cook for 7-8 minutes until just al dente. Drain and set aside.
- In a medium saucepan, melt 4 tablespoons unsalted butter over medium heat. Sprinkle in the flour and whisk continuously for about 2 minutes until lightly golden.
- Slowly pour in warmed whole milk while whisking constantly. Cook and stir until sauce thickens and coats the back of a spoon, about 5-7 minutes.
- Stir in garlic powder, onion powder, nutmeg, salt, and pepper to taste.
- Remove sauce from heat and stir in shredded cheddar, mozzarella, and half of the Parmesan cheese until melted and smooth. Add a splash of milk if sauce is too thick.
- Add drained macaroni to the cheese sauce and mix gently until evenly coated.
- In a small bowl, combine panko breadcrumbs, melted butter (from the reserved butter), remaining Parmesan cheese, and optional smoked paprika or cayenne pepper.
- Pour the cheesy pasta mixture into the prepared baking dish and spread evenly. Sprinkle the breadcrumb topping evenly over the surface.
- Bake for 25-30 minutes until the topping is golden brown and crispy and the sauce is bubbling around the edges.
- Let the baked mac and cheese rest for 5 minutes before serving.
Notes
If topping browns too quickly, cover loosely with foil halfway through baking. Use panko breadcrumbs for best crunch. Avoid pre-shredded cheese with anti-caking agents for smoother sauce. Milk can be warmed before adding to sauce to help thicken faster. Leftovers reheat best in oven covered with foil to maintain creaminess and topping crispness.
Nutrition
- Serving Size: 1/6th of the recipe
- Calories: 450
- Fat: 25
- Carbohydrates: 35
- Protein: 18
Keywords: baked mac and cheese, creamy mac and cheese, crispy topping, comfort food, easy mac and cheese, cheesy pasta bake