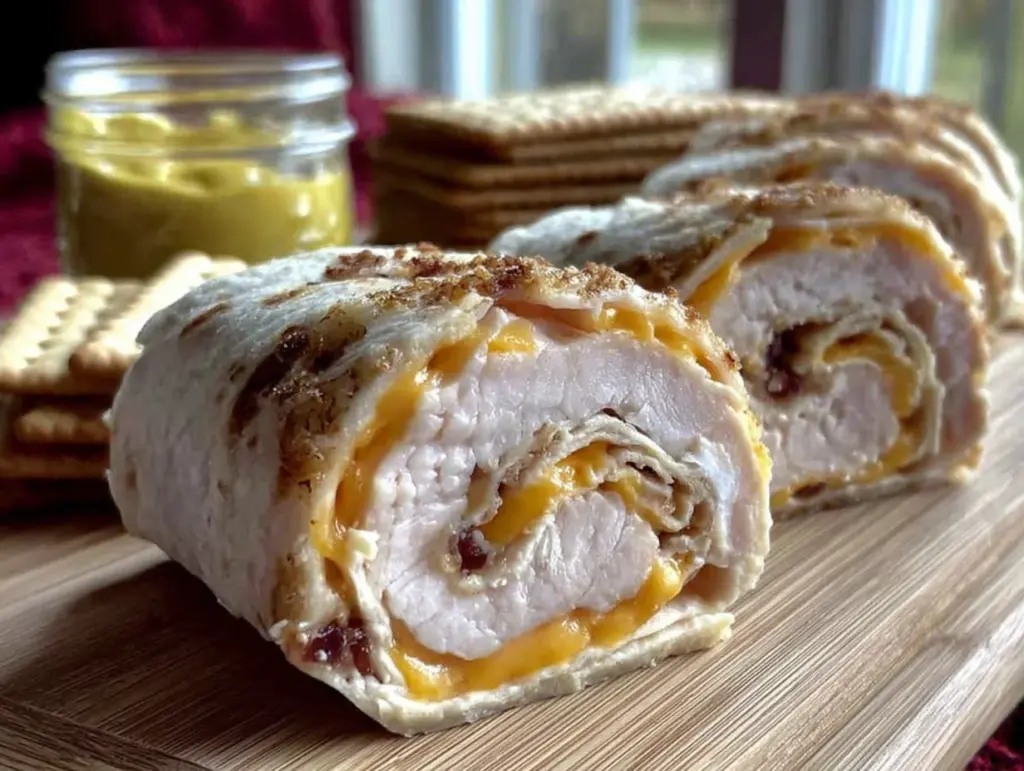
Standing in my kitchen at 6:45 AM, staring into an open fridge with a lunchbox that needed filling in fifteen minutes. The usual suspects were there — some turkey slices, a block of cheddar, and a stack of flour tortillas that were probably a day away from going stale. My kid had been bringing back half-eaten sandwiches for weeks, and I was tired of finding sad, squished bread crusts at the bottom of the lunchbox. So I grabbed the cream cheese, laid everything out on the counter, and just started rolling. That first batch of Easy Turkey Cheddar Pinwheel Lunchbox Bites came together in a frantic morning rush, and honestly? They were the best lunchbox accident I’ve ever made.
There’s something about a pinwheel that just works for kids (and let’s be real, adults too). The spiral looks fun, the fillings stay tucked inside, and there’s no sad, soggy bread situation by lunchtime. These little bites have become my go-to for school lunches, road trip snacks, and even quick appetizers when friends pop over unexpectedly. They’re the kind of recipe that makes you feel like you’ve got your life together — even when you absolutely don’t.
Why You’ll Love This Recipe
I’ve tested this recipe about a dozen times to get the proportions just right, and here’s why it’s earned a permanent spot in my weekly rotation:
- Ready in Under 15 Minutes : From fridge to lunchbox in less time than it takes to find matching socks. Perfect for those chaotic weekday mornings.
- Simple Ingredients : You probably have everything already. No fancy grocery runs, no obscure spices — just real food you can actually pronounce.
- Perfect for Lunchboxes : They hold up beautifully, don’t get soggy, and kids actually eat them. No more trading lunches or coming home with half-eaten meals.
- Crowd-Pleaser : I’ve served these at playdates, birthday parties, and even book club (don’t judge). Everyone reaches for them first.
- Unbelievably Delicious : The cream cheese layer keeps everything moist, the turkey adds protein, and the cheddar brings that salty, melty satisfaction. It’s comfort food in bite-sized form.
What makes these pinwheels different from every other roll-up recipe out there? It’s the cream cheese. Most recipes skip it or use too little, but that thin layer of creamy tanginess is the secret to keeping everything together without getting mushy. Plus, it adds a richness that makes these feel more like a treat than a “healthy lunch.” And let’s face it — if your kid thinks they’re getting a treat, you’ve already won.
These bites are the kind of thing that makes you close your eyes after the first bite. Not because they’re fancy or complicated, but because they’re exactly right. The perfect balance of creamy, salty, and satisfying. And they make you feel like you’ve got this whole parenting thing figured out — even if just for one meal.
What Ingredients You Will Need
This recipe uses simple, wholesome ingredients that come together to create something surprisingly satisfying. Most of these are pantry and fridge staples, which is exactly what you want in a weekday lunch solution.
- Large flour tortillas (10-inch) — Look for soft, pliable tortillas that won’t crack when you roll them. I prefer Mission or Guerrero brand for their flexibility. Burrito-sized works best for getting enough filling in each bite.
- 8 ounces cream cheese, softened — This is the glue that holds everything together. Make sure it’s at room temperature so it spreads smoothly. Philadelphia is my go-to, but any block-style cream cheese works. (Pro tip: leave it out for 20 minutes before starting.)
- 1/2 pound sliced deli turkey — Go for oven-roasted or honey turkey for a milder flavor that kids love. I usually ask for thick-sliced at the deli counter — about 1/8 inch thick works best. Thin slices tear too easily when rolling.
- 1 cup shredded sharp cheddar cheese — Sharp cheddar gives you more flavor per bite, so you can use less and still get that cheesy punch. Pre-shredded works in a pinch, but freshly shredded melts and sticks better.
- 1/4 cup finely chopped green onions (optional) — Adds a tiny crunch and mild onion flavor. Leave these out if your kids are picky, or swap in finely chopped bell peppers for color.
- 1/4 teaspoon garlic powder — Just enough to add depth without being obvious. Trust me on this one — it makes a difference.
- 1/4 teaspoon black pepper — Freshly ground if you have it, but pre-ground works fine.
- Pinch of salt — Only if your turkey and cheese aren’t already salty enough. Taste your filling before adding.
For the cream cheese spread, I like to mix in a splash of milk (about a tablespoon) to make it extra spreadable. This is one of those little tricks I learned after fighting with cold cream cheese on too many rushed mornings. If you’re dairy-free, Kite Hill makes a fantastic plant-based cream cheese that works perfectly here.
One thing I’ve learned the hard way — don’t use low-fat cream cheese. It’s too thin and makes the tortillas soggy. Full-fat gives you that perfect creamy texture that holds up until lunchtime. Same goes for the cheese; pre-shredded has anti-caking agents that don’t melt as smoothly, so grate your own if you have five extra minutes.
And if you’re feeling adventurous, try swapping the turkey for ham or roast beef. I’ve done a version with crispy ham and cheese sticks filling that was absolutely incredible — just make sure the ham is sliced thin enough to roll easily.
Equipment Needed
You don’t need much for this recipe, which is part of its beauty. Here’s what you’ll need:
- Cutting board — Any size works, but a large one gives you room to work. I use a wooden board for rolling and a plastic one for slicing.
- Sharp knife — A serrated bread knife actually works best for clean cuts through the tortillas without squishing them. A chef’s knife works too, just make sure it’s sharp.
- Small mixing bowl — For combining the cream cheese spread. Any bowl works, but a shallow one makes mixing easier.
- Spatula or butter knife — For spreading the cream cheese mixture evenly. An offset spatula is my secret weapon here.
- Plastic wrap or parchment paper — For wrapping the rolls tightly before chilling. This step isn’t optional if you want clean slices.
- Serving platter or container — For storing or serving. A wide, shallow container works best for keeping the pinwheels from getting squished.
- Toothpicks (optional) — If you’re serving these as appetizers, toothpicks keep them from unrolling. For lunchboxes, skip them for safety.
If you don’t have a serrated knife, try using dental floss (unflavored!) to slice the rolls. Slide a long piece under the roll, cross the ends over the top, and pull. It gives you perfect, clean cuts without any squishing. This is one of those kitchen hacks that sounds ridiculous but actually works beautifully.
For storage, I love using glass meal prep containers with snap lids. They keep the pinwheels from getting crushed and you can see exactly what’s inside. Budget-friendly option: reuse the plastic containers from takeout — just make sure they’re clean and dry.
Preparation Method

Let me walk you through this step by step. I’ve made these so many times I could do it in my sleep, but I’ll share all the little tricks I’ve picked up along the way.
- Soften the cream cheese. Take it out of the fridge about 20 minutes before you start. If you forgot (which I do constantly), microwave it in 10-second bursts until it’s soft but not melted. You want it spreadable, not runny.
- Make the cream cheese spread. In your small bowl, combine the softened cream cheese, garlic powder, black pepper, and a pinch of salt. Mix until smooth and creamy. If it’s too thick to spread easily, add a splash of milk. Taste it — it should be creamy with just a hint of savory flavor. Fold in the chopped green onions if you’re using them.
- Prepare your work surface. Lay a tortilla flat on your cutting board. If your tortillas are cold, warm them in the microwave for 10 seconds to make them more pliable. This prevents cracking when you roll.
- Spread the cream cheese mixture. Using your spatula or butter knife, spread a thin, even layer of the cream cheese mixture over the entire surface of the tortilla. Leave about a half-inch border around the edges. Don’t go too thick — you want just enough to hold everything together without making the tortilla soggy.
- Layer the turkey. Place slices of turkey evenly over the cream cheese layer. Overlap them slightly so there are no gaps. You want every bite to have some turkey in it. If your turkey slices are thick, you might only need one layer; if they’re thin, do two layers.
- Add the cheese. Sprinkle the shredded cheddar evenly over the turkey. Press it down gently so it sticks to the cream cheese. Don’t overload it — about 1/4 cup per tortilla is perfect. Too much cheese and everything will squish out when you roll.
- Roll it up tight. Starting from one edge, roll the tortilla tightly but gently. Keep the roll even and firm as you go. Think of it like rolling a sleeping bag — you want it snug but not so tight that the filling squeezes out the ends. When you reach the end, press down gently to seal.
- Wrap and chill. Wrap each roll tightly in plastic wrap or parchment paper. Twist the ends like a candy wrapper to keep the roll secure. Place them in the fridge for at least 30 minutes. This is the hardest part — waiting. But trust me, chilling makes slicing so much easier. The cream cheese firms up and holds everything together.
- Slice into pinwheels. Unwrap your chilled rolls and place them on the cutting board. Using your sharpest knife (or dental floss!), slice each roll into 1-inch pieces. A gentle sawing motion works better than pressing straight down. You should get about 8-10 pinwheels per tortilla, depending on how thick you slice them.
- Arrange and serve. Place the pinwheels on a platter or pack them directly into lunchboxes. If you’re serving them immediately, they’re perfect at room temperature. For lunchboxes, they stay fresh for hours.
One thing I’ve learned: if your pinwheels are falling apart when you slice them, they weren’t chilled long enough. Pop them back in the fridge for another 15 minutes and try again. The first time I made these, I was in too much of a hurry and ended up with a pile of filling and torn tortillas. Still tasted great, but looked like a disaster.
For a fun variation, try making these with crispy pepperoni pizza rolls filling — just swap the turkey for pepperoni and add a little pizza sauce to the cream cheese. My kids went absolutely wild for that version.
Cooking Tips & Techniques
After making these probably fifty times (not exaggerating), here are the things I wish someone had told me from the start:
The temperature matters. Cold tortillas crack. Cold cream cheese tears the tortilla when you try to spread it. Let everything come to room temperature before you start. I take the cream cheese out first, then the tortillas, then prep the other ingredients. By the time I’m ready to assemble, everything is perfect.
Don’t overfill. I know it’s tempting to pile on the turkey and cheese, but less really is more here. A thin, even layer of everything gives you clean rolls that stay together. Overstuffed rolls burst at the seams and make a mess. Trust me — I’ve cleaned up enough exploded pinwheels to know.
The rolling technique matters. Start with the edge closest to you and roll away from your body. Keep even pressure with your fingertips. If you see filling starting to squeeze out the sides, you’re rolling too tight. Ease up and adjust. It takes a few tries to get the feel, but once you do, it’s like riding a bike.
Chill time isn’t optional. I know, I know — you’re hungry and the kids are hungry and waiting is the worst. But those 30 minutes in the fridge are what transform a sloppy roll into a perfect pinwheel. The cream cheese firms up, the flavors meld together, and everything stays put when you slice. If you’re really in a rush, 15 minutes in the freezer works in a pinch.
Sharp knife = pretty pinwheels. A dull knife squishes the roll and drags the filling out. I learned this lesson when I ruined an entire batch with my dull chef’s knife. Now I use a serrated bread knife and it’s a game-changer. The sawing motion cuts through without compressing the roll.
Make ahead magic. These actually taste better the next day. The flavors have time to meld, and the cream cheese sets up perfectly. I often make a double batch on Sunday night and we eat them all week. They keep beautifully for 3-4 days in the fridge.
Variations & Adaptations
This recipe is endlessly adaptable, which is why it never gets old in our house. Here are some of my favorite variations:
Mediterranean Version: Swap the turkey for roasted red peppers and spinach. Use feta cheese instead of cheddar, and add a smear of hummus under the cream cheese. This is my personal favorite for adult lunches — it feels fancy but takes the same five minutes.
Spicy Southwest: Add a layer of refried beans under the cream cheese, use pepper jack instead of cheddar, and throw in some sliced jalapeños. This version pairs perfectly with a fresh Southwest chipotle salad for a complete lunch that’s anything but boring.
Breakfast Pinwheels: Use scrambled eggs instead of turkey, add crispy bacon bits, and use a mild cheddar. These are perfect for breakfast on the go or brunch parties. My husband requests these every weekend.
Gluten-Free Option: Use gluten-free tortillas or large lettuce leaves (romaine or butter lettuce work best). The lettuce version is lighter and crisper — perfect for summer lunches. Just note that lettuce wraps don’t keep as long, so eat them within a few hours.
Dairy-Free Adaptation: Use dairy-free cream cheese and vegan cheddar shreds. Kite Hill and Violife both make excellent versions that melt and spread beautifully. The texture is slightly different, but the flavor is still fantastic.
Low-Carb Version: Swap the tortillas for large collard green leaves (blanched briefly to soften) or use thinly sliced deli meat as the wrapper. This is my go-to when I’m watching my carbs, and honestly, the collard green version has become a favorite in its own right.
Veggie-Packed: Add thin slices of cucumber, bell pepper, or shredded carrots along with the turkey. The extra crunch is amazing, and it’s an easy way to sneak more vegetables into lunchboxes. My kids don’t even notice the veggies when they’re rolled up inside.
One of my favorite experiments was making these with the filling from savory antipasto squares — salami, provolone, roasted red peppers, and a little balsamic glaze. It was incredible. Don’t be afraid to get creative with whatever you have in the fridge.
Serving & Storage Suggestions
These pinwheels are incredibly versatile when it comes to serving. Here’s what works best:
Serving Temperature: They’re delicious cold from the fridge, at room temperature, or even slightly warm. For lunchboxes, cold is perfect. For parties, let them sit out for 10-15 minutes before serving so the cream cheese softens slightly.
Presentation Ideas: Arrange them in a circular pattern on a platter with the spiral facing up. Garnish with fresh herbs like parsley or dill. For kids, I sometimes arrange them to look like flowers or use cookie cutters to make fun shapes (yes, you can cut the assembled pinwheels into stars or hearts).
What to Serve With: These pair beautifully with fresh fruit, veggie sticks, or a simple salad. For a complete lunch, add some cherry tomatoes, cucumber slices, and a handful of grapes. They’re also great alongside a cup of tomato soup or a creamy chicken Caesar pasta salad for a heartier meal.
Storage: Keep assembled pinwheels in an airtight container in the refrigerator for up to 4 days. Place a paper towel at the bottom of the container to absorb any excess moisture. Layer them in a single row if possible — stacking can squish the bottom layer.
Freezer Instructions: These freeze beautifully! Wrap the uncut rolls tightly in plastic wrap, then foil, and freeze for up to 2 months. When you’re ready to use them, thaw overnight in the fridge and slice as usual. I keep a stash in the freezer for emergency lunchbox situations.
Reheating: These are best served cold or at room temperature, so no reheating needed. If you want them warm, pop them in a 350°F oven for 5-7 minutes or microwave for 15-20 seconds. Just know that the tortilla will soften and they won’t hold their shape as well.
Flavor Development: Here’s something interesting — these actually taste better the next day. The flavors meld together overnight, and the cream cheese sets up perfectly. I always make them a day ahead if I can. The texture is firmer, the flavors are more integrated, and they slice even cleaner.
Nutritional Information & Benefits
Here’s the approximate nutritional breakdown for one pinwheel (based on 8 pinwheels per tortilla, using standard ingredients):
| Nutrient | Amount per Pinwheel |
|---|---|
| Calories | 85-100 |
| Protein | 6-7g |
| Fat | 5-6g |
| Carbohydrates | 4-5g |
| Fiber | 1g |
| Sodium | 200-250mg |
These pinwheels pack a surprising nutritional punch for their size. The turkey provides lean protein that keeps kids (and adults) full and focused through the afternoon. The cheddar cheese adds calcium for strong bones and teeth, plus a little vitamin A for immune health. Cream cheese contributes a small amount of protein and healthy fats that help with nutrient absorption.
For parents worried about sodium, choose low-sodium turkey and cheese options. You can also reduce the added salt in the cream cheese spread. The green onions (if you use them) add a tiny amount of vitamin K and antioxidants.
These are naturally low in sugar (less than 1g per pinwheel) and can be made gluten-free or dairy-free with simple substitutions. They’re also nut-free, making them school-safe for most classrooms. Just check your specific ingredient labels to be sure.
I love that these are a “real food” solution — no processed lunch kits, no artificial ingredients, just whole foods that happen to look fun and taste amazing. It’s the kind of lunch I feel good about packing, and that matters.
Conclusion
These Easy Turkey Cheddar Pinwheel Lunchbox Bites have honestly changed my morning routine. What started as a frantic, last-minute experiment has become a staple in our kitchen, and I’m pretty sure it’ll become one in yours too. They’re quick, they’re simple, and they actually get eaten — which is the highest compliment any lunchbox recipe can receive.
The best part? You can make them your own. Swap in different meats, cheeses, or add-ins based on what your family loves. Use them for lunches, snacks, parties, or road trips. They’re forgiving, adaptable, and always delicious. That’s the kind of recipe worth keeping around.
I’d love to hear how these turn out for you! Drop a comment below and let me know what variations you tried, or tag me in your photos on social media. Did your kids love them? Did you discover a killer new combination? Share it with the community — we’re all in this together, trying to get good food on the table (or in the lunchbox) without losing our minds.
Now go make some pinwheels. Your lunchbox game is about to level up.
Frequently Asked Questions
Can I make these pinwheels the night before?
Absolutely! In fact, they taste even better the next day. Assemble and roll the tortillas, wrap them tightly, and store them in the fridge overnight. Slice them in the morning before packing. The flavors meld together beautifully overnight.
How do I keep the pinwheels from getting soggy in the lunchbox?
The cream cheese layer actually helps prevent sogginess by creating a barrier between the tortilla and the moist fillings. Make sure your turkey isn’t too wet (pat it dry with a paper towel if needed) and don’t add any wet ingredients like tomatoes or cucumbers directly against the tortilla. A paper towel in the container also helps absorb excess moisture.
Can I use different types of cheese?
Yes! Sharp cheddar is my go-to, but provolone, mozzarella, pepper jack, or Swiss all work beautifully. Just make sure whatever cheese you use is shredded or sliced thin enough to roll easily. Hard cheeses like Parmesan don’t work as well because they don’t stick to the cream cheese layer.
How long do these pinwheels last in the fridge?
Stored in an airtight container, they’ll stay fresh for 3-4 days. After that, the tortillas start to get soft and the filling can separate. I recommend making a batch that you’ll eat within a few days, or freeze the uncut rolls for longer storage.
Can I use these for a party or gathering?
Definitely! These are perfect party food. Arrange them on a platter with the spiral facing up, garnish with fresh herbs, and serve with toothpicks. They’re always the first thing to disappear at potlucks and game day gatherings. For parties, try making several variations so guests can try different flavors.
Pin This Recipe!

Easy Turkey Cheddar Pinwheel Bites

These Easy Turkey Cheddar Pinwheel Bites are the perfect lunchbox solution—ready in under 15 minutes with simple ingredients. Cream cheese keeps them moist, turkey adds protein, and cheddar brings salty satisfaction in a fun, no-soggy-bread spiral.
- Prep Time: 15 minutes
- Cook Time: 0 minutes
- Total Time: 45 minutes (includes 30 minutes chilling)
- Yield: 32-40 pinwheels (4 servings of 8-10 pinwheels each) 1x
- Category: Appetizer / Snack / Lunch
- Cuisine: American
Ingredients
- 4 large flour tortillas (10-inch)
- 8 ounces cream cheese, softened
- 1/2 pound sliced deli turkey (oven-roasted or honey turkey, about 1/8 inch thick)
- 1 cup shredded sharp cheddar cheese
- 1/4 cup finely chopped green onions (optional)
- 1/4 teaspoon garlic powder
- 1/4 teaspoon black pepper
- Pinch of salt (optional)
- 1 tablespoon milk (optional, for spreading)
Instructions
- Soften the cream cheese: Take it out of the fridge about 20 minutes before starting. If forgotten, microwave in 10-second bursts until soft but not melted.
- Make the cream cheese spread: In a small bowl, combine softened cream cheese, garlic powder, black pepper, and a pinch of salt. Mix until smooth and creamy. If too thick, add a splash of milk. Fold in chopped green onions if using.
- Prepare your work surface: Lay a tortilla flat on a cutting board. If tortillas are cold, warm in microwave for 10 seconds to make them more pliable.
- Spread the cream cheese mixture: Using a spatula or butter knife, spread a thin, even layer over the entire tortilla, leaving a half-inch border around the edges.
- Layer the turkey: Place slices of turkey evenly over the cream cheese layer, overlapping slightly so there are no gaps.
- Add the cheese: Sprinkle shredded cheddar evenly over the turkey. Press down gently so it sticks. Use about 1/4 cup per tortilla.
- Roll it up tight: Starting from one edge, roll the tortilla tightly but gently, keeping the roll even and firm. Press down gently to seal the end.
- Wrap and chill: Wrap each roll tightly in plastic wrap or parchment paper, twisting the ends like a candy wrapper. Refrigerate for at least 30 minutes.
- Slice into pinwheels: Unwrap chilled rolls and place on cutting board. Using a sharp knife (serrated works best) or unflavored dental floss, slice each roll into 1-inch pieces. You should get about 8-10 pinwheels per tortilla.
- Arrange and serve: Place pinwheels on a platter or pack directly into lunchboxes. They are perfect at room temperature or cold.
Notes
Chilling is essential for clean slices. If pinwheels fall apart when slicing, chill longer. For best results, make a day ahead—flavors meld and texture improves. Use full-fat cream cheese to prevent sogginess. For gluten-free, use gluten-free tortillas or large lettuce leaves. For dairy-free, use plant-based cream cheese and vegan cheddar. Freeze uncut rolls for up to 2 months.
Nutrition
- Serving Size: 8-10 pinwheels
- Calories: 85100
- Sugar: 1
- Sodium: 200250
- Fat: 56
- Saturated Fat: 34
- Carbohydrates: 45
- Fiber: 1
- Protein: 67
Keywords: turkey cheddar pinwheels, lunchbox bites, easy appetizer, kid-friendly lunch, no-cook recipe, make-ahead snack