Juggling three hungry kids, a barking dog, and a phone that won’t stop ringing—slicing through a cake seemed like a luxury I couldn’t afford that July afternoon. Half a box of cake mix and two different jello flavors staring at me from the countertop, twenty minutes before a small backyard barbecue kicked off. The idea to create a Fresh Red White and Blue Layered Jello Poke Cake hit me mid-chaos—something quick, festive, and cool enough to beat the heat without me losing my mind.
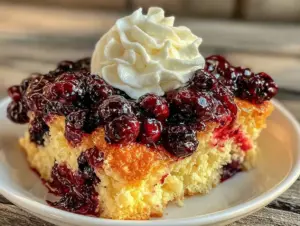
The kitchen smelled like a mix of vanilla and cherry, and the sticky glaze from poking holes into the cake made a brief mess on the counter. Honestly, I wasn’t sure if the colors would hold or if the flavors would blend too much, but the result was a surprise. The red and blue jello seeped into the moist white cake, layering flavors and colors in every bite.
It wasn’t just a dessert; it was a moment of calm in the whirlwind, a simple treat that brought smiles and sticky fingers. It stuck with me because it’s the kind of recipe that feels like summer itself—bright, easy, and just a little bit messy, with enough sweetness to make everyone pause and savor.
So here’s how that last-minute idea turned into a summer classic that I keep coming back to, perfect for anyone who needs a little patriotic cheer without the fuss.
Why You’ll Love This Recipe
This Fresh Red White and Blue Layered Jello Poke Cake isn’t just another dessert; it’s a tried-and-true crowd-pleaser with a few tricks up its sleeve.
- Quick & Easy: Takes under an hour from start to finish, perfect for those busy summer days when you want dessert but don’t want to spend hours baking.
- Simple Ingredients: Uses pantry staples and common grocery items—no need for specialty stores or complicated prep.
- Perfect for Summer Gatherings: Whether it’s the Fourth of July, Memorial Day, or a casual cookout, this cake’s patriotic colors and refreshing taste fit right in.
- Crowd-Pleaser: Kids love the fun colors and adults appreciate the balance of sweet and fruity flavors.
- Unbelievably Moist and Flavorful: The poke method lets the jello soak in, making the cake tender with bursts of vibrant flavor.
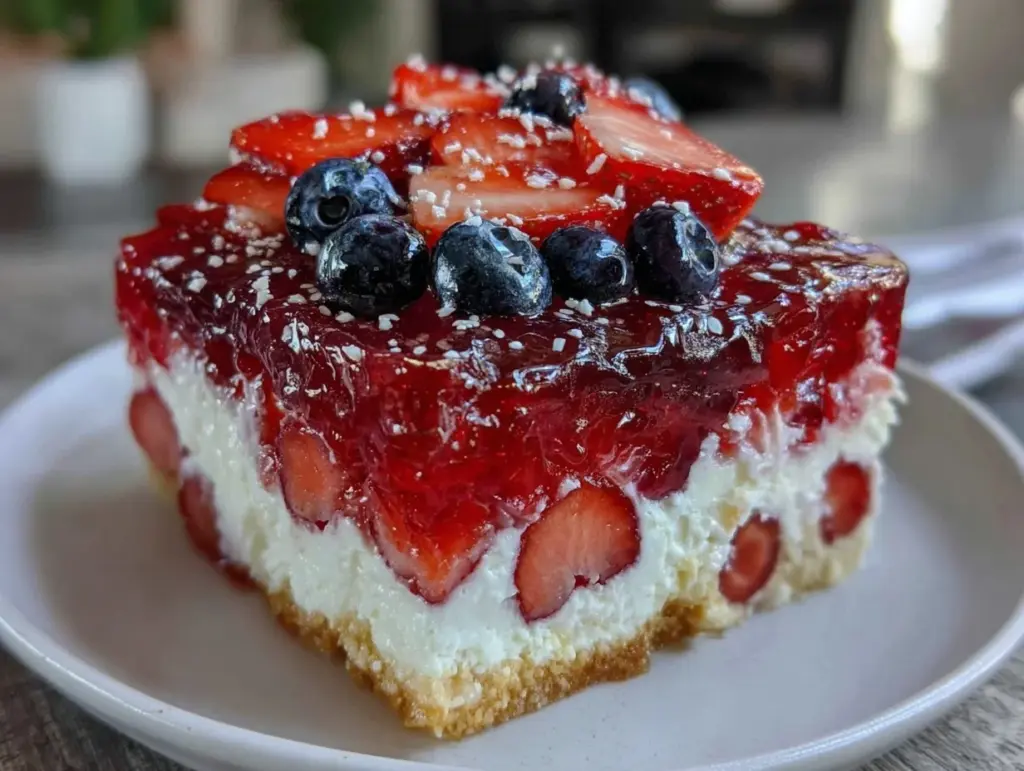
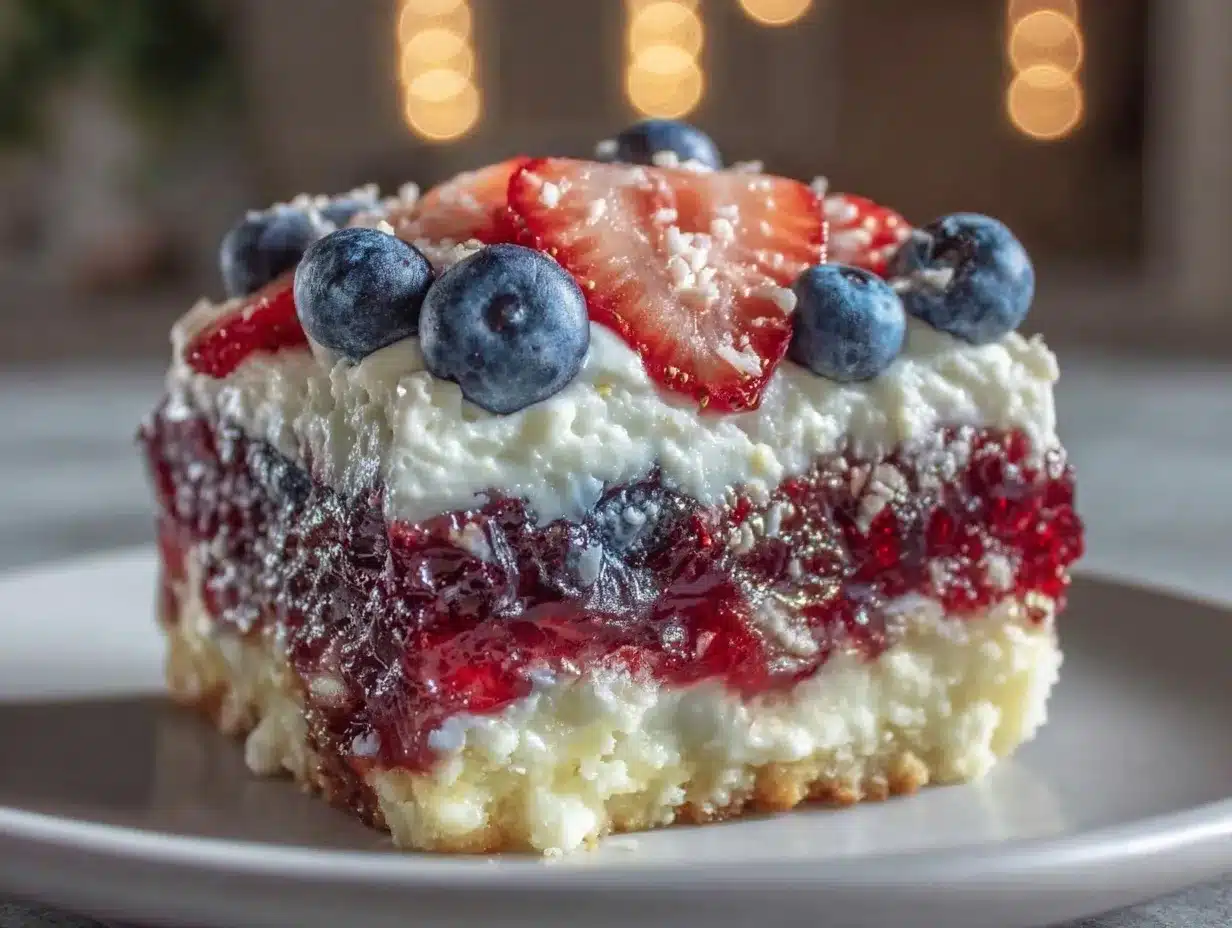
What sets this poke cake apart is the layering technique—I use two different jello flavors to create distinct red and blue layers that don’t just look cool but taste amazing side by side. Also, a cloud of whipped topping adds creaminess that cuts through the sweetness just right.
Honestly, it’s the kind of dessert that brings back memories of warm evenings, sparklers, and laughter. Plus, if you’re like me and prefer desserts that don’t scream “too sweet,” this recipe’s balance is just right.
What Ingredients You Will Need
This recipe relies on simple, wholesome ingredients to deliver bold colors and fresh flavors without any fuss. Most of these are pantry staples, and the jello adds that festive pop of color and taste.
- For the Cake:
- 1 box white cake mix (about 15.25 oz or 432 g), plus ingredients listed on the box (usually eggs, oil, water)
- For the Jello Layers:
- 1 package (3 oz/85 g) red jello (cherry or strawberry works best for a fresh, bright flavor)
- 1 package (3 oz/85 g) blue jello (blueberry or berry blue for a vibrant color)
- 2 cups boiling water (divided)
- For the Topping:
- 1 container (8 oz/226 g) whipped topping (I prefer store-bought for convenience, but homemade whipped cream works too)
- Optional: fresh blueberries and strawberries for garnish (adds a natural touch and texture)
Tip for ingredient selection: I usually reach for Duncan Hines or Betty Crocker for cake mix because of their consistent texture. For jello, the classic Jell-O brand still gives me the best, brightest colors. If you want to keep it gluten-free, just make sure to pick a certified gluten-free cake mix.
If fresh berries aren’t in season, frozen works fine too—just thaw and drain before adding. For dairy-free options, swap whipped topping with coconut whipped cream for a similar fluffy finish.
Equipment Needed
- 9×13 inch (23×33 cm) baking pan – a standard glass or metal pan works perfectly
- Mixing bowls – at least two, one for the cake mix and one for preparing jello
- Electric mixer or whisk – to mix the cake batter smoothly
- Wooden skewer or fork – for poking holes evenly across the baked cake
- Measuring cups and spoons – for precise measurements of liquids and powders
- Spatula or large spoon – to spread the whipped topping evenly
- Cooling rack – helpful but not essential for cooling the cake before poking
If you don’t have an electric mixer, a sturdy whisk and a little elbow grease will do just fine. Glass pans help you see the layers better, but a non-stick metal pan is easier for cleanup. Personally, I recommend keeping your poking tool long and thin, like a wooden skewer, for more even jello absorption.
Preparation Method
- Preheat your oven to 350°F (175°C). Grease your 9×13 inch pan lightly with butter or non-stick spray.
- Prepare the cake batter according to the instructions on the box. This usually means mixing the cake mix with eggs, oil, and water until smooth—about 2-3 minutes on medium speed.
- Pour the batter into the prepared pan and spread evenly with a spatula.
- Bake for 25-30 minutes, or until a toothpick inserted in the center comes out clean. (If using a glass pan, watch the edges so they don’t overbrown.)
- Cool the cake in the pan on a wire rack for about 20 minutes. It should be warm but not hot before you poke it.
- Prepare jello mixtures: Dissolve each jello packet separately in 1 cup (240 ml) boiling water. Stir until completely dissolved.
- Poke holes all over the warm cake with a wooden skewer or fork, spacing them about 1 inch (2.5 cm) apart. This is what allows the jello to seep in and flavor the cake.
- Pour the red jello evenly over half of the cake, covering the holes. Let it set in the fridge for 10-15 minutes until slightly firm but not fully set.
- Pour the blue jello over the other half of the cake, again covering holes and letting it soak in. Chill for at least 2 hours to fully set and let flavors meld.
- Before serving, spread the whipped topping evenly over the entire cake, covering the jello layers. Garnish with fresh berries if desired.
Pro tip: Don’t rush the chilling step! The cake needs that time for the jello to soak in and set properly. If the jello is still liquid when you apply the whipped topping, it can get messy.
Cooking Tips & Techniques
Keeping this poke cake moist and flavorful is all about timing and technique. Here’s what I’ve learned:
- Don’t overbake the cake. It may seem counterintuitive, but a slightly underbaked cake will soak up jello better without turning mushy.
- Use warm cake to poke and pour jello. If the cake cools completely, the jello won’t absorb as well and just pools on top.
- Poke evenly and thoroughly. It’s tempting to poke a few holes here and there, but full coverage lets every bite burst with flavor.
- Let jello set partially between layers. Pouring red and blue jello separately and chilling in between prevents colors from running into each other.
- Chill long enough. At least two hours, preferably overnight, to let flavors meld and the cake firm up.
- For an extra smooth topping, whip your own cream. But store-bought whipped topping is a great time-saver.
I once tried layering the jello without poking first—big mistake. The jello just sat on top and made the cake soggy. Another time, I poured both jellos at once, and the colors bled into a muddy purple. Lesson learned!
Variations & Adaptations
This Fresh Red White and Blue Layered Jello Poke Cake is super flexible if you want to personalize it.
- Flavor swaps: Use lime or lemon jello instead of blue for a different twist. Orange adds a citrus pop, too.
- Diet-friendly: Use sugar-free jello and a sugar-free white cake mix to reduce sugar content. Swap whipped topping for coconut cream for dairy-free.
- Seasonal fruit layers: Instead of jello, poke holes and fill with fruit purees or gelatin-free fruit juice gels for a fresher taste.
- Mini versions: Make cupcakes and poke layers individually for easy serving and portion control.
- Personal favorite: I once added a layer of crushed graham crackers between the cake and whipped topping for a bit of crunch—unexpected but delicious.
If you want to mix things up with an easy side, this cake pairs well with the fresh southwest chipotle salad that brightens any summer meal.
Serving & Storage Suggestions
Serve this cake chilled, straight from the fridge, so the jello layers hold their shape and the whipped topping stays fluffy. It’s perfect for casual slice-and-serve at backyard parties or holiday picnics.
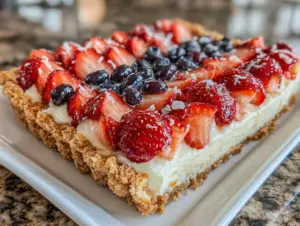
For presentation, I like to garnish with fresh blueberries and sliced strawberries, which add a fresh burst and complement the jello flavors visually and taste-wise.
Store leftovers tightly covered in the refrigerator for up to 3 days. The flavors tend to blend more over time, which I find makes the cake even better the next day. Avoid freezing as the texture of the jello and whipped topping doesn’t freeze well.
If you need to reheat, just let it sit at room temperature for 10-15 minutes—don’t microwave!
Nutritional Information & Benefits
Each serving (about 1/12th of the cake) contains approximately:
| Calories | 270 |
|---|---|
| Fat | 9g |
| Carbohydrates | 45g |
| Protein | 2g |
| Sugar | 35g |
The cake provides a sweet treat with moderate fat and carbs. The use of real fruit in garnish adds a touch of antioxidants and vitamins. Using sugar-free jello and reduced sugar cake mix can lower the sugar content significantly.
This recipe is gluten-friendly if you select a gluten-free cake mix. It contains dairy in the whipped topping unless using a dairy-free alternative. Personally, I appreciate that this dessert lets me indulge a bit while still feeling fresh and light compared to heavier frostings or cream-based cakes.
Conclusion
This Fresh Red White and Blue Layered Jello Poke Cake is my go-to when I want a festive, fuss-free dessert that’s as fun to make as it is to eat. The layered jello soaked into the white cake creates a bright, juicy treat that’s perfect for summer celebrations or anytime you want a pop of color on your dessert table.
Feel free to tweak the jello flavors, try different toppings, or add fresh fruit to make this recipe your own. I love how forgiving and adaptable it is—plus, it’s a nostalgic recipe that always brings a smile.
If you’re looking for more easy, crowd-pleasing recipes, you might enjoy the crispy ham and cheese sticks or the creamy church salad for a complete summer spread.
Thanks for stopping by—let me know how your poke cake turns out or if you try a new variation!
FAQs About Fresh Red White and Blue Layered Jello Poke Cake
Can I make this cake ahead of time?
Absolutely! It’s best made a few hours or even a day ahead so the jello has plenty of time to soak in and set, improving flavor and texture.
What if I don’t have blue jello?
Try grape or berry-flavored jello for a similar effect. You can also use lemon-lime for a different color twist.
Can I use homemade cake instead of box mix?
Yes, but make sure your cake is a white or yellow cake that’s sturdy enough to hold up to poking and soaking.
How do I prevent the jello colors from bleeding into each other?
Pour one color and chill it until it’s partially set before adding the next color. This helps keep the layers distinct.
Is this recipe suitable for kids?
Definitely! Kids love the bright colors and the fun texture of the jello-soaked cake. Just check for any gelatin allergies first.
Pin This Recipe!
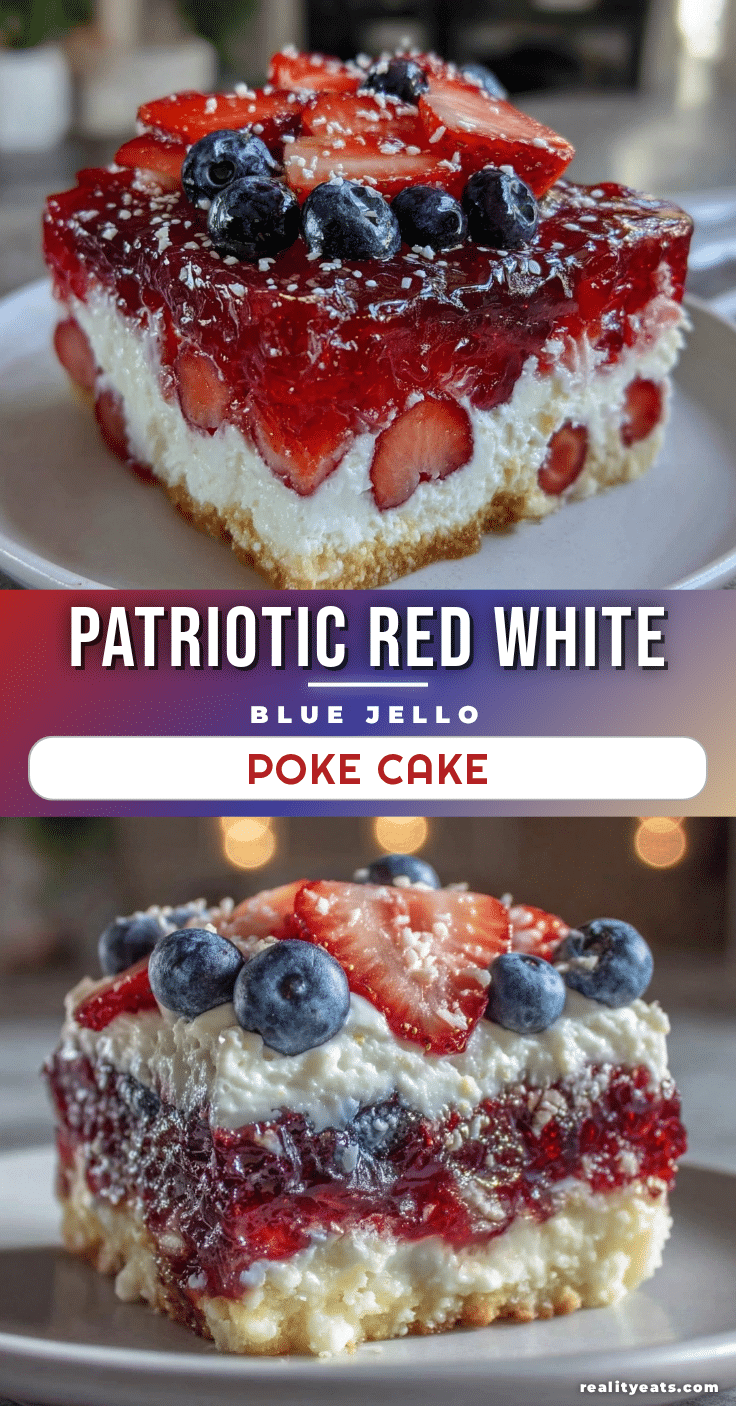
Fresh Red White and Blue Layered Jello Poke Cake

A quick, festive, and moist poke cake featuring red and blue jello layers soaked into a white cake, topped with whipped cream and fresh berries. Perfect for summer gatherings and patriotic celebrations.
- Prep Time: 15 minutes
- Cook Time: 30 minutes
- Total Time: 2 hours 45 minutes
- Yield: 12 servings 1x
- Category: Dessert
- Cuisine: American
Ingredients
- 1 box white cake mix (about 15.25 oz or 432 g), plus ingredients listed on the box (usually eggs, oil, water)
- 1 package (3 oz/85 g) red jello (cherry or strawberry)
- 1 package (3 oz/85 g) blue jello (blueberry or berry blue)
- 2 cups boiling water (divided)
- 1 container (8 oz/226 g) whipped topping
- Optional: fresh blueberries and strawberries for garnish
Instructions
- Preheat your oven to 350°F (175°C). Grease a 9×13 inch baking pan lightly with butter or non-stick spray.
- Prepare the cake batter according to the instructions on the box, mixing cake mix with eggs, oil, and water until smooth (about 2-3 minutes on medium speed).
- Pour the batter into the prepared pan and spread evenly with a spatula.
- Bake for 25-30 minutes, or until a toothpick inserted in the center comes out clean.
- Cool the cake in the pan on a wire rack for about 20 minutes until warm but not hot.
- Dissolve each jello packet separately in 1 cup boiling water, stirring until completely dissolved.
- Poke holes all over the warm cake with a wooden skewer or fork, spacing about 1 inch apart.
- Pour the red jello evenly over half of the cake, covering the holes. Refrigerate for 10-15 minutes until slightly firm but not fully set.
- Pour the blue jello over the other half of the cake, covering holes. Chill for at least 2 hours to fully set and let flavors meld.
- Before serving, spread the whipped topping evenly over the entire cake and garnish with fresh berries if desired.
Notes
Do not overbake the cake to ensure it soaks up the jello well. Use warm cake for poking and pouring jello. Let jello set partially between layers to prevent colors from bleeding. Chill the cake for at least 2 hours or overnight for best flavor and texture. Store leftovers covered in the refrigerator for up to 3 days. Avoid freezing.
Nutrition
- Serving Size: 1 slice (1/12th of c
- Calories: 270
- Sugar: 35
- Fat: 9
- Carbohydrates: 45
- Protein: 2
Keywords: poke cake, jello poke cake, patriotic dessert, red white and blue dessert, summer cake, easy dessert, layered jello cake