Introduction
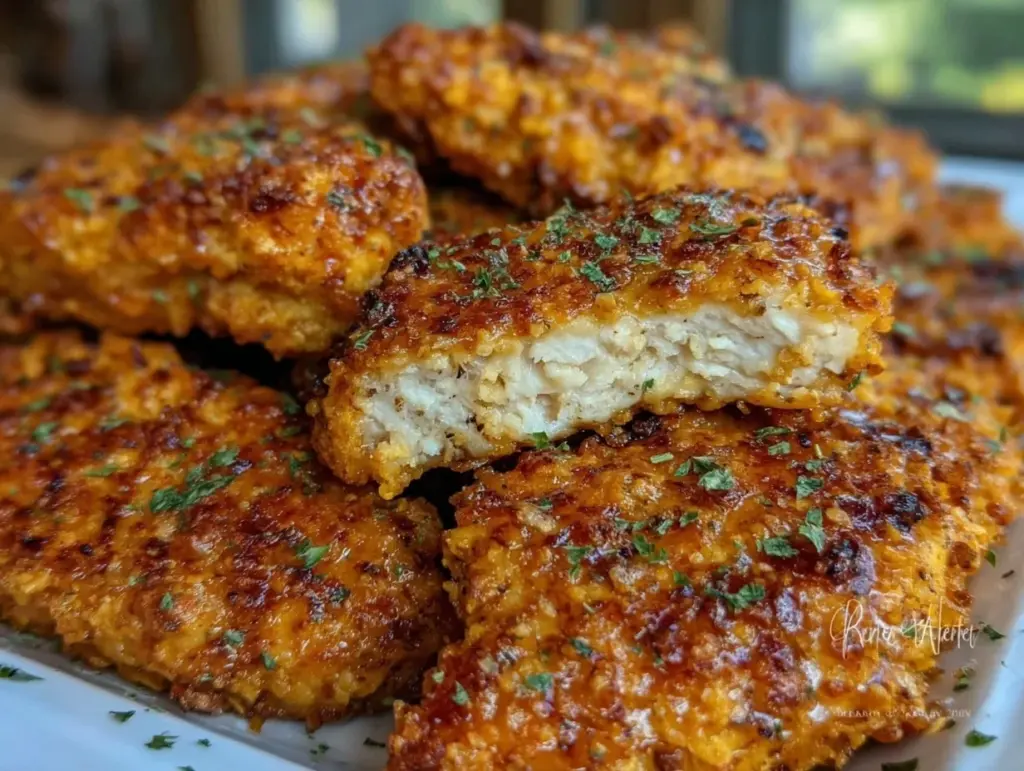
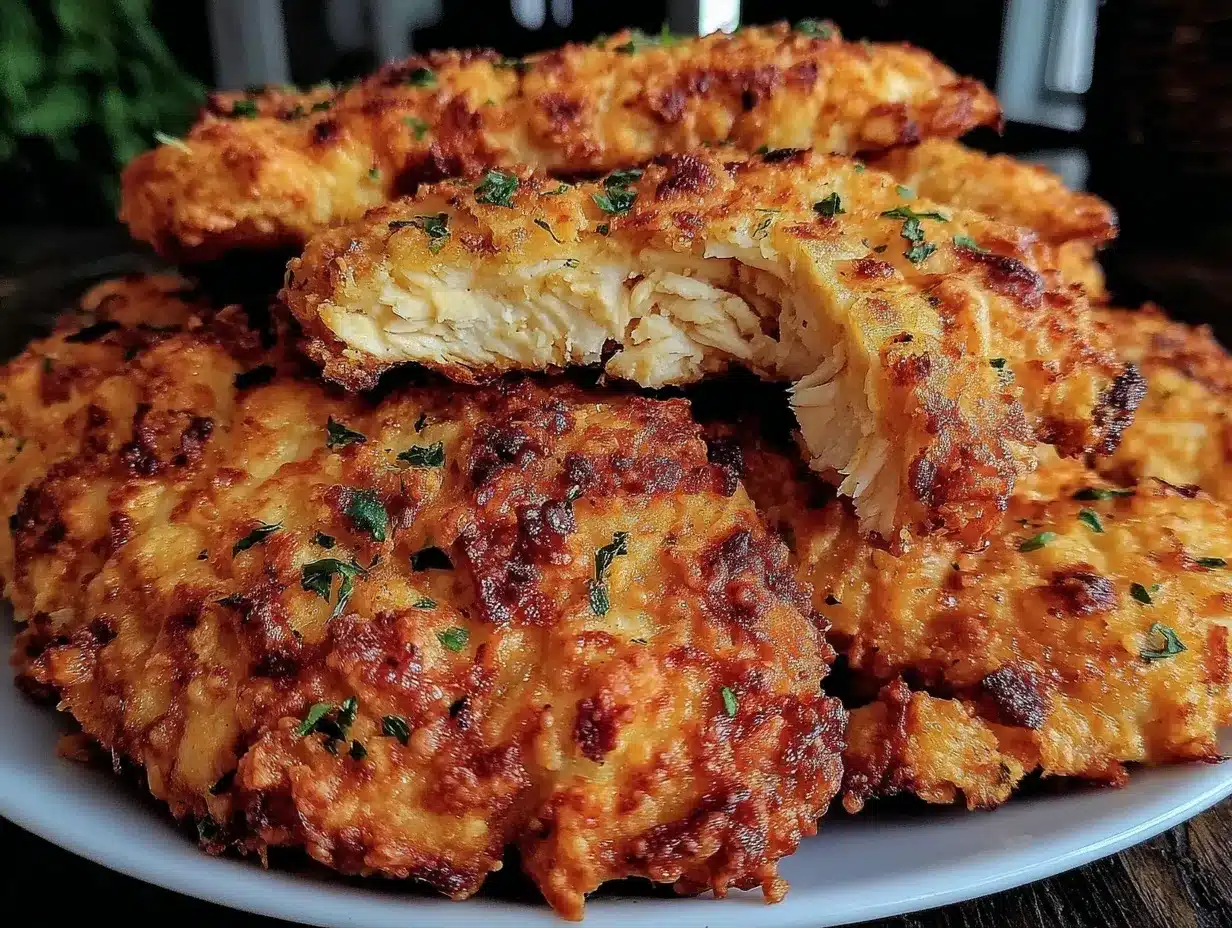
“You’ve got to try this ranch chicken tender recipe,” my neighbor texted me one hectic evening while I was juggling dinner and work emails. Honestly, I was skeptical — ranch seasoning and baked chicken? Isn’t that usually greasy or bland? But that night, with nothing fancy in the fridge, I gave these Crispy Baked Ranch Chicken Tenders with Panko Coating a shot. The first bite surprised me: crunchy, flavorful, and juicy, without the guilt of frying. What stuck with me wasn’t just the crispy texture or that herb-packed kick but the way it felt comforting and effortless at the same time.
Weeks later, I found myself making these tenders repeatedly, sometimes swapping sides or tweaking the seasoning just a bit. They’ve quietly become my go-to when I need a quick dinner that doesn’t compromise on taste or texture. It’s the kind of recipe that turns “I don’t feel like cooking” evenings into a satisfying meal with very little fuss. Plus, the panko coating gives such a perfect crunch that you’d swear it was fried.
In a way, this simple dish feels like a little reward after a long day — crisp, flavorful, and ready in under 30 minutes. No wonder people keep asking for the recipe, and I’m happy to share it here, just as it is, a solid comfort food win that’s easy to trust.
Why You’ll Love This Recipe
This Crispy Baked Ranch Chicken Tenders recipe isn’t just another chicken dinner; it’s been tested and tweaked until it hits that sweet spot of crispy, juicy, and packed with flavor. From personal kitchen trials (and some friendly peer reviews!), here’s what makes it stand out:
- Quick & Easy: Ready in about 30 minutes, perfect for busy weeknights or last-minute cravings when you want something satisfying fast.
- Simple Ingredients: You probably already have ranch seasoning and panko breadcrumbs in your pantry—no need for specialty stores or complicated prep.
- Perfect for Any Occasion: Whether it’s a casual family dinner or a relaxed weekend lunch, these tenders fit right in.
- Crowd-Pleaser: Kids and adults alike love the crispy texture and familiar ranch flavor combo. They’re just plain addictive.
- Unbelievably Delicious: The panko coating keeps the tenders crisp while the ranch seasoning adds a tangy, herby punch that’s anything but boring.
Unlike other recipes that can turn soggy or require frying, this one nails the balance: baked to perfection with a coating that stays crunchy. I like to think the secret’s in the panko breadcrumbs paired with a touch of olive oil before baking, which locks in that crispiness without any mess or extra fat. It’s a recipe that’s both fuss-free and impressive, the kind you’ll want to share with friends—kind of like when I made it alongside my crispy ham and cheese sticks for a casual game night. Trust me, this dish sticks around in your meal rotation for good reasons.
What Ingredients You Will Need
This recipe uses straightforward ingredients that come together to create a bold flavor and satisfying crunch without any fuss. Most are pantry staples, making it super convenient.
- Chicken Tenders: About 1 pound (450g) of fresh or thawed chicken tenders, trimmed of excess fat.
- Panko Breadcrumbs: 1 ½ cups (150g) — I recommend Japanese-style panko for that extra airy crunch.
- Ranch Seasoning Mix: 2 tablespoons — you can use a store-bought packet or homemade blend for fresher herbs.
- Parmesan Cheese: ¼ cup (25g), finely grated — adds a subtle sharpness and helps crisp the coating.
- All-Purpose Flour: ½ cup (60g) — lightly coats chicken to help the panko stick.
- Eggs: 2 large, beaten — acts as the binding agent for the coating.
- Olive Oil or Cooking Spray: 2 tablespoons or as needed — lightly drizzled to help bake the coating crispier.
- Optional: Fresh cracked black pepper or a pinch of smoked paprika for an extra flavor kick.
For substitutions, almond flour works well if you’re looking for a gluten-free option, and dairy-free Parmesan or nutritional yeast can replace cheese if needed. During summer, I like to pair these tenders with a fresh salad like the fresh southwest chipotle salad for a light, vibrant meal.
Equipment Needed
- Baking Sheet: A rimmed baking sheet to catch drips and allow air circulation for crisping.
- Wire Rack: Placed on the baking sheet to let excess oil drip and keep tenders crispy all around. If you don’t have one, you can bake directly on parchment paper but expect slightly less crunch.
- Mixing Bowls: At least three — one for flour, one for eggs, and one for the breadcrumb mixture.
- Whisk or Fork: For beating eggs and mixing seasoning.
- Tongs or Fork: For handling chicken pieces without messing up the coating.
For budget-friendly kitchens, you can use a sturdy baking rack from most department stores or even improvise with an oven-safe cooling rack. Keeping your wire rack clean and dry between uses helps maintain crisp results each time. I’ve found that over the years, investing in a good wire rack really changes how “baked” foods come out — it’s like a secret weapon for crispy textures.
Preparation Method
- Preheat your oven: Set it to 425°F (220°C) and line a rimmed baking sheet with foil or parchment paper for easy cleanup. Place a wire rack on top.
- Prepare the coating stations: In one bowl, add ½ cup (60g) of all-purpose flour. In a second, beat 2 large eggs until smooth. In a third, combine 1 ½ cups (150g) panko breadcrumbs, 2 tablespoons ranch seasoning, and ¼ cup (25g) grated Parmesan cheese. Feel free to toss in a pinch of smoked paprika here if you want a smoky touch.
- Coat the chicken tenders: Working one at a time, dredge each tender in the flour, shaking off any excess. Then dip into the beaten eggs, letting the extra drip off. Finally, press into the panko mixture, coating thoroughly on all sides. Use your hands if you want to really press the crumbs on, but keep it light enough to avoid clumps.
- Place tenders on the wire rack: Arrange them spaced out so the hot air can circulate and crisp every side. Lightly drizzle or spray 2 tablespoons of olive oil over the coated tenders to promote golden browning.
- Bake: Pop the tray into the preheated oven for 15-18 minutes. Flip tenders halfway through baking to encourage even crispness and check that the internal temperature hits 165°F (74°C) for safety.
- Check for doneness: The coating should be golden and crunchy, and the chicken should feel firm but juicy when pressed. If they look pale or soft, give them a few extra minutes but watch carefully to avoid burning.
- Rest and serve: Let the tenders sit for 3-5 minutes after baking. This lets the juices settle and the coating firm up just a bit more.
Pro tip: If you want an even crispier finish, pop the tenders under the broiler for 1-2 minutes, keeping a close eye so they don’t burn. I’ve learned the hard way that broilers can be unforgiving!
Cooking Tips & Techniques
One trick that changed my baked chicken game is using panko instead of regular breadcrumbs. Panko’s airy texture creates a crunch that stays crisp longer, even after cooling. I also always pat my chicken dry before starting; moisture is the enemy of crispiness.
Another tip: don’t skip the wire rack. Trust me, baking directly on a sheet makes the bottom soggy. The rack lets heat circulate all around the tenders, giving you that coveted crunch without frying.
Watch your oven’s hot spots. If your first batch browns unevenly, rotate the tray halfway through baking. That little move saved me from a few sad, half-burnt tenders.
It’s tempting to pile on the coating thickly, but a light, even layer crisps better and cooks faster. Pressing the crumbs gently into the egg wash helps them stick without clumps that can burn.
And here’s a personal lesson: resist opening the oven too often. Every peek drops the temperature and can mess with crispness. Set a timer and trust the process!
Variations & Adaptations
- Spicy Ranch: Add cayenne pepper or hot paprika to the ranch seasoning for a little heat kick. My spice-loving friends swear by this twist.
- Gluten-Free Option: Swap panko for gluten-free breadcrumbs or crushed gluten-free cereal. Almond flour can also work for a nuttier flavor and texture.
- Herb-Infused: Mix fresh chopped herbs like parsley or chives into your panko mixture for a fresh burst of flavor. I once paired this with a light lemon aioli dip for something extra special.
- Cooking Method: Although baking is preferred for easy cleanup, you can pan-fry the tenders in a bit of oil for a quicker finish if you don’t mind a bit more mess.
One variation I tried recently was swapping the ranch seasoning for a smoky barbecue rub — it gave the tenders a completely different vibe but just as delicious. I’ve also paired these tenders with creamy sides like the creamy chicken Caesar pasta salad to balance the crunch with smoothness.
Serving & Storage Suggestions
These tenders are best served hot and fresh from the oven when the coating is at peak crispiness. I like to plate them with a simple dipping sauce — ranch dressing, honey mustard, or even a spicy sriracha mayo all work beautifully.
Pair them with crunchy veggies, like celery sticks, or a crisp salad for a well-rounded meal. For something heartier, creamy sides like mac and cheese or these creamy baked mac and cheese complement the texture and flavors perfectly.
To store, let tenders cool completely, then place them in an airtight container. They keep well in the fridge for 3-4 days. When reheating, use an oven or toaster oven at 375°F (190°C) for about 8-10 minutes to bring back the crispiness. Avoid microwaving if you want to keep that crunch intact.
Flavors often mellow and meld overnight, so leftovers can taste even better the next day, especially if you add fresh herbs or a squeeze of lemon before serving.
Nutritional Information & Benefits
These Crispy Baked Ranch Chicken Tenders offer a satisfying protein boost with fewer calories and less fat than fried versions. On average, one serving (about 3 tenders) provides roughly 250 calories, 25g protein, 12g fat, and 10g carbohydrates.
Chicken tenders are a great source of lean protein, essential for muscle repair and energy. The panko breadcrumbs add a crunchy texture with less oil absorption compared to traditional breading. Using olive oil instead of butter or heavy frying oils adds heart-healthy fats.
This recipe is naturally gluten-free if you substitute gluten-free panko or almond flour, and it’s free from added sugars. The ranch seasoning adds herbs and spices that bring flavor without sodium overload, especially if you use a low-sodium mix.
Allergy note: this recipe contains eggs and dairy (Parmesan cheese). For dairy-free needs, omit cheese or choose a substitute like nutritional yeast.
Conclusion
If you’re after a crispy, flavorful chicken tender that’s quick to make and easy to trust, this Crispy Baked Ranch Chicken Tenders recipe delivers every time. It’s flexible, approachable, and brings that crave-worthy crunch without any frying drama. Honestly, I keep coming back to this one—whether it’s a weeknight rescue or a casual get-together with friends.
Feel free to tweak the seasoning or sides to match your mood. Maybe next time, I’ll serve these up alongside a fresh garden salad or even my favorite cheesy ham sticks. Either way, these tenders remind me that simple ingredients, a bit of patience, and the right technique can make all the difference.
When you try the recipe, I’d love to hear how you customize it or what your favorite dipping sauce is — drop a comment below, share your photos, or tell me about your kitchen wins!
Frequently Asked Questions
Can I use frozen chicken tenders for this recipe?
Yes, but make sure to fully thaw and pat them dry before coating to avoid soggy breadcrumbs.
How do I make homemade ranch seasoning?
Mix dried parsley, dill, garlic powder, onion powder, salt, black pepper, and a pinch of dried chives. Adjust to taste!
Can I make these tenders ahead of time?
You can prep and coat the chicken early, then bake just before serving for maximum crispness.
What if I don’t have panko breadcrumbs?
Regular breadcrumbs work but expect less crunch. Crushing some crackers or cornflakes can be a good substitute too.
How do I keep the tenders crispy after baking?
Place them on a wire rack while cooling and avoid stacking. Reheat in the oven or toaster oven rather than microwaving.
Pin This Recipe!
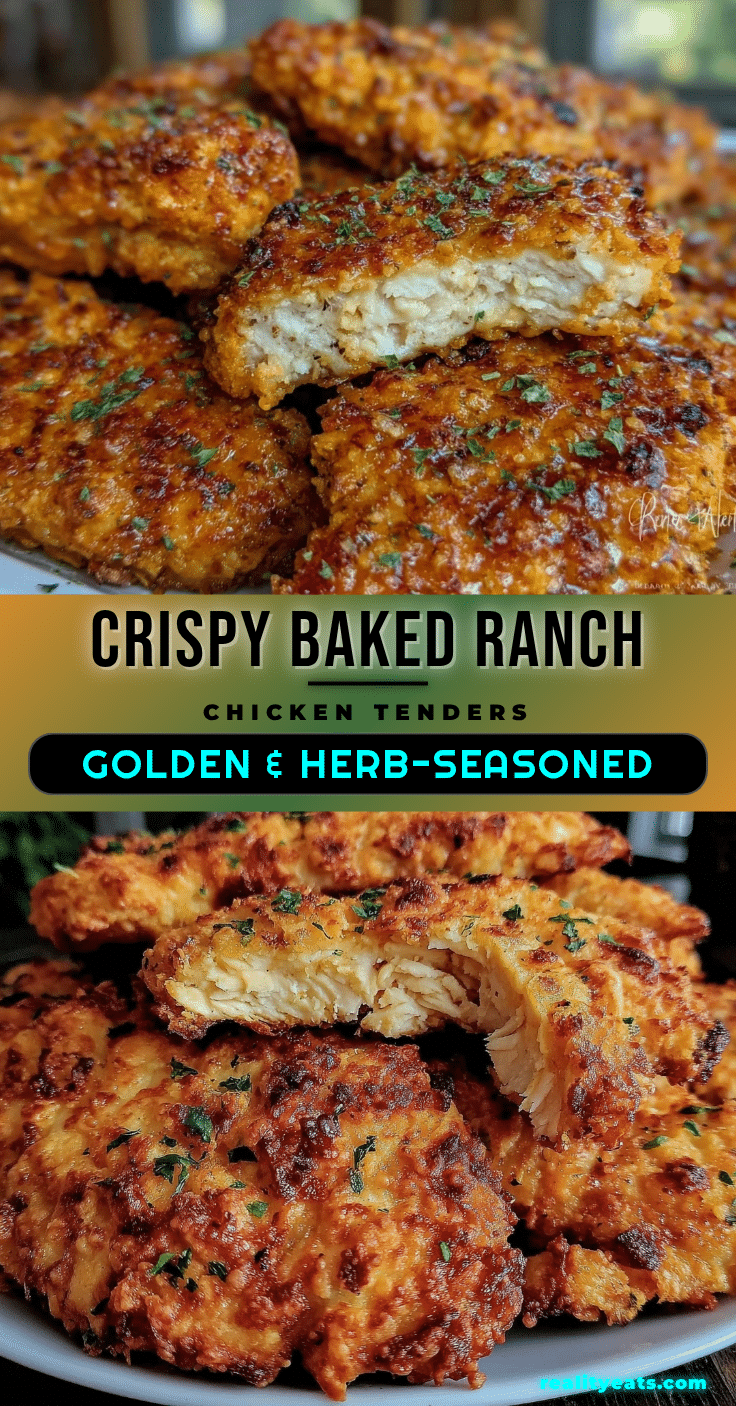
Crispy Baked Ranch Chicken Tenders Easy Panko Coating Recipe

These crispy baked ranch chicken tenders are crunchy, flavorful, and juicy without the guilt of frying. Ready in under 30 minutes, they are perfect for quick dinners and crowd-pleasing meals.
- Prep Time: 10 minutes
- Cook Time: 18 minutes
- Total Time: 28 minutes
- Yield: 4 servings 1x
- Category: Main Course
- Cuisine: American
Ingredients
- 1 pound (450g) chicken tenders, trimmed of excess fat
- 1 ½ cups (150g) Japanese-style panko breadcrumbs
- 2 tablespoons ranch seasoning mix (store-bought or homemade)
- ¼ cup (25g) finely grated Parmesan cheese
- ½ cup (60g) all-purpose flour
- 2 large eggs, beaten
- 2 tablespoons olive oil or cooking spray
- Optional: fresh cracked black pepper or a pinch of smoked paprika
Instructions
- Preheat your oven to 425°F (220°C) and line a rimmed baking sheet with foil or parchment paper. Place a wire rack on top.
- Prepare the coating stations: place flour in one bowl, beaten eggs in a second bowl, and combine panko breadcrumbs, ranch seasoning, and Parmesan cheese in a third bowl. Add smoked paprika if desired.
- Dredge each chicken tender in flour, shaking off excess. Dip into beaten eggs, letting extra drip off. Press into the panko mixture to coat thoroughly on all sides.
- Arrange coated tenders spaced out on the wire rack. Lightly drizzle or spray with olive oil.
- Bake for 15-18 minutes, flipping halfway through, until coating is golden and internal temperature reaches 165°F (74°C).
- If desired, broil for 1-2 minutes for extra crispiness, watching carefully to avoid burning.
- Let tenders rest for 3-5 minutes before serving.
Notes
Pat chicken dry before coating to ensure crispiness. Use a wire rack to prevent soggy bottoms. For extra crispiness, broil 1-2 minutes at the end. Avoid opening the oven frequently to maintain temperature. For gluten-free, substitute panko with gluten-free breadcrumbs or almond flour. Dairy-free options include omitting Parmesan or using nutritional yeast.
Nutrition
- Serving Size: About 3 tenders per
- Calories: 250
- Fat: 12
- Carbohydrates: 10
- Protein: 25
Keywords: crispy baked chicken tenders, ranch chicken tenders, panko chicken, baked chicken recipe, easy chicken tenders, healthy chicken tenders