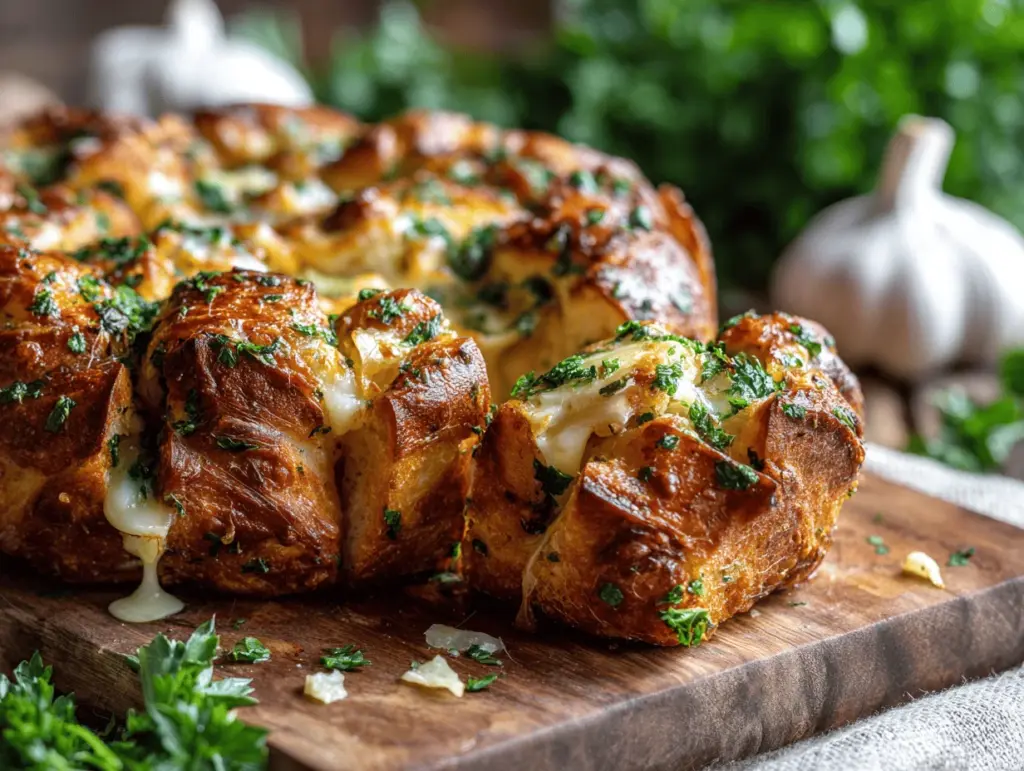
Imagine this: golden, buttery bread bubbling with gooey cheese and the unmistakable aroma of roasted garlic wafting through your kitchen. That’s what you get with my Cheesy Garlic Air Fryer Pull-Apart Bread. The first time I made this, I honestly didn’t expect my family to fight over the last piece—but, you know, here we are. There’s something magical about how the air fryer crisps up the edges, while the center stays soft and cheesy (it’s basically a flavor hug for your taste buds).
I came across the idea for Cheesy Garlic Air Fryer Pull-Apart Bread during a late-night Pinterest scroll—looking for snacks that wouldn’t require a ton of effort or dishes. I’ve tweaked it over the months, testing different cheeses and bread types until I found my favorite combo. If you’re anything like me, you crave a snack that’s quick, satisfying, and just a little bit nostalgic. This recipe ticks all those boxes. It’s perfect for parties, game nights, or spontaneous family gatherings (because, let’s face it, cheesy bread never goes out of style).
What really sets this apart is the air fryer technique. Traditional oven pull-apart breads can be delicious, but the air fryer gives you a crispy crust and melty middle without any fuss. And, bonus, it’s ready in a fraction of the time. Whether you’re a seasoned home chef or just someone who loves a good shortcut, this Cheesy Garlic Air Fryer Pull-Apart Bread is for you. I’ve baked it at least a dozen times—so trust me, it’s foolproof. Let’s jump in and get cheesy!
Why You’ll Love This Cheesy Garlic Air Fryer Pull-Apart Bread
- Quick & Easy: Honestly, you can whip up this pull-apart bread in under 30 minutes. No waiting around for dough to rise, so it’s ideal for last-minute get-togethers or late-night cravings.
- Simple Ingredients: Most of these you’ll already have—think store-bought bread rolls, cheese, garlic, and butter. No fancy shopping trips needed.
- Perfect for Parties: This cheesy garlic bread is the ultimate shareable snack for game nights, potlucks, or holiday brunches. It’s a hands-down crowd-pleaser.
- Crowd-Pleaser: Kids, adults, picky eaters—everyone loves cheesy bread. I’ve made this for birthday parties and it’s always the first thing to disappear.
- Unbelievably Delicious: The combo of melted cheese, garlic butter, and crispy bread edges is pure comfort food. The center stays soft and loaded with flavor.
So, what makes this Cheesy Garlic Air Fryer Pull-Apart Bread stand out? First, I blend a mix of cheeses—mozzarella for stretch, cheddar for tang, and parmesan for depth. The garlic-butter gets slathered between each piece, so you get flavor in every bite. The air fryer’s even heat means every roll crisps up perfectly (no soggy bottoms here).
This recipe isn’t just another cheesy bread—it’s my best version. I’ve tried slicing, stuffing, even layering different cheeses, but nothing beats the pull-apart effect from soft dinner rolls packed together and drenched in garlic butter. It’s comfort food with a modern twist, and you won’t need restaurant skills to nail it. If you’re looking for something that’ll impress guests but won’t stress you out, this is it. And if you’re just making it for yourself, well, you’ll want to hide the leftovers!
What Ingredients You Will Need
This recipe uses simple, wholesome ingredients to deliver bold flavor and satisfying texture—without any complicated prep. Everything is easy to find and most are kitchen staples. Feel free to swap out or add extras to suit your taste (I’ll share some of my favorite hacks below).
- For the Bread Base:
- 12 soft dinner rolls (store-bought or homemade; I love using King’s Hawaiian or brioche for that slight sweetness)
- For the Cheesy Garlic Filling:
- 1 cup shredded mozzarella cheese (about 100 g; gives that classic pull-apart stretch)
- 1/2 cup shredded sharp cheddar cheese (50 g; adds a little bite)
- 1/4 cup grated parmesan cheese (25 g; for savory depth)
- 4 tablespoons unsalted butter, melted (60 g; the richness glue that brings this all together)
- 3 large garlic cloves, finely minced (or use a garlic press; for max flavor)
- 2 tablespoons fresh parsley, chopped (optional; adds color and fresh taste)
- 1/4 teaspoon salt (or to taste)
- 1/4 teaspoon ground black pepper
- 1/4 teaspoon dried Italian seasoning (optional; for an herby note)
- Optional Extras:
- Red pepper flakes (for a little heat—my teens love this!)
- Chopped chives or green onions (for garnish)
- Crumbled cooked bacon (adds smoky flavor, especially for brunch)
Ingredient Tips: I recommend using whole-milk mozzarella for better melt. If you’re going gluten-free, swap the dinner rolls for gluten-free buns (I’ve tried Udi’s brand in a pinch; works great!). For dairy-free—use plant-based butter and cheese (Violife mozzarella shreds melt nicely). If you’re out of fresh garlic, 1 teaspoon garlic powder will do, but fresh really pops.
I’ve experimented with everything from sourdough to French bread. Softer rolls work best for that classic pull-apart texture. You can also toss in a bit of Italian sausage or diced pepperoni for a pizza-inspired twist. Honestly, this recipe is forgiving—just use what you have and make it yours!
Equipment Needed
- Air Fryer: Any standard basket-style or oven-style air fryer works. I use a 5-quart Cosori, but even the smaller ones get the job done (just work in batches).
- 8-inch round cake pan or oven-safe dish: Fits perfectly in most air fryer baskets. If you don’t have one, use a pie dish or line with parchment paper for easy removal.
- Mixing bowl: For stirring the garlic butter and cheese mixture.
- Pastry brush: Handy for slathering on butter (though a spoon works in a pinch—trust me, I’ve used both).
- Sharp knife: For slicing rolls if needed. Serrated works best for soft breads.
- Measuring cups and spoons: For accuracy—though I admit, sometimes I eyeball the cheese.
Equipment Notes: If you don’t have a round pan, you can arrange rolls directly in the air fryer basket lined with parchment. Just be careful lifting them out! I’ve had cleanup disasters with stuck-on cheese, so I recommend greasing your pan. For budget-friendly options, I’ve grabbed mixing bowls and brushes from the dollar store—no shame in that. Clean air fryer baskets immediately after baking so the cheese doesn’t harden (I learned that the hard way!).
Preparation Method
- Prep the Bread:
- Using 12 soft dinner rolls, slice each roll halfway through (don’t cut all the way down). This keeps the rolls connected at the base for easy pull-apart action.
- Arrange the rolls snugly in an 8-inch round cake pan or oven-safe dish. If you’re using parchment paper, line the pan for easier removal.
- Make the Garlic Butter:
- In a medium mixing bowl, combine 4 tablespoons melted unsalted butter (60 g), 3 minced garlic cloves, 2 tablespoons chopped parsley, 1/4 teaspoon salt, 1/4 teaspoon black pepper, and 1/4 teaspoon Italian seasoning (if using).
- Stir until well mixed. The aroma at this stage is incredible—don’t be surprised if family members wander into the kitchen!
- Stuff with Cheese:
- Mix together 1 cup shredded mozzarella (100 g), 1/2 cup cheddar (50 g), and 1/4 cup parmesan (25 g) in a separate bowl.
- Carefully stuff cheese mixture into each sliced roll, pressing gently so it doesn’t spill out. (Tip: Use your fingers for best control.)
- Brush with Garlic Butter:
- Generously brush the garlic butter mixture over the tops and into the cracks of each roll. Make sure every nook is coated—this is where the flavor magic happens.
- If you like heat, sprinkle red pepper flakes over the top at this point.
- Air Fry:
- Preheat your air fryer to 350°F (175°C) for 3 minutes.
- Place the pan with assembled bread into the air fryer basket. Bake for 8-10 minutes until cheese is melted and bread is golden brown. (I check at 8 minutes—if the cheese isn’t bubbling, give it another 2 minutes.)
- If your air fryer runs hot, cover loosely with foil for the last few minutes to stop the tops from burning.
- Cool and Garnish:
- Let the bread cool for 2-3 minutes before serving—this helps the cheese set a bit so it doesn’t all ooze out. Sprinkle with extra parsley or chives if you’re feeling fancy.
- Serve:
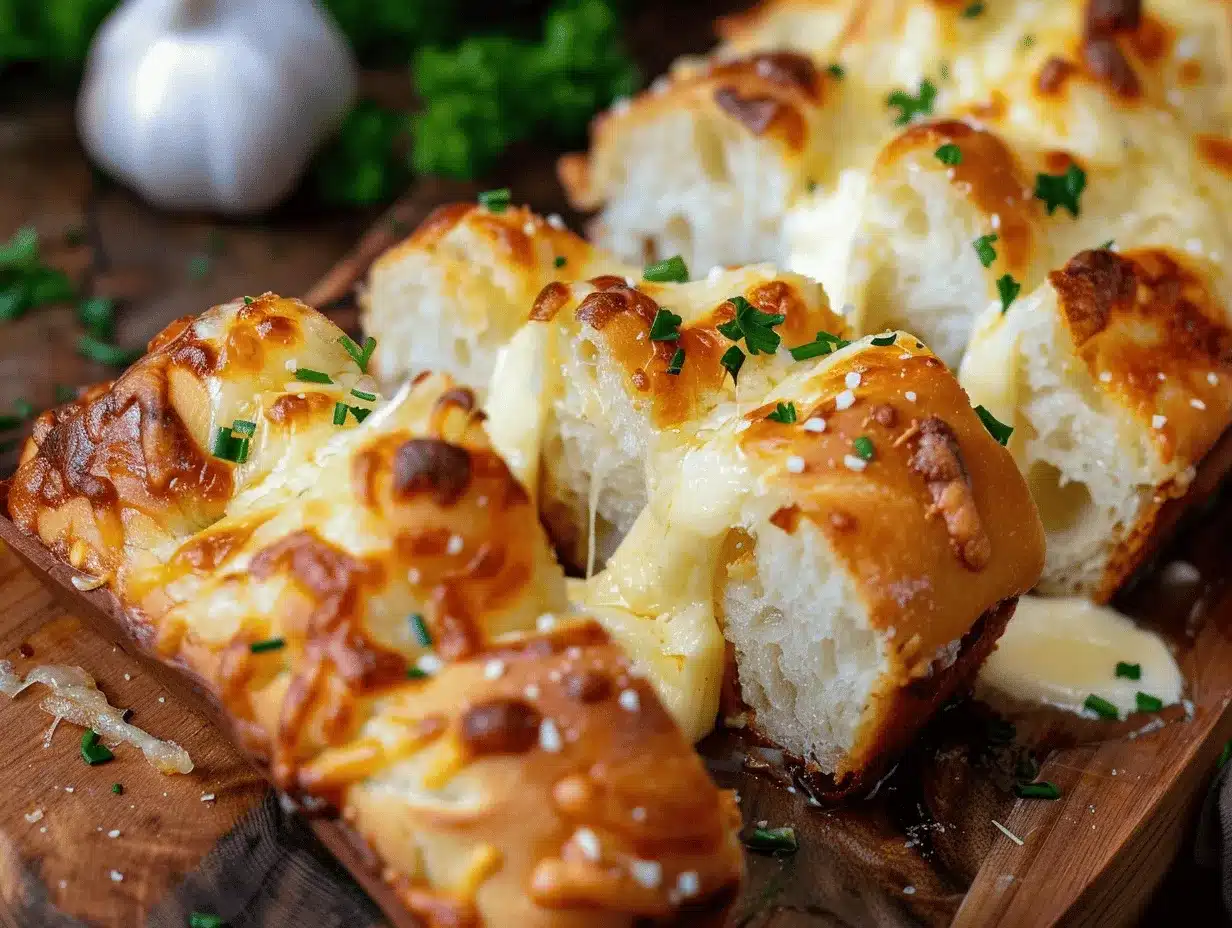
- Pull apart and enjoy! The bread should be crisp on the outside, gooey in the center, and loaded with garlic flavor.
Preparation Notes: If you notice uneven browning, rotate the pan halfway through. If your air fryer is smaller, bake in batches—just reduce cook time by a minute or two. If cheese spills into the pan, that’s normal (and honestly, the crispy bits are a treat!).
What if my bread is browning too fast?
Cover with foil for the last few minutes to prevent burning. Every air fryer heats differently!
How do I know when it’s done?
The cheese will be bubbly and the tops golden brown. The smell will let you know, too—the garlic and cheese aroma is your cue.
Cooking Tips & Techniques
- Don’t Overstuff: It’s tempting to load up the cheese, but too much will spill out and burn in the air fryer. I learned the hard way—less is more for neat pull-aparts.
- Use Room Temperature Butter: Melted butter blends better with garlic and herbs. Cold butter doesn’t carry flavor as well.
- Rotate for Even Cooking: Air fryers sometimes have hot spots. At the halfway mark, rotate the pan for even browning.
- Watch the Time: Air fryers cook fast. Start checking at 8 minutes. Overcooking dries out the rolls and toughens the cheese.
- Line with Parchment: Cheese can be messy. Parchment paper keeps cleanup easy (I’ve scraped burnt cheese off pans too many times!).
Common Mistakes: I’ve tried making this with cold rolls—don’t do it; they don’t crisp up well. Also, using pre-shredded cheese saves time, but freshly shredded cheese melts smoother. If you go dairy-free, expect slightly less browning and a different melt.
Timing & Multitasking: Prep the garlic butter while the air fryer preheats. You can assemble the bread ahead and refrigerate—just add 2 minutes to baking time. If you’re serving for brunch, make the bread while you prep coffee and fruit. It’s all about efficiency and keeping stress low.
Consistency: Stick with soft dinner rolls for reliable results. Crustier breads don’t pull apart as easily and can dry out. If you want a crispier base, brush with extra butter before baking. Trust me, every batch gets better as you experiment!
Variations & Adaptations
- Gluten-Free: Use gluten-free dinner rolls or buns. I’ve swapped in Udi’s rolls and the texture still comes out soft and cheesy.
- Vegan: Substitute with plant-based butter and cheese. Violife mozzarella and Earth Balance butter are my go-tos. Add a pinch of nutritional yeast for extra flavor.
- Spicy Jalapeño: Add 1/4 cup diced pickled jalapeños to the cheese mixture for a zesty kick. Sprinkle a little cayenne on top before baking.
- Pizza Style: Toss in 1/4 cup mini pepperoni slices and a dash of Italian seasoning with the cheese. Serve with warm marinara for dipping.
- Herb Lovers: Swap parsley for basil or thyme. Lemon zest mixed into the butter adds a fresh twist.
Cooking Methods: No air fryer? Bake at 350°F (175°C) in a standard oven for 15-18 minutes. If using a toaster oven, check at 10 minutes—these can run hot! For grill fans, wrap the pan in foil and cook over indirect heat for 10 minutes (I’ve tried this at summer BBQs—it’s a hit).
Personal Twist: Sometimes I’ll add a layer of caramelized onions between the rolls. It’s sweet, savory, and pairs perfectly with the cheese. My kids request this version for movie nights!
Serving & Storage Suggestions
Serve Cheesy Garlic Air Fryer Pull-Apart Bread fresh from the air fryer, while it’s still warm and the cheese is melty. Arrange on a rustic wooden board for that Pinterest-worthy look. Sprinkle with extra parsley or chives for color.
Presentation: Slice along the base to make pulling apart easy. I like serving with small bowls of marinara or ranch for dipping. Pair with soups, salads, or as a side for pasta dishes. For drinks, cold lemonade or a light beer complement the garlicky richness.
Storage: Store leftovers in an airtight container in the refrigerator for up to 3 days. Reheat in the air fryer at 320°F (160°C) for 3-4 minutes until warm and crispy. You can also microwave individual pieces for 20-30 seconds, but the air fryer keeps the texture best.
Freezing: Wrap cooled bread tightly in foil and freeze for up to 1 month. Thaw overnight in the fridge and reheat in the air fryer for best results. Honestly, the flavor deepens after a day or two—the garlic and herbs meld with the bread, making leftovers almost better than fresh!
Nutritional Information & Benefits
Each serving (about 1 roll) provides approximately 180 calories, 9g fat, 15g carbohydrates, and 8g protein. Cheesy Garlic Air Fryer Pull-Apart Bread offers protein from cheese and some calcium for bone health. The garlic adds immune-boosting properties, and fresh herbs supply antioxidants.
Dietary Considerations: Easily adaptable for gluten-free or dairy-free diets. Contains wheat and dairy; swap rolls and cheese for allergen-free alternatives. For lower carb, use keto rolls and skip the cheddar.
From a wellness perspective, I love that you can sneak in extra herbs or use whole wheat rolls for added fiber. This bread satisfies cravings without needing deep frying or loads of oil. It’s comfort food, but not a total splurge!
Conclusion
If you’re searching for a show-stopping party snack or just want to treat yourself, this Cheesy Garlic Air Fryer Pull-Apart Bread is totally worth trying. It’s fast, easy, and brings everyone to the table. The gooey cheese, buttery garlic, and crispy edges are pure joy in every bite.
Make it your own—add your favorite herbs, try different cheeses, or toss in bacon for extra wow. I love this recipe because it never fails to impress and brings a little happiness to any meal. Plus, it’s as fun to make as it is to eat.
Give it a go and let me know how you like it! Drop a comment below with your favorite twist, share with friends, or pin it for later. I can’t wait to hear about your cheesy bread adventures—seriously, let’s get baking!
FAQs
Can I use different types of bread for this recipe?
Absolutely! Soft dinner rolls work best, but you can try brioche, Hawaiian rolls, or even gluten-free buns. Just avoid crusty breads—they don’t pull apart as easily.
Do I need to preheat my air fryer?
Preheating helps the bread crisp up evenly. I recommend 3 minutes at 350°F (175°C), but if you forget, just add 1-2 minutes to the bake time.
Can I make this ahead of time?
Yes, assemble the bread and refrigerate up to a day in advance. Add 2 minutes to baking time when cooking from cold.
What’s the best way to reheat leftovers?
The air fryer works best—320°F (160°C) for 3-4 minutes. You can use a microwave, but the bread won’t be as crispy.
How can I make this recipe dairy-free?
Swap regular butter and cheese for plant-based alternatives. Violife mozzarella and Earth Balance butter work well. The texture will be slightly different, but still delicious!
Pin This Recipe!

Cheesy Garlic Air Fryer Pull-Apart Bread

Golden, buttery pull-apart bread loaded with gooey cheese and roasted garlic, crisped to perfection in the air fryer. This easy, crowd-pleasing snack is perfect for parties, game nights, or any time you crave cheesy comfort food.
- Prep Time: 10 minutes
- Cook Time: 10 minutes
- Total Time: 20 minutes
- Yield: 12 servings 1x
- Category: Appetizer
- Cuisine: American
Ingredients
- 12 soft dinner rolls (store-bought or homemade, such as King’s Hawaiian or brioche)
- 1 cup shredded mozzarella cheese (about 4 oz)
- 1/2 cup shredded sharp cheddar cheese (about 2 oz)
- 1/4 cup grated parmesan cheese (about 1 oz)
- 4 tablespoons unsalted butter, melted
- 3 large garlic cloves, finely minced
- 2 tablespoons fresh parsley, chopped (optional)
- 1/4 teaspoon salt
- 1/4 teaspoon ground black pepper
- 1/4 teaspoon dried Italian seasoning (optional)
- Red pepper flakes (optional, for heat)
- Chopped chives or green onions (optional, for garnish)
- Crumbled cooked bacon (optional, for extra flavor)
Instructions
- Slice each of the 12 soft dinner rolls halfway through, keeping the base intact for pull-apart action.
- Arrange the rolls snugly in an 8-inch round cake pan or oven-safe dish. Line with parchment paper if desired.
- In a medium mixing bowl, combine melted butter, minced garlic, chopped parsley, salt, black pepper, and Italian seasoning (if using). Stir until well mixed.
- In a separate bowl, mix together mozzarella, cheddar, and parmesan cheeses.
- Carefully stuff the cheese mixture into each sliced roll, pressing gently.
- Generously brush the garlic butter mixture over the tops and into the cracks of each roll. Sprinkle red pepper flakes if desired.
- Preheat the air fryer to 350°F (175°C) for 3 minutes.
- Place the pan with the assembled bread into the air fryer basket. Bake for 8-10 minutes, until cheese is melted and bread is golden brown. Cover loosely with foil if browning too quickly.
- Let the bread cool for 2-3 minutes before serving. Sprinkle with extra parsley or chives if desired.
- Pull apart and enjoy while warm and gooey.
Notes
For best results, use soft dinner rolls and freshly shredded cheese. Rotate the pan halfway through for even browning. If your air fryer is small, bake in batches and reduce cook time slightly. Line the pan with parchment for easy cleanup. To make gluten-free, use gluten-free rolls; for dairy-free, use plant-based butter and cheese. Serve with marinara or ranch for dipping.
Nutrition
- Serving Size: 1 roll
- Calories: 180
- Sugar: 3
- Sodium: 320
- Fat: 9
- Saturated Fat: 5
- Carbohydrates: 15
- Fiber: 1
- Protein: 8
Keywords: cheesy bread, air fryer, pull-apart bread, garlic bread, party snack, easy appetizer, game day, comfort food


