Introduction
“You’ve got to try roasting the strawberries first,” my friend texted me after I confessed my frustration over yet another bland batch of homemade ice cream. Honestly, I was skeptical. Roasted fruit in ice cream? That sounded like some complicated chef stuff—something I’d never have time for, especially on a busy weeknight. But curiosity got the best of me. So one evening, while the kitchen hummed quietly and the sun was dipping low, I tossed fresh strawberries with a sprinkle of sugar and a quick roast in the oven. The house filled with this warm, caramelized aroma that instantly made me think, “Okay, this might actually work.”
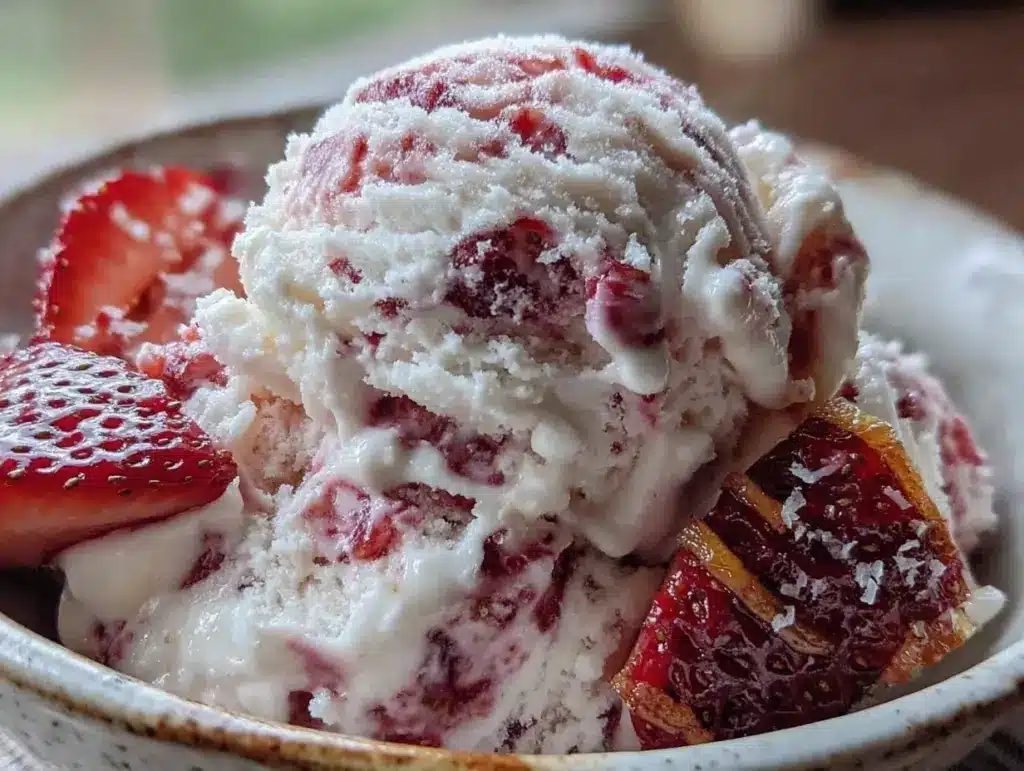
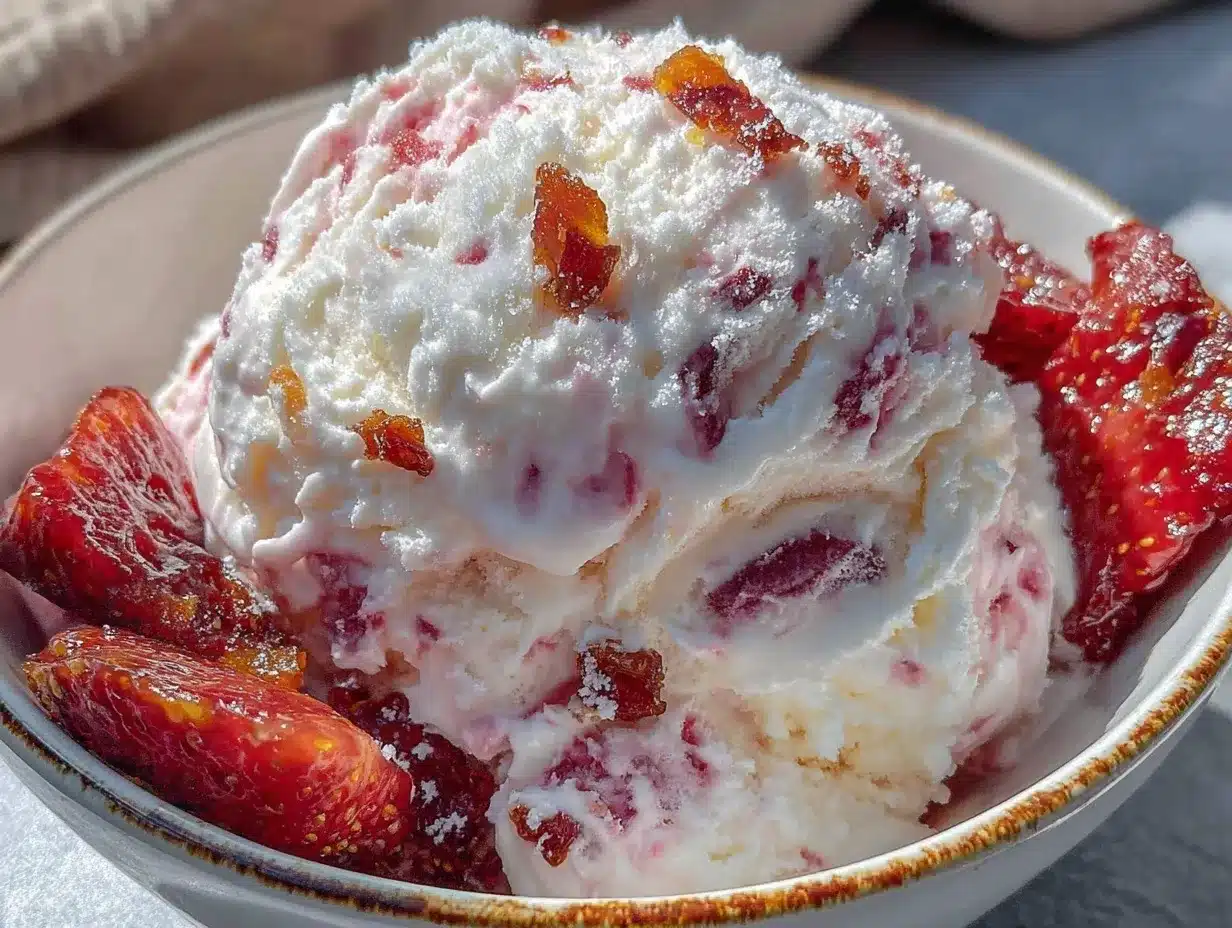
After blending those roasted berries into the cream mixture and letting it freeze without even churning, I was hooked. The texture was unbelievably smooth, and the flavor was deep, rich, and so much more layered than plain strawberry ice cream. It wasn’t just sweet—it was cozy, comforting, and felt like a small reward after a hectic day. No fancy ice cream maker, no mess, just simple ingredients and a little patience. That’s how this creamy no-churn roasted strawberry ice cream recipe found its way into my regular rotation. It’s the kind of dessert that makes you pause, savor, and maybe even close your eyes for a moment after the first bite.
Honestly, this recipe stuck because it’s easy enough to whip up on a whim but special enough to impress anyone who tries it. If you, like me, often feel too rushed to tackle complicated desserts, this is a quiet little win you’ll want to keep tucked in your back pocket.
Why You’ll Love This Recipe
After making this creamy no-churn roasted strawberry ice cream recipe several times (and tweaking small details here and there), I can say it’s truly a keeper. It’s not just another frozen treat—it’s the kind that feels thoughtfully homemade yet barely demands effort.
- Quick & Easy: Takes about 15 minutes active prep plus freezing time. No need for an ice cream machine.
- Simple Ingredients: Mostly pantry staples and fresh strawberries. No grocery runs for weird additives.
- Perfect for Summer Gatherings: Great for backyard barbecues, casual brunches, or just a quiet night in.
- Crowd-Pleaser: The roasted berry flavor gets raves from kids and adults alike, even those who usually avoid fruit in desserts.
- Unbelievably Delicious: The roasting step brings out caramel notes that deepen the strawberry’s natural sweetness, making it more complex and satisfying.
This isn’t just strawberry ice cream with a fancy name. Roasting the berries first adds this subtle smoky sweetness that changes the whole game. Plus, skipping the churn means you don’t have to interrupt your evening with constant stirring or worry about bulky equipment. It’s a recipe that fits into real life—especially when you want something homemade but don’t have hours to spend in the kitchen.
It’s like that comforting hug of a dessert that feels indulgent but is refreshingly straightforward. And honestly, it pairs beautifully with other homemade treats, like the soft sugar cookies with creamy icing I recently perfected or a fresh Southwest chipotle salad when you want to balance sweet with savory.
What Ingredients You Will Need
This recipe uses simple, wholesome ingredients to deliver bold flavor and a satisfyingly creamy texture without the fuss. Most of these are pantry basics, and the star is definitely the fresh strawberries — the sweeter and riper, the better.
- Fresh Strawberries (about 2 cups, hulled and halved): Choose firm, ripe berries for best roasting results. If out of season, frozen berries can work but fresh is ideal.
- Granulated Sugar (1/4 cup): Helps caramelize the berries during roasting and sweetens the ice cream base.
- Heavy Whipping Cream (2 cups / 480 ml): Use full-fat for the creamiest texture; brands like Organic Valley or Horizon work well.
- Sweetened Condensed Milk (1 can, 14 oz / 396 g): Adds sweetness and creaminess without needing extra sugar.
- Pure Vanilla Extract (1 teaspoon): Adds depth and balances the strawberry’s tartness.
- Fresh Lemon Juice (1 tablespoon): Brightens the flavor and enhances the berry notes.
Optional but recommended:
- Pinch of Salt: Just a little to bring out the sweetness and balance flavors.
- Mint Leaves or Basil (for garnish): Adds a fresh herbal note if serving immediately.
Seasonal swaps: In summer, you might roast fresh peaches or cherries instead of strawberries for a different twist. Or, if you want a dairy-free version, swapping the heavy cream for coconut cream and the condensed milk for a coconut-based sweetened milk works surprisingly well.
Equipment Needed
You really don’t need much for this creamy no-churn roasted strawberry ice cream recipe. Here’s what I use:
- Baking Sheet: For roasting the strawberries. I prefer a rimmed sheet lined with parchment paper for easy cleanup.
- Mixing Bowls: One large for whipping cream, one medium for mixing the base.
- Electric Mixer or Hand Whisk: An electric hand mixer speeds up whipping cream, but a sturdy whisk works if you’re patient.
- Spatula: For folding ingredients gently without deflating the whipped cream.
- Freezer-Safe Container: To store and freeze the ice cream mixture. A loaf pan or any airtight container does the job.
If you don’t have an electric mixer, no worries—just whip the cream by hand, but it’ll take a bit longer and more elbow grease. I’ve also tried this with a stand mixer, which works like a charm if you have one. For roasting, a toaster oven can be a handy alternative if your kitchen is small or you’re making a smaller batch.
Preparation Method
- Roast the Strawberries (about 20 minutes): Preheat your oven to 400°F (200°C). Toss the hulled and halved strawberries with 1/4 cup sugar on the lined baking sheet. Spread them out in a single layer. Roast until they’re soft, fragrant, and slightly caramelized—usually 18-20 minutes. You’ll notice the edges getting golden and syrupy. Let them cool completely.
- Whip the Cream (5-7 minutes): While strawberries cool, pour 2 cups (480 ml) of heavy whipping cream into a chilled mixing bowl. Whip on medium-high speed until soft peaks form—meaning the cream holds shape but still looks fluffy. Be careful not to overwhip to avoid turning it grainy.
- Mix Ice Cream Base: In a separate bowl, combine the cooled roasted strawberries (with their juices), 1 can (14 oz / 396 g) sweetened condensed milk, 1 teaspoon vanilla extract, 1 tablespoon fresh lemon juice, and a pinch of salt. Stir gently to blend the flavors.
- Fold Together: Carefully fold the whipped cream into the strawberry mixture using a spatula. Fold gently to keep the airiness intact—this is key for that creamy texture.
- Freeze: Transfer the mixture to your freezer-safe container, smoothing the top. Cover tightly with a lid or plastic wrap. Freeze for at least 6 hours, preferably overnight, until firm but scoopable.
- Serve: Let the ice cream sit at room temperature for 5 minutes before scooping. This makes it easier to serve and enhances the creamy mouthfeel.
Tip: If you notice any icy crystals during freezing, a quick stir with a fork after 2-3 hours helps maintain smoothness. Also, don’t skip cooling the roasted berries completely before mixing. Warm berries can deflate the whipped cream and ruin texture.
Cooking Tips & Techniques
Roasting the strawberries is the secret weapon here. It concentrates the natural sugars and brings out rich caramel notes that raw berries just can’t match. I’ve learned that tossing them evenly with sugar before roasting prevents burning and encourages that beautiful syrupy glaze.
Whipping the cream to the perfect soft peak stage is another trick. If you whip too little, the ice cream ends up dense; too much, and it can turn buttery or separate. Using chilled cream and a cold bowl helps speed this up and gives more volume.
Folding is where many recipes go wrong. You want to mix just enough to combine flavors but keep as much air in the whipped cream as possible. I usually use a gentle “cut and fold” motion with a spatula—think light and patient, not hurried or rough.
Finally, freezing time is non-negotiable. No-churn ice cream needs patience to firm up properly. Resist the urge to dig in too soon or the texture will be soft and mushy. If you want to speed things along, freezing in a shallow pan increases surface area and can reduce freezing time slightly.
One personal fail: the first time I skipped the lemon juice, thinking it was optional. The flavor was flat and lacked brightness. That splash of acidity really wakes up the strawberries and balances the sweetness beautifully.
Variations & Adaptations
This recipe is surprisingly flexible and invites fun twists:
- Dietary Swap: For a dairy-free version, replace heavy cream with full-fat coconut cream and use sweetened condensed coconut milk. The roasting step still works great, and the tropical coconut pairs nicely with strawberries.
- Flavor Boost: Add a teaspoon of balsamic vinegar to the roasting strawberries for a subtle tang and complexity. It’s unexpected but works like charm.
- Texture Play: Fold in crushed freeze-dried strawberries or chopped toasted pistachios just before freezing for crunch and color contrast.
- Seasonal Adaptation: In cooler months, roast apples or pears with cinnamon and swap those in place of strawberries for a cozy twist. You might enjoy pairing this with a slice of warm apple pie bars for a comforting combo.
- Creative Spin: Stir in a tablespoon of strawberry jam for a bit of extra sweetness and swirled texture.
Personally, I once tried adding a handful of fresh basil leaves to the strawberry roast—mild and herbaceous, it elevated the ice cream into something unexpectedly fresh without overpowering the fruit.
Serving & Storage Suggestions
This creamy no-churn roasted strawberry ice cream is best served chilled but slightly softened. Let it sit out for about 5 minutes after taking it from the freezer to make scooping effortless and bring out the luscious texture.
For a pretty presentation, garnish with fresh mint or basil leaves, or even a drizzle of honey or balsamic glaze. It pairs beautifully with crisp summer salads like the fresh Southwest chipotle salad recipe, balancing heat and sweetness on your plate.
Store leftover ice cream in an airtight container in the freezer for up to 2 weeks. Press a piece of parchment paper on the surface before sealing to prevent ice crystals from forming. When reheating, just let it thaw slightly at room temperature before scooping.
Flavors actually deepen over the first day of freezing—so if you can wait, the next-day ice cream tastes even better, with roasted strawberry notes becoming more pronounced.
Nutritional Information & Benefits
This recipe balances indulgence with wholesome ingredients. Each serving (about 1/2 cup or 120 ml) offers roughly 250 calories, 15 grams of fat, and 20 grams of sugar. The natural sugars come mostly from the strawberries and sweetened condensed milk.
Strawberries bring vitamin C, antioxidants, and fiber, while the lemon juice adds a boost of immune-supportive vitamin C. Using real cream means you get some saturated fat, which helps with satiety and flavor absorption.
If you prefer a lighter version, consider swapping half the cream for Greek yogurt, but that changes the classic creamy texture. This recipe is naturally gluten-free and can be adapted for dairy-free diets as noted.
From my experience, this ice cream feels like a treat that’s worth the calories—comforting, satisfying, and made with real food, not artificial ingredients.
Conclusion
This creamy no-churn roasted strawberry ice cream recipe is one of those rare wins where simplicity meets sophistication. It’s easy enough to throw together after a hectic day but special enough to feel like something you made just for yourself (or your lucky guests). You can tweak it with your favorite add-ins or seasonal fruits, making it a versatile dessert any time of year.
Personally, I love how roasting transforms ordinary strawberries into something almost magical, and skipping the churn means I can make it without interrupting my evening flow. If you try this recipe, I’d love to hear what creative twists you add or what moments it ends up making sweeter in your life.
Enjoy every creamy, fruity spoonful.
FAQs About Creamy No-Churn Roasted Strawberry Ice Cream
- Can I use frozen strawberries instead of fresh?
Yes, but fresh is best for roasting. If using frozen, thaw and drain excess juice before roasting for the best texture. - Do I need to roast the strawberries?
Roasting isn’t required but it really enhances the flavor by caramelizing the natural sugars and adding depth. - How long can I store this ice cream?
Stored properly in an airtight container, it keeps well for up to 2 weeks in the freezer. - Can I make this dairy-free?
Absolutely! Use coconut cream and sweetened condensed coconut milk for a delicious dairy-free version. - Why doesn’t this recipe require churning?
The whipped cream folded in creates airiness and creaminess, so churning is unnecessary—making it super easy to prepare.
Pin This Recipe!

Creamy No-Churn Roasted Strawberry Ice Cream
A simple and delicious homemade ice cream recipe featuring roasted strawberries for a deep, caramelized flavor without the need for an ice cream maker.
- Prep Time: 15 minutes
- Cook Time: 20 minutes
- Total Time: 6 hours 35 minutes
- Yield: 8 servings 1x
- Category: Dessert
- Cuisine: American
Ingredients
- 2 cups fresh strawberries, hulled and halved
- 1/4 cup granulated sugar
- 2 cups heavy whipping cream (480 ml)
- 1 can (14 oz / 396 g) sweetened condensed milk
- 1 teaspoon pure vanilla extract
- 1 tablespoon fresh lemon juice
- Pinch of salt (optional)
- Mint leaves or basil for garnish (optional)
Instructions
- Preheat oven to 400°F (200°C). Toss hulled and halved strawberries with 1/4 cup sugar on a parchment-lined baking sheet. Spread in a single layer.
- Roast strawberries for 18-20 minutes until soft, fragrant, and slightly caramelized. Let cool completely.
- While strawberries cool, whip 2 cups heavy cream in a chilled bowl on medium-high speed until soft peaks form (5-7 minutes).
- In a separate bowl, combine cooled roasted strawberries with their juices, sweetened condensed milk, vanilla extract, lemon juice, and a pinch of salt. Stir gently.
- Fold whipped cream gently into the strawberry mixture using a spatula to keep airiness intact.
- Transfer mixture to a freezer-safe container, smooth the top, cover tightly, and freeze for at least 6 hours or overnight until firm but scoopable.
- Before serving, let ice cream sit at room temperature for 5 minutes to soften for easier scooping.
Notes
Cool roasted strawberries completely before mixing to avoid deflating whipped cream. If icy crystals form during freezing, stir gently after 2-3 hours to maintain smoothness. For dairy-free version, substitute heavy cream with coconut cream and sweetened condensed milk with sweetened condensed coconut milk.
Nutrition
- Serving Size: 1/2 cup (120 ml)
- Calories: 250
- Sugar: 20
- Sodium: 50
- Fat: 15
- Saturated Fat: 9
- Carbohydrates: 28
- Fiber: 1
- Protein: 3
Keywords: no-churn ice cream, roasted strawberry ice cream, easy homemade ice cream, summer dessert, no ice cream maker, creamy strawberry ice cream


