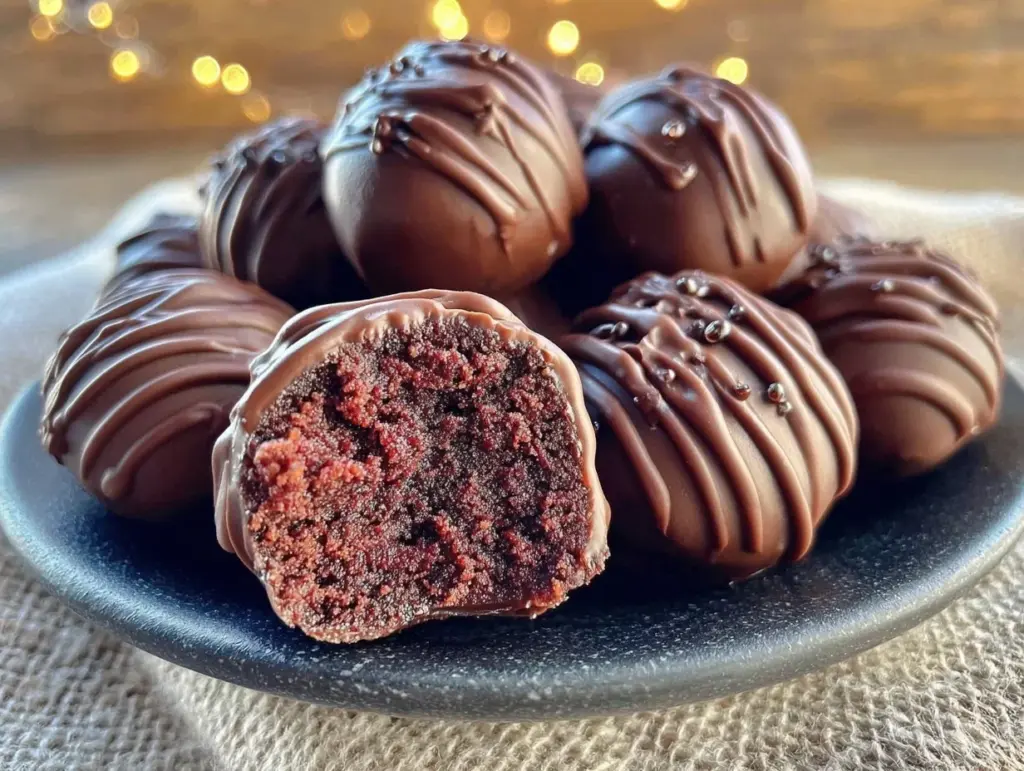
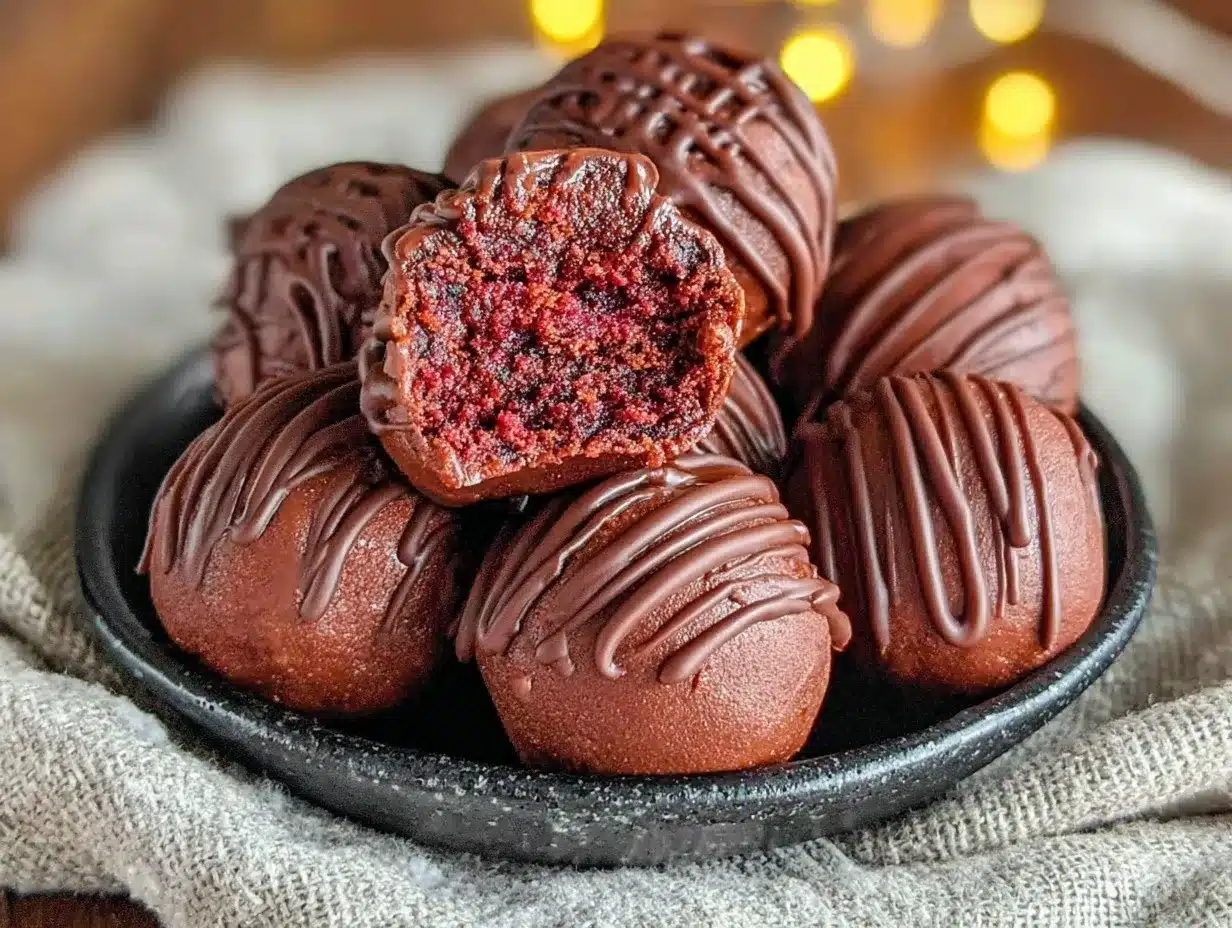
“You seriously made Death Star cake balls?” my friend asked, eyes wide as the midnight kitchen light flickered on. That night, I was testing a last-minute dessert for a movie marathon, half-expecting these truffles to flop. Honestly, I wasn’t even aiming for a fancy shape initially—just needed to use up some leftover chocolate cake crumbs and dark cocoa powder. But as I rolled those dense, fudgy spheres and dipped them into the rich cocoa coating, something clicked. The texture was almost hypnotic—velvety, bittersweet, and so unapologetically indulgent it felt like a little rebellion against the usual sweet treats.
There’s something about the deep, dusty aroma of dark cocoa that pulls you in—it’s not just dessert, it’s a moment. I remember sitting back with one of these decadent Death Star cake ball truffles, feeling the chocolate coating crack just right before melting away to reveal moist cake inside. It was like my taste buds were on a secret mission, and honestly, that night turned into a sweet obsession. I ended up making these truffles multiple times that week, tweaking the cocoa levels and rolling techniques until I could say for sure: this recipe isn’t just another cake ball—it’s got character, drama, and a dark side you want to surrender to.
What stuck with me was how these little treats managed to be both simple and impressive, perfect for a quick dessert fix or a conversation starter at gatherings. They’re not overly sweet, which means you can savor each bite without feeling weighed down. If you’ve ever wondered how to make a cake ball that feels truly special, with a dark cocoa coating that’s just the right mix of bitter and smooth, you’ll find this recipe hard to forget. And yes, they do look a bit like mini Death Stars—because, why not add a little fun to decadence?
Why You’ll Love This Recipe
After several kitchen experiments and taste tests, these decadent Death Star cake ball truffles with dark cocoa coating have earned a permanent spot in my dessert lineup. They’re surprisingly easy to make yet deliver a rich, indulgent experience that feels far more complicated than it really is.
- Quick & Easy: Comes together in about 45 minutes, perfect for last-minute dessert cravings or a themed party treat.
- Simple Ingredients: No need to hunt down exotic components; everything’s likely in your pantry or local store.
- Perfect for Geeky Gatherings: Ideal conversation starters at movie nights, themed parties, or casual get-togethers.
- Crowd-Pleaser: The bittersweet dark cocoa coating balances the sweet cake inside, making it a hit with both kids and adults.
- Unbelievably Delicious: The texture combo of moist cake center and crisp cocoa shell hits all the right comfort food notes.
- What Makes It Different: Using a dark cocoa powder coating instead of traditional chocolate gives these truffles a sophisticated edge. Plus, shaping them to mimic the Death Star adds a playful twist that’s both fun and impressive.
This isn’t your standard cake ball recipe—it’s the kind you want to share when you’re feeling a little adventurous but also craving that familiar chocolate comfort. Trust me, once you bite into one, you’ll understand why this recipe stuck around longer than expected.
What Ingredients You Will Need
This recipe relies on a handful of straightforward, pantry-friendly ingredients that come together to create a bold, satisfying flavor and texture. The dark cocoa coating gives these cake balls a distinct look and taste, setting them apart from the usual chocolate-dipped versions.
- Chocolate Cake: About 1 box (or homemade equivalent) of rich chocolate cake, baked and cooled (crumbled finely). I like using a moist, fudgy cake base for best results.
- Cream Cheese: 4 oz (115 g), softened—adds creaminess and helps bind the crumbs together without overwhelming sweetness.
- Powdered Sugar: ½ cup (60 g)—for subtle sweetness and smooth texture.
- Unsweetened Dark Cocoa Powder: ¾ cup (75 g) for coating—look for a Dutch-processed variety for deeper flavor and smoother finish.
- Butter: 2 tbsp (28 g), melted—helps the cocoa coating adhere and adds richness.
- Vanilla Extract: 1 tsp—just a splash for aromatic depth.
- Pinch of Salt: Balances the sweetness and enhances the chocolate notes.
Substitution Tips: You can swap cream cheese with mascarpone or Greek yogurt (strained) for a lighter option. For a gluten-free version, use gluten-free chocolate cake crumbs. If you want to avoid dairy, coconut cream cheese works surprisingly well.
If you prefer a sweeter coating, add a tablespoon of powdered sugar to the cocoa before mixing with melted butter. For a seasonal twist, dust with edible silver glitter or crushed peppermint during the holidays (a fun alternative to the classic look).
Equipment Needed
Gathering the right tools makes the process easier and more enjoyable. Luckily, this recipe calls for simple kitchen equipment you probably already own.
- Mixing Bowls: Medium and small bowls for combining ingredients comfortably.
- Electric Mixer or Hand Whisk: To beat the cream cheese smooth and combine the batter evenly.
- Baking Tray: For chilling the cake balls before coating.
- Parchment Paper: Prevents sticking and keeps cleanup simple.
- Spoon or Cookie Scoop: For portioning out consistent cake balls (a 1-inch scoop works great).
- Small Bowl: To mix the dark cocoa coating with melted butter.
- Cooling Rack: Optional but helpful to let excess cocoa coating drip and set evenly.
If you don’t have an electric mixer, a sturdy spoon and some elbow grease will do just fine—just make sure that cream cheese is well softened before mixing. For budget-friendly alternatives, use a sturdy spatula and a chilled baking sheet to keep the cake balls firm during preparation.
Preparation Method
- Prepare the Cake Crumbs: Start by crumbling your cooled chocolate cake into a large bowl. Aim for fine, even crumbs—no big chunks, but not powdery either. This should take about 5 minutes.
- Mix in Cream Cheese and Sugar: Add the softened cream cheese, powdered sugar, vanilla extract, and a pinch of salt to the crumbs. Use an electric mixer or sturdy spoon to combine until the mixture is moist and sticks together well. This step usually takes 3-4 minutes. If it feels too dry, add a teaspoon of milk; if too wet, sprinkle in a bit more powdered sugar.
- Shape the Cake Balls: Using a 1-inch cookie scoop or spoon, portion the mixture and roll into tight, smooth balls with your hands. The smoother the surface, the cleaner the final look. Place each ball on a parchment-lined baking tray. Chill in the fridge for at least 30 minutes to firm up — this helps prevent cracking when coating.
- Prepare the Dark Cocoa Coating: In a small bowl, mix the unsweetened dark cocoa powder with melted butter until you get a thick, spreadable paste. The butter helps the cocoa stick and adds a subtle glossy finish. Adjust consistency by adding more cocoa or butter as needed.
- Coat the Cake Balls: Remove the chilled balls from the fridge. Using a small spoon or your fingers, gently press and smooth the cocoa coating over each ball, covering every inch. Don’t worry if the surface looks slightly uneven—that’s part of the charm and adds texture reminiscent of the Death Star’s rugged surface. Return coated balls to the tray.
- Final Chill: Place the coated truffles back in the fridge for at least 20 minutes to set the cocoa coating. This helps the dark cocoa harden slightly, giving each truffle a satisfying snap when bitten.
- Optional Decoration: For an extra touch, you can pipe tiny white chocolate details mimicking the Death Star’s superlaser dish or sprinkle edible glitter for a starry effect.
Pro Tip: If the dark cocoa paste feels too thick to spread, warm it gently in the microwave for 5-10 seconds. If it’s too runny, add more cocoa powder gradually to thicken. Patience here really pays off in the final texture.
Cooking Tips & Techniques
Getting these decadent Death Star cake ball truffles just right takes a bit of practice, but here are some tips I’ve picked up through trial and error:
- Don’t rush chilling: The key to clean coating and shaping is letting the cake balls firm up properly. I once skipped this step and ended up with a gooey mess that refused to hold shape.
- Use room temperature cream cheese: Cold cream cheese lumps make mixing hard and uneven. Let it soften on the counter for about 30 minutes before starting.
- Consistency check: The cake ball mixture should feel like playdough—not too wet, not crumbly. If needed, tweak with a little cream cheese or powdered sugar.
- Dark cocoa coating technique: Unlike melted chocolate, this cocoa and butter coating requires a gentle hand. Use a small spoon and light pressure to avoid breaking the balls.
- Multitasking: While the cake balls chill, prep your coating and clean up to save time.
- Storage preparation: If you plan to store the truffles, keep them chilled in an airtight container to maintain texture and freshness.
Don’t worry if your first batch isn’t perfectly spherical or smooth—these little imperfections give the truffles character and make them feel homemade, just like my soft sugar cookies with creamy icing.
Variations & Adaptations
One of the coolest things about this recipe is how easily it adapts to different tastes and dietary needs:
- Flavor Twist: Add a teaspoon of instant espresso powder to the cake ball mix for a mocha Death Star variation—rich and slightly bitter.
- Nutty Crunch: Roll the coated truffles in finely chopped toasted hazelnuts or pecans before chilling for added texture and flavor.
- Gluten-Free Option: Use gluten-free chocolate cake crumbs and ensure your cocoa powder is certified gluten-free.
- Dairy-Free Version: Swap cream cheese for dairy-free cream cheese alternatives and use vegan butter for the coating.
- Seasonal Spin: For holidays, mix a pinch of cinnamon or chili powder into the cocoa coating for festive warmth or a tiny kick.
Personally, I once tried adding a swirl of raspberry jam inside each ball before chilling for a surprise fruity center—unexpected but delicious. It reminded me of the layered flavors in my cozy cranberry-orange pecan crisp where sweet and tart mingle beautifully.
Serving & Storage Suggestions
These decadent Death Star cake ball truffles are best served chilled or at room temperature. The dark cocoa coating should have a slight firmness that gives way to the moist cake inside.
- Presentation: Arrange on a dark or metallic platter to emphasize the galactic theme. Dust with edible silver glitter or place on star-shaped parchment liners for a fun touch.
- Pairings: Serve alongside a rich coffee, black tea, or a glass of red wine to complement the bitterness of the dark cocoa.
- Storage: Store in an airtight container in the refrigerator for up to 5 days. For longer storage, freeze the truffles separated by parchment paper for up to a month. Thaw in the fridge overnight.
- Reheating: Let truffles come to room temperature for about 15 minutes before serving to soften the coating slightly without melting it.
- Flavor Development: The flavor actually deepens and becomes more complex after a day or two in the fridge—worth the wait if you can resist!
Nutritional Information & Benefits
Estimated per truffle (based on 24 pieces): 110 calories, 6g fat, 14g carbs, 1g protein.
The key ingredient, dark cocoa powder, is rich in antioxidants and can support heart health when eaten in moderation. Using cream cheese adds a bit of protein and calcium, while the minimal sugar keeps the sweetness balanced. This recipe can fit well into a balanced diet when enjoyed as an occasional treat.
For those mindful of allergens, this recipe contains dairy and gluten (unless using substitutions). The low sugar content and the use of dark cocoa make it a somewhat healthier alternative to many traditional cake balls.
Conclusion
These decadent Death Star cake ball truffles with dark cocoa coating are the kind of dessert that surprises you with their depth and texture. They’re easy enough to whip up on a whim but special enough to impress friends (or just treat yourself). Whether you’re a fan of geeky themed treats or simply craving rich, bittersweet chocolate, this recipe delivers both flavor and fun.
Feel free to tweak the flavors and coatings to fit your mood or occasion—there’s plenty of room to make this recipe your own. I love how these truffles bring a touch of whimsy and sophistication to simple ingredients, reminding me of the joy in unexpected culinary adventures. If you try this recipe, I’d love to hear how you made it yours!
Frequently Asked Questions
Can I use homemade chocolate cake instead of boxed cake mix?
Absolutely! Homemade chocolate cake works beautifully and often gives even more moistness and flavor. Just crumble it finely once cooled.
Is it possible to freeze these cake ball truffles?
Yes, freezing is a great option. Place them in an airtight container with parchment paper between layers and freeze for up to a month. Thaw overnight in the fridge before serving.
How do I make the dark cocoa coating less bitter?
You can add a tablespoon of powdered sugar to the cocoa and butter mix to balance bitterness without losing that rich flavor.
Can I shape these cake balls into other designs?
Definitely! While the Death Star shape is fun, you can roll them into simple spheres or even use molds for different shapes depending on your occasion.
What’s the best way to store these to keep them fresh?
Store in an airtight container in the refrigerator. They’ll stay fresh for about 5 days and taste best slightly chilled or at room temperature.
Pin This Recipe!

Decadent Death Star Cake Ball Truffles Easy Dark Cocoa Recipe

These decadent Death Star cake ball truffles feature a rich, bittersweet dark cocoa coating and a moist chocolate cake center, perfect for quick, indulgent desserts or themed gatherings.
- Prep Time: 15 minutes
- Cook Time: 0 minutes
- Total Time: 45 minutes
- Yield: 24 truffles 1x
- Category: Dessert
- Cuisine: American
Ingredients
- 1 box (or homemade equivalent) rich chocolate cake, baked and cooled, crumbled finely
- 4 oz (115 g) cream cheese, softened
- ½ cup (60 g) powdered sugar
- ¾ cup (75 g) unsweetened dark cocoa powder (Dutch-processed recommended) for coating
- 2 tbsp (28 g) butter, melted
- 1 tsp vanilla extract
- Pinch of salt
Instructions
- Crumble cooled chocolate cake into a large bowl until fine and even, about 5 minutes.
- Add softened cream cheese, powdered sugar, vanilla extract, and a pinch of salt to the crumbs. Mix with an electric mixer or sturdy spoon until moist and sticks together well, about 3-4 minutes. Adjust moisture with milk or powdered sugar if needed.
- Portion mixture using a 1-inch cookie scoop or spoon and roll into tight, smooth balls. Place on parchment-lined baking tray and chill in fridge for at least 30 minutes.
- In a small bowl, mix unsweetened dark cocoa powder with melted butter until thick and spreadable. Adjust consistency as needed.
- Remove chilled cake balls from fridge and gently press and smooth cocoa coating over each ball, covering completely. Return coated balls to tray.
- Chill coated truffles in fridge for at least 20 minutes to set the cocoa coating.
- Optional: Decorate with piped white chocolate details or edible glitter for a themed effect.
Notes
Use room temperature cream cheese for easier mixing. Chill cake balls thoroughly before coating to prevent cracking. Warm cocoa paste briefly if too thick. Store truffles in airtight container refrigerated up to 5 days or freeze up to 1 month. Flavor improves after chilling for a day or two. Variations include adding espresso powder, nuts, or seasonal spices.
Nutrition
- Serving Size: 1 truffle
- Calories: 110
- Fat: 6
- Carbohydrates: 14
- Protein: 1
Keywords: cake balls, truffles, dark cocoa, Death Star, chocolate dessert, easy dessert, party treats, geeky dessert


