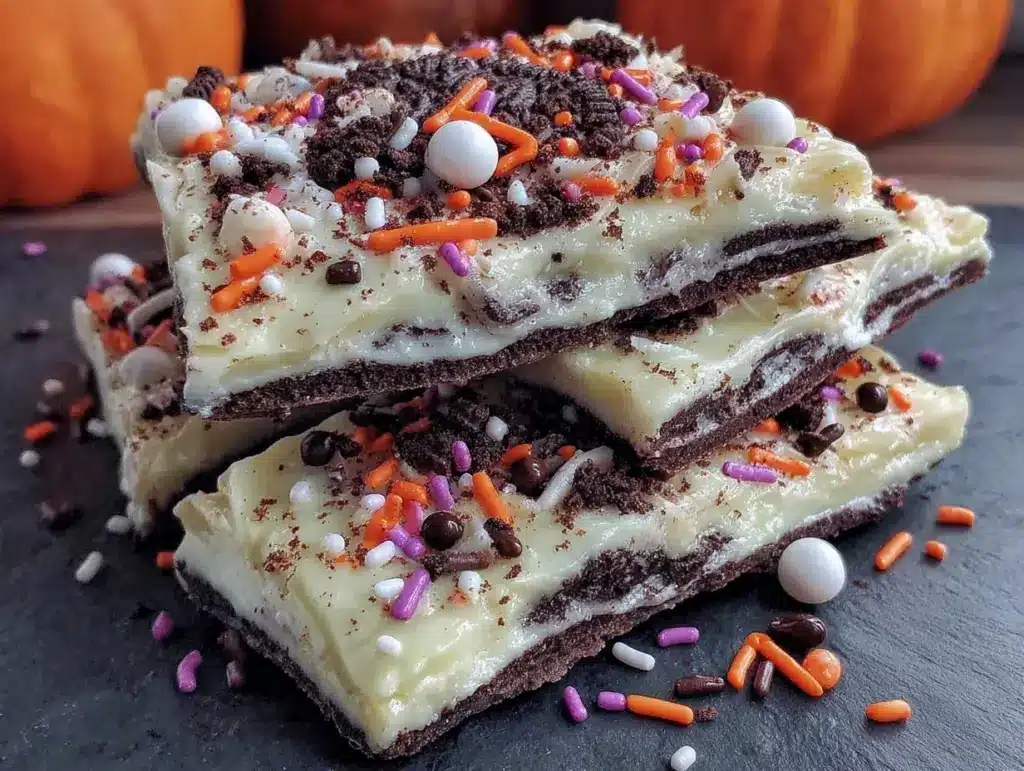
There’s something magical about Halloween that makes me want to whip up spooky treats that are as fun to make as they are to eat. This irresistible Halloween Oreo Bark recipe is one of my favorite go-to party snacks when the spooky season rolls around. It’s quick, easy, and doesn’t require turning on the oven—perfect for busy moms, party planners, or anyone who simply loves a no-fuss recipe. Plus, it’s packed with festive colors, sweet crunch, and Halloween-themed goodies that will have kids and adults alike reaching for seconds!
The best part? You can customize it to your heart’s content with your favorite candies, sprinkles, and even different types of Oreos. Whether you’re hosting a Halloween bash, need a last-minute treat for the kids, or just want to indulge in some seasonal fun, this recipe is a guaranteed crowd-pleaser. Let’s dive into the details and get started on whipping up this spooky and sweet masterpiece!
Why You’ll Love This Recipe
- No-Bake Wonder: Who has time to bake when you’re busy planning costumes or hosting a party? This recipe takes the stress out of dessert prep.
- Perfect for Parties: It’s colorful, festive, and can easily be made in large batches to feed a crowd.
- Customizable: Use your favorite Halloween candies, different Oreo flavors, or even add nuts for a unique twist.
- Kid-Friendly: This recipe is so easy and fun that the little ones can help decorate it with their favorite toppings.
Every bite is a delicious contrast of creamy chocolate and crunchy cookies. - Visually Stunning: It’s Insta-worthy with all those bold Halloween colors and textures—it’ll be the star of your spooky spread!
Honestly, this Oreo bark is the epitome of festive fun. It’s the kind of treat that gets everyone talking, snapping photos, and asking for the recipe. Not to mention, it’s so easy to whip up that you’ll wonder why you didn’t start making it sooner. You’ll love how effortlessly it adds a pop of Halloween magic to your party table!
What Ingredients You Will Need
This recipe uses simple ingredients that you can find at any grocery store. Plus, most of these are pantry staples, so you might already have them on hand!
- White Chocolate Chips: The base of the bark that gives it its creamy texture. You can also use almond bark or candy melts.
- Halloween Oreos: These have orange-colored filling, which adds a festive touch and a delicious flavor.
- M&Ms (Halloween colors): Perfect for adding pops of color and extra chocolatey sweetness.
- Candy Corn: A must-have for Halloween treats, but feel free to skip if you’re not a fan.
- Halloween Sprinkles: Go wild with candy eyes, bats, pumpkins, or other themed sprinkles for added texture and flair.
- Mini Pretzels: These add crunch and a bit of saltiness to balance the sweetness.
All these ingredients come together to create a treat that’s not only delicious but also a visual feast for the eyes. Feel free to get creative with substitutions—like using dark chocolate for a spookier look or swapping out pretzels for nuts if you prefer.
Equipment Needed
- Baking Sheet: A rimmed baking sheet works best to contain the melted chocolate.
- Parchment Paper: Essential for easy removal of the bark once it hardens.
- Microwave-Safe Bowl: Use this to melt the chocolate quickly and evenly.
- Spatula: For spreading the melted chocolate smoothly on the parchment paper.
- Zip-top Bag (optional): For crushing the Oreos without making a mess.
If you don’t have a microwave, you can easily melt the chocolate over a double boiler. And if you’re missing a zip-top bag, just use a rolling pin wrapped in plastic wrap to crush the Oreos. This recipe is forgiving, so don’t stress about having specific tools!
How to Make Halloween Oreo Bark

- Prepare Your Baking Sheet: Line a large baking sheet with parchment paper to prevent sticking and make cleanup a breeze.
- Melt the Chocolate: Place the white chocolate chips in a microwave-safe bowl. Heat in 30-second intervals, stirring in between, until fully melted and smooth. Be careful not to overheat, as chocolate can seize up quickly.
- Crush the Oreos: Place the Halloween Oreos in a zip-top bag and gently crush them into chunks using a rolling pin. You don’t want them finely crushed—aim for bite-sized pieces.
- Spread the Chocolate: Pour the melted chocolate onto the prepared baking sheet and use a spatula to spread it into an even layer. Aim for about 1/4-inch thickness.
- Add the Toppings: While the chocolate is still melted, sprinkle the crushed Oreos, M&Ms, candy corn, and pretzels evenly across the surface. Press them lightly into the chocolate to ensure they stick.
- Decorate with Sprinkles: Finish off your bark by scattering Halloween-themed sprinkles and candy eyes on top for extra flair.
- Let It Set: Allow the bark to cool completely. You can speed up the process by placing the baking sheet in the fridge for about 30 minutes.
- Break Into Pieces: Once the bark is firm, use your hands to break it into uneven pieces. The irregular shapes add to the charm!
And just like that, your Halloween Oreo Bark is ready to wow your guests. It’s as simple as melting, mixing, and decorating—it doesn’t get easier or more fun than this!
Cooking Tips & Techniques
- Don’t Overheat the Chocolate: If your chocolate starts to seize or harden while melting, add a teaspoon of coconut oil or shortening to smooth it out.
- Work Quickly: Once the chocolate is melted, you’ll want to add your toppings immediately before it starts to harden.
- Crush with Care: Crushing the Oreos too finely will make them disappear into the bark. Keep them chunky for added texture.
- Chill for Crispness: Refrigerating the bark not only helps it set faster but also makes the texture extra crisp and refreshing.
- Use Fresh Ingredients: Make sure your chocolate, sprinkles, and toppings are fresh for the best flavor and appearance.
Trust me, once you get the hang of these tips, making Oreo bark will become second nature. And the best part? You can tweak the recipe to suit your preferences and make it uniquely yours!
Variations & Adaptations
- Gluten-Free Version: Swap out regular Oreos for gluten-free Oreos and double-check that your sprinkles and candy are gluten-free.
- Dark Chocolate Base: For a richer, bittersweet flavor, use dark chocolate instead of white chocolate.
- Seasonal Twist: Don’t limit yourself to Halloween! Use red and green M&Ms for Christmas or pastel candies for Easter.
- Nutty Addition: Add chopped nuts like almonds or pecans for extra crunch and a savory contrast.
- Vegan Option: Use dairy-free white chocolate and vegan candy options to suit a plant-based diet.
One of my favorite variations is swapping the candy corn for gummy worms—it adds a playful “spooky” touch that kids absolutely love!
Serving & Storage Suggestions
This Halloween Oreo Bark is best served chilled or at room temperature. Arrange it on a platter or festive tray for a party-ready presentation. If you’re feeling extra creative, you can even wrap individual pieces in cellophane bags tied with Halloween-themed ribbons for a cute party favor.
Store any leftovers in an airtight container in the fridge for up to a week. If you want to make it ahead, you can freeze the bark for up to a month—just let it thaw in the fridge before serving. The flavors tend to deepen after a day or two, so it’s even more delicious if you make it slightly ahead of time!
Nutritional Information & Benefits
While this Halloween Oreo Bark is definitely a sweet indulgence, it’s perfect for a special treat during the holiday season. Here’s a rough estimate of the nutritional breakdown per serving (about 1-2 pieces):
- Calories: 220
- Fat: 12g
- Sugar: 18g
- Protein: 2g
Key ingredients like dark chocolate can offer antioxidants, and the mini pretzels add a touch of whole grains. However, this recipe is all about balance and enjoying the season, so don’t worry too much about the calories—Halloween comes but once a year!
Conclusion
This irresistible Halloween Oreo Bark recipe is everything you need for a festive season treat: quick, delicious, and endlessly customizable. It’s sure to be the centerpiece of your Halloween dessert spread and a hit with kids and adults alike. Whether you’re hosting a party or just want a fun activity to do with the family, this recipe will bring all the spooky vibes and sweet smiles.
If you try this Halloween Oreo Bark recipe, I’d love to hear how it turned out! Share your creations in the comments below or tag me on social media. Happy haunting, and may your Halloween be as sweet as this bark!
FAQs
Can I use regular Oreos instead of Halloween Oreos?
Yes, regular Oreos work perfectly! They won’t have the orange filling, but you can add more Halloween sprinkles for an extra festive look.
How far in advance can I make Halloween Oreo Bark?
You can make it up to a week in advance if stored in an airtight container in the fridge or up to a month in the freezer.
What can I use instead of white chocolate?
If you prefer, you can use milk or dark chocolate, or even a mix of both for a richer flavor. Just adjust the toppings to match the chocolate base.
Can I leave out the candy corn?
Absolutely! If candy corn isn’t your thing, you can swap it with another Halloween candy or simply leave it out entirely.
How do I crush the Oreos without a mess?
The easiest way is to place them in a zip-top bag and gently crush them with a rolling pin or the bottom of a glass. Aim for chunky pieces rather than crumbs.
Pin This Recipe!

Irresistible Halloween Oreo Bark Recipe Perfect for Parties
This irresistible Halloween Oreo Bark recipe is a quick, no-bake treat packed with festive colors, sweet crunch, and Halloween-themed goodies, perfect for parties and family fun.
- Prep Time: 10 minutes
- Cook Time: 30 minutes
- Total Time: 40 minutes
- Yield: 10 servings 1x
- Category: Dessert
- Cuisine: American
Ingredients
- 2 cups white chocolate chips
- 1 cup Halloween Oreos, crushed
- 1/2 cup M&Ms (Halloween colors)
- 1/2 cup candy corn
- 1/4 cup Halloween sprinkles
- 1 cup mini pretzels
Instructions
- Line a large baking sheet with parchment paper.
- Place the white chocolate chips in a microwave-safe bowl and heat in 30-second intervals, stirring in between, until fully melted and smooth.
- Place the Halloween Oreos in a zip-top bag and gently crush them into chunks using a rolling pin.
- Pour the melted chocolate onto the prepared baking sheet and use a spatula to spread it into an even layer, about 1/4-inch thick.
- Sprinkle the crushed Oreos, M&Ms, candy corn, and pretzels evenly across the surface of the melted chocolate. Press them lightly into the chocolate to ensure they stick.
- Scatter Halloween-themed sprinkles and candy eyes on top for extra flair.
- Allow the bark to cool completely, or place the baking sheet in the fridge for about 30 minutes to set.
- Once firm, break the bark into uneven pieces using your hands.
Notes
[‘Don’t overheat the chocolate; add a teaspoon of coconut oil or shortening if it seizes.’, ‘Work quickly to add toppings before the chocolate hardens.’, ‘Keep Oreo pieces chunky for added texture.’, ‘Refrigerating the bark helps it set faster and makes the texture crisp.’, ‘Use fresh ingredients for the best flavor and appearance.’]
Nutrition
- Serving Size: 1-2 pieces
- Calories: 220
- Sugar: 18
- Fat: 12
- Protein: 2
Keywords: Halloween, Oreo Bark, No-Bake Dessert, Party Snack, Festive Treat


