Introduction
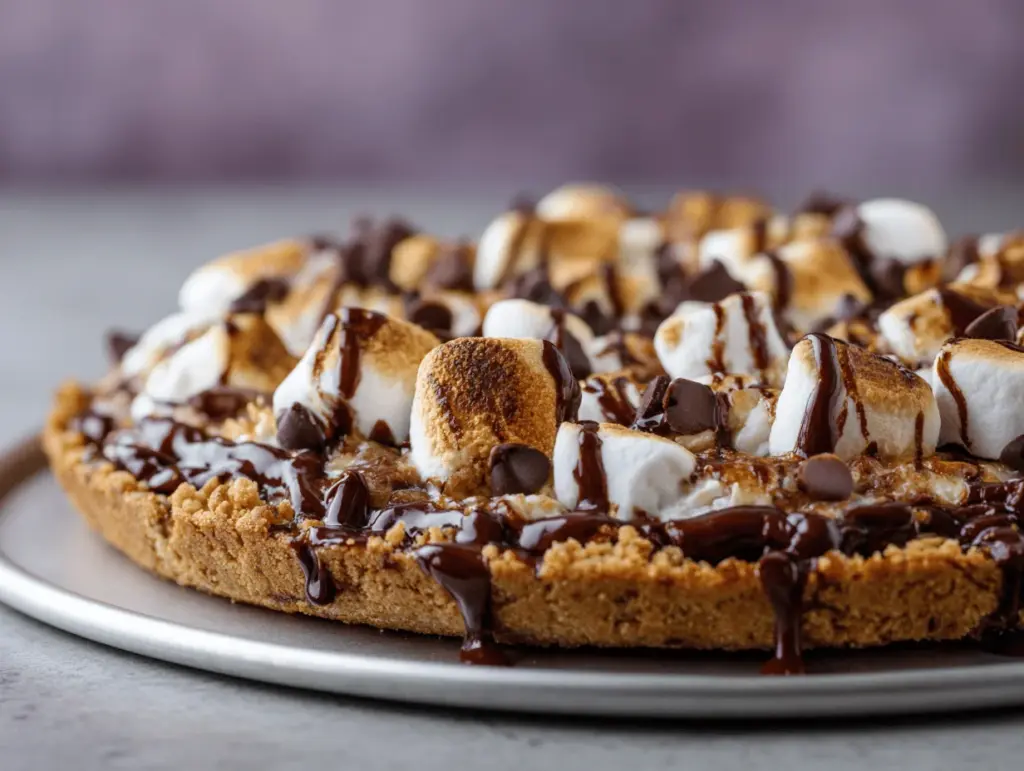
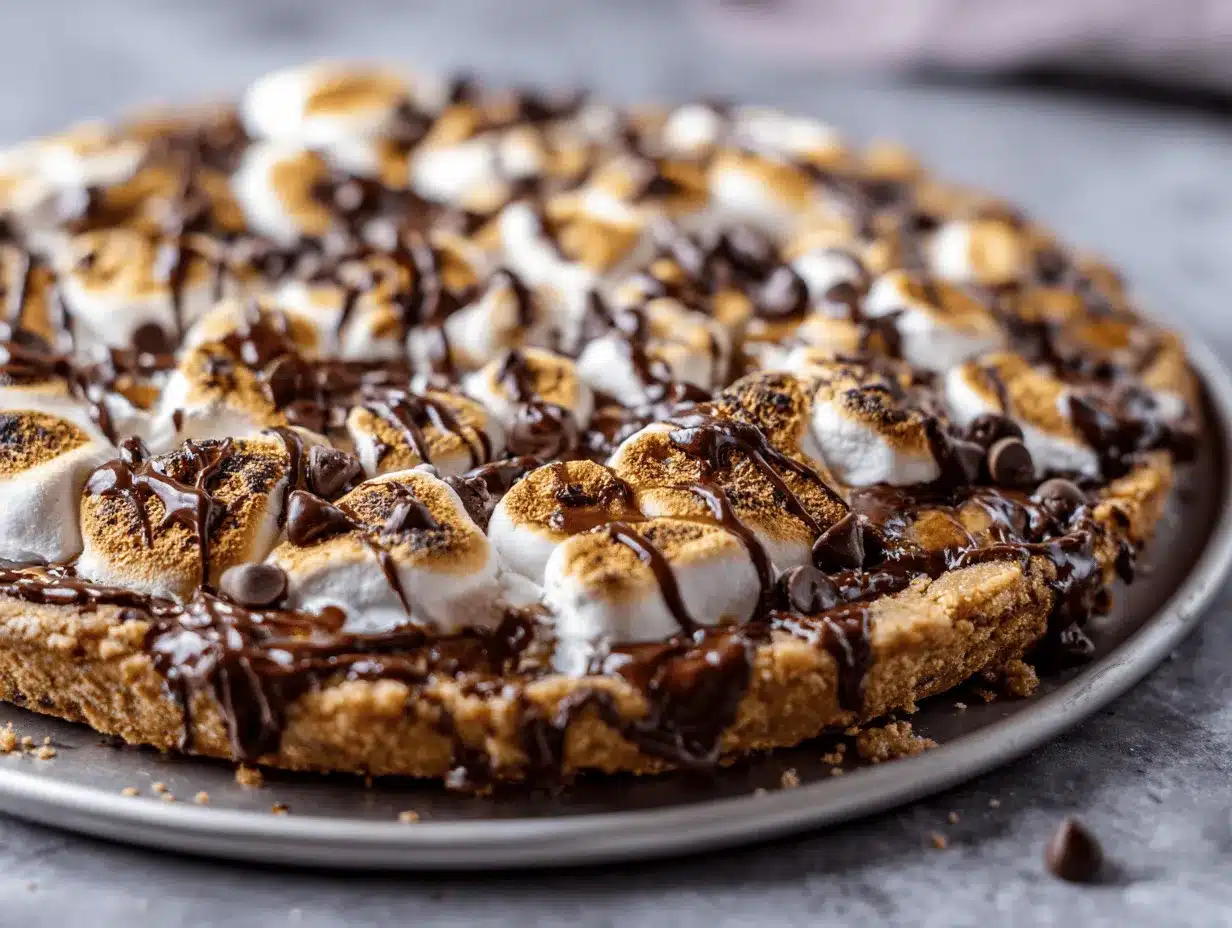
Sticky marshmallows, gooey chocolate, and crispy graham cracker crumbs all melted together on a chewy pizza crust—honestly, is there anything more tempting than a s’mores pizza? The first time I made this, the whole kitchen smelled like a campfire party (without the smoke in your eyes), and my kids couldn’t stop sneaking tastes before it even hit the oven. It’s an easy homemade camping dessert that’s as fun to make as it is to eat—perfect for families, parties, or, you know, just a random Tuesday night when you’re craving something extra special.
I stumbled on the idea for this s’mores pizza during a backyard camping night when we ran out of skewers. I figured, why not pile everything onto pizza dough and toast it all together? Turns out, it’s the ultimate treat: a sliceable, shareable dessert that’s pure nostalgia with a gooey twist. Whether you’re a camping pro or just camping out on your couch for movie night, this recipe brings the magic of s’mores indoors (or to your campfire, if you’re feeling adventurous).
If you love classic s’mores but want something a little more impressive—and a lot less messy—this s’mores pizza recipe is your new go-to. I’ve made it for potlucks, birthdays, and yes, even breakfast (don’t judge until you’ve tried it). With a few simple ingredients and hardly any prep, you’ll have the ultimate crowd-pleaser. I’ve tested this s’mores pizza recipe at least a dozen times, tweaking the crust and playing with the chocolate-to-marshmallow ratio, and trust me, this version is the one you’ll crave again and again.
Why You’ll Love This Recipe
There’s a reason this s’mores pizza recipe is the first thing I get asked for after any get-together. After countless test runs—some a little too charred, some not gooey enough—I’ve landed on a method that’s foolproof and absolutely irresistible. It’s not just about the flavors (although, hello, melty chocolate and toasted marshmallows!)—it’s about that moment when you pull a slice and those marshmallow strands just stretch forever. So, what makes this s’mores pizza a total favorite?
- Quick & Easy: Ready in under 30 minutes, so you can whip it up for last-minute dessert cravings or spontaneous campfire nights.
- Simple Ingredients: Nothing fancy here—you’ll probably find everything in your pantry right now. No specialty store trips required.
- Perfect for Gatherings: Whether it’s a backyard barbecue, a birthday party, or a camping trip, this dessert pizza is always the first thing to disappear.
- Kid and Adult Approved: I’ve yet to meet someone who can resist a slice, and trust me, I’ve tested it on every age group.
- The Ultimate Comfort Food: It’s like a warm hug from your childhood, but with a grown-up twist thanks to the crispy crust and the option for dark chocolate.
But what truly sets this s’mores pizza recipe apart? I blend the graham crackers right into the dough and sprinkle even more on top for an extra crunch that makes every bite taste like the real campfire deal. No more soggy crusts or uneven chocolate distribution—every slice is loaded with melty goodness. Plus, you can make it over the fire, on a grill, or even in your kitchen oven. This recipe isn’t just another knockoff; it’s the one you’ll save and share, trust me.
It’s the kind of dessert that brings everyone to the table, no matter what else is going on. Whether you’re five or fifty-five, this s’mores pizza delivers pure joy with every bite.
What Ingredients You Will Need
This s’mores pizza recipe is a real winner because it uses everyday ingredients in a fresh, creative way. I love that you don’t need anything fancy—just the classic s’mores trio and a good pizza base. Here’s what you’ll want to gather before you start (most of it’s probably already in your kitchen). I’m all about options, so I’ve included a few swaps in case you’re out of something or want to mix things up.
- Pizza Dough (1 lb / 450 g): Use homemade or store-bought; regular or whole wheat both work. If you’re camping, pre-baked crusts are super handy. (I’m a fan of Trader Joe’s dough for quick nights.)
- Graham Crackers (6 full sheets, crushed, about 1 cup / 100 g): These give that signature s’mores flavor and a bit of crunch. If you need gluten-free, use GF graham crackers or even crushed digestive biscuits.
- Chocolate Bars (2 standard bars, 3 oz / 85 g each): Classic milk chocolate for that OG s’mores taste, but dark or semi-sweet chocolate is amazing too. If you only have chocolate chips, those totally work (about 1 cup / 150 g).
- Mini Marshmallows (2 cups / 100 g): Minis melt and brown perfectly, but if you only have large marshmallows, cut them into quarters. I’ve even used vegan marshmallows for allergy-friendly batches.
- Butter (2 tbsp / 28 g, melted): Brushed on the crust for a golden finish and extra flavor. You can swap for coconut oil if dairy-free.
- Brown Sugar (1 tbsp / 13 g): Sprinkled on the crust for a hint of caramelized sweetness. Optional but so worth it.
- Salt (a pinch): Just a touch to balance out all the sweet stuff.
- Optional Toppings:
- Peanut Butter (2 tbsp / 32 g): Swirled on top for a nutty kick.
- Caramel Sauce (2 tbsp / 32 g): Drizzled after baking for extra decadence.
- Crushed Nuts (1/4 cup / 30 g): For crunch and a salty-sweet vibe.
A quick note on substitutions: If you’re dairy-free, swap in coconut oil and vegan chocolate/marshmallows. For gluten-free, use a GF pizza base and graham crackers. Honestly, this s’mores pizza recipe is super flexible—just use what you have and don’t stress.
Equipment Needed
You don’t need a fancy setup for this s’mores pizza recipe, but the right tools make things run smoother (trust me, I’ve tried everything from a campfire grate to a regular old cookie sheet). Here’s what I reach for every time:
- Baking Sheet or Pizza Stone: A pizza stone gives a crispier crust, but any sturdy baking sheet works. For campfire cooking, a cast-iron skillet is a game-changer.
- Rolling Pin: For shaping the dough. If you’re out camping, a clean bottle or even your hands will do the trick.
- Parchment Paper: Prevents sticking and makes cleanup easy (especially nice if you’re on dish duty in the woods).
- Pastry Brush: For spreading melted butter over the crust. A spoon works in a pinch.
- Knife or Pizza Cutter: To slice your masterpiece. If you’re camping, a sharp pocket knife can handle the job.
- Mixing Bowl and Spoon: For crushing graham crackers and combining toppings.
If you’re using a campfire, a grill-safe pan or cast-iron skillet is your best bet. I’ve made this on a baking stone right in the embers—just keep an eye out for hot spots and rotate for even browning. For kitchen bakers, budget-friendly baking sheets work perfectly, and parchment paper’s saved me from many sticky situations. Don’t forget to give your pizza stone a gentle scrub—marshmallow can get sticky!
Preparation Method
- Preheat Your Oven or Grill: If you’re baking indoors, heat your oven to 450°F (232°C) with a pizza stone or baking sheet inside. For a campfire or grill, get your coals or burners medium-hot—about 400°F (204°C) if you have a thermometer.
- Prepare the Dough: On a lightly floured surface, roll out the pizza dough into a 12-inch (30 cm) round. If it springs back, let it rest for 5 minutes and try again. I like to press a little crushed graham cracker into the edge for that classic s’mores touch.
- Transfer to Baking Surface: Place the dough on a piece of parchment paper for easy transfer (or right into your skillet if campfire cooking). Brush the top with melted butter and sprinkle with brown sugar and a pinch of salt. This is what gives the crust that caramelized edge!
- Add the S’mores Toppings: Evenly spread 2/3 of the crushed graham crackers over the dough, leaving about 1/2 inch (1 cm) border. Scatter chopped chocolate or chocolate chips all over, then sprinkle with mini marshmallows. Save a little of everything for topping after baking if you like extra crunch.
- Bake or Grill: Slide the pizza (with parchment, if using) onto the hot stone, sheet, or skillet. Bake or grill for 10-12 minutes, until the marshmallows are golden brown and puffed, and the chocolate is melted. If using a campfire, cover the skillet loosely with foil to help melt the chocolate and toast the marshmallows without burning.
- Finish and Garnish: Carefully remove the pizza—watch those hot marshmallows! Sprinkle the remaining graham crackers, and drizzle with optional caramel sauce or peanut butter if desired. Let it cool for 2-3 minutes; the chocolate will be molten at first.
- Slice and Serve: Use a sharp knife or pizza cutter to slice into 8 pieces. Serve warm for the ultimate gooey s’mores experience.
Pro Tip: If the marshmallows aren’t as toasty as you like, pop the pizza under the broiler for 1-2 minutes, watching closely (they go from golden to burnt in seconds—I learned that the hard way).
If your crust isn’t browning underneath, try moving it to a lower oven rack for the last few minutes. On the grill or campfire, rotate the pan often for even cooking. And don’t worry if some marshmallows melt off the side—that’s the best part for crispy, caramelized bites!
Cooking Tips & Techniques
Getting the perfect s’mores pizza isn’t hard, but a few tricks make a big difference (learned after more than a few “oops” moments). Here’s what I’ve picked up along the way:
- Don’t Overload with Toppings: It’s tempting to pile on extra marshmallows, but too many can slide off and burn. Stick to a single even layer, and add more after baking if you want that classic look.
- Chop the Chocolate: Chopped chocolate bars melt better than big chunks or chips. You get those lovely chocolatey puddles in every bite.
- Keep an Eye on the Marshmallows: Marshmallows brown quickly, especially under the broiler or over a fire. Don’t wander off—set a timer and check at the 8-minute mark.
- Rotate for Even Cooking: On a grill or in a campfire, rotate your pan or stone every couple minutes. This helps avoid burnt spots and gives a perfectly golden finish.
- Rest Before Slicing: Let the pizza sit for 2-3 minutes after baking. The chocolate sets just enough so you don’t end up with a gooey mess (unless you love extra-messy s’mores, which—no judgment!).
- Use Parchment Paper: Especially for sticky toppings, parchment makes transferring and cleanup a breeze. No more scraping burnt marshmallow off your pan.
Honestly, my first s’mores pizza was a learning curve—burnt marshmallows, underbaked dough, and toppings everywhere. Now, I always check the bottom of the crust before pulling it out, and I keep a close eye under the broiler. Multitasking? Prep your toppings while the oven heats so you’re ready to go. Consistency comes with practice, but with these tips, you’ll nail it every time.
Variations & Adaptations
One of the best things about this s’mores pizza recipe is how easy it is to customize. Here are a few of my favorite twists—plus a personal spin I make for late-night cravings:
- Gluten-Free S’mores Pizza: Use a gluten-free pizza crust and certified GF graham crackers. Everything else stays the same for a classic flavor—just a little more inclusive.
- Peanut Butter S’mores Pizza: Swirl 2 tablespoons of creamy peanut butter over the crust before adding chocolate and marshmallows. The salty-sweet combo is out of this world.
- Berry S’mores Pizza: Scatter 1/2 cup (75 g) of fresh raspberries or sliced strawberries over the chocolate before baking. The fruit adds a tart pop that balances all the sweetness.
- Dairy-Free/Vegan Version: Use vegan pizza dough, dairy-free chocolate, and vegan marshmallows. Swap butter for coconut oil. It’s just as gooey and delicious.
- Campfire Variation: Make mini s’mores pizzas on individual naan breads or pita rounds, wrap in foil, and cook right in the coals. Perfect for a personalized treat.
My personal favorite? A drizzle of salted caramel and a pinch of flaky sea salt after baking—it’s like grown-up s’mores in pizza form. Don’t be afraid to mix and match flavors to make it your own!
Serving & Storage Suggestions
For the best experience, serve your s’mores pizza warm, straight from the oven or campfire. The marshmallows will be perfectly gooey, and the chocolate just melty enough for those classic s’mores vibes. If you want a pretty presentation, sprinkle extra crushed graham crackers and a drizzle of caramel or chocolate sauce right before slicing.
Pair slices with cold milk, hot chocolate, or even a scoop of vanilla ice cream for an over-the-top treat. When I serve this at parties, I cut it into smaller wedges for easy finger food. Honestly, it’s a hit whether you’re around a campfire or your kitchen table.
To store leftovers (if you somehow have any!), let the pizza cool completely. Wrap slices in parchment, then foil, and keep in the fridge for up to 3 days. For longer storage, freeze the slices in a single layer, then transfer to a freezer bag—just reheat in a 350°F (177°C) oven for 10 minutes to revive that gooey texture. The flavors get even toastier the next day, and the crust stays surprisingly crisp!
Nutritional Information & Benefits
Let’s be real—this s’mores pizza is a treat, not a salad! Each slice (based on 8 servings) is roughly 280 calories with 8g fat, 45g carbs, and 4g protein. You’ll get a little calcium from the chocolate and some fiber from the graham crackers (especially if you use whole wheat dough).
Using dark chocolate bumps up the antioxidants and makes it a bit less sweet, while swapping in whole grain crust adds more fiber. There are potential allergens: wheat, dairy, and possibly nuts if you add peanut butter or nuts. For gluten-free or dairy-free needs, the substitutions above work perfectly.
In my house, I see this as a special occasion food—something fun that encourages sharing and a little nostalgia. If you’re looking for a lighter option, try thinning out the toppings or making mini versions for portion control. However you slice it, it’s a dessert that brings joy!
Conclusion
If you’re looking for a dessert that’s easy, shareable, and downright delicious, this s’mores pizza recipe is it. It takes everything you love about classic s’mores and turns it into a sliceable treat that’s perfect for any occasion—camping, parties, or just because.
What I love most about this recipe is how adaptable it is—you can play with flavors, make it allergy-friendly, or even cook it over a campfire for the full experience. Every time I make it, I’m reminded of backyard campouts and laughter around the table.
Give this s’mores pizza a try and make it your own! Leave a comment with your favorite twist or share your creation on social media (tag me so I can see your gooey results). No matter how you serve it, I hope it brings a little extra fun to your dessert lineup.
FAQs
Can I make this s’mores pizza ahead of time?
You can prep the dough and toppings in advance, but for the best gooey texture, bake it right before serving. If you need to reheat, pop slices in a 350°F (177°C) oven for about 8 minutes.
Can I use a pre-baked pizza crust?
Absolutely! Pre-baked crusts are a great shortcut—just add your toppings and bake until the marshmallows are golden and the chocolate is melted.
How do I make this recipe gluten-free?
Use a gluten-free pizza crust and certified gluten-free graham crackers. All the toppings can stay the same or be swapped for allergy-friendly versions.
Can I cook s’mores pizza on a grill or campfire?
Yes! Use a cast-iron skillet or grill-safe pan. Cover loosely with foil and watch closely to avoid burning. Rotate the pan often for even cooking.
What’s the best way to cut and serve s’mores pizza?
Let the pizza rest for 2-3 minutes after baking, then use a sharp knife or pizza cutter. Serve warm for that classic gooey, stretchy s’mores effect!
PrintS’mores Pizza Recipe – Easy Homemade Camping Dessert You’ll Love

This gooey, shareable s’mores pizza combines sticky marshmallows, melty chocolate, and crunchy graham crackers on a chewy pizza crust. It’s a quick, crowd-pleasing dessert perfect for camping, parties, or cozy nights at home.
- Prep Time: 10 minutes
- Cook Time: 12 minutes
- Total Time: 22 minutes
- Yield: 8 servings 1x
- Category: Dessert
- Cuisine: American
Ingredients
- 1 lb (16 oz) pizza dough (homemade or store-bought, regular or whole wheat)
- 6 full sheets graham crackers, crushed (about 1 cup)
- 2 chocolate bars (3 oz each, or 1 cup chocolate chips)
- 2 cups mini marshmallows
- 2 tbsp melted butter
- 1 tbsp brown sugar
- Pinch of salt
- Optional: 2 tbsp peanut butter
- Optional: 2 tbsp caramel sauce
- Optional: 1/4 cup crushed nuts
Instructions
- Preheat oven to 450°F (232°C) with a pizza stone or baking sheet inside. For grill/campfire, heat to medium-hot (about 400°F).
- On a lightly floured surface, roll out pizza dough into a 12-inch round. Press some crushed graham cracker into the edge if desired.
- Transfer dough to parchment paper. Brush with melted butter, sprinkle with brown sugar and a pinch of salt.
- Spread 2/3 of the crushed graham crackers evenly over the dough, leaving a 1/2-inch border. Scatter chopped chocolate or chocolate chips, then sprinkle with mini marshmallows. Reserve a little of each for topping after baking if desired.
- Bake or grill for 10-12 minutes, until marshmallows are golden and puffed, and chocolate is melted. If using a campfire, cover skillet loosely with foil.
- Remove pizza and sprinkle remaining graham crackers. Drizzle with optional caramel sauce or peanut butter. Let cool for 2-3 minutes.
- Slice into 8 pieces and serve warm.
Notes
For extra crunch, press graham cracker crumbs into the dough edge. Use parchment paper for easy transfer and cleanup. Watch marshmallows closely under the broiler—they brown fast! For gluten-free or dairy-free, use appropriate substitutions. Let pizza rest before slicing for less mess.
Nutrition
- Serving Size: 1 slice (1/8 of pizza)
- Calories: 280
- Sugar: 22
- Sodium: 180
- Fat: 8
- Saturated Fat: 4
- Carbohydrates: 45
- Fiber: 2
- Protein: 4
Keywords: s'mores pizza, camping dessert, easy dessert, chocolate, marshmallow, graham cracker, kid-friendly, party food, campfire recipe, pizza dessert